Installation
Requirements
-
A Java 17 JDK (have a look at the
Spincast Hotswap
plugin documentation if you want to use hot reloading)
-
A build tool able to use Maven artifacts.
Spincast versions
Spincast ultimate goal is to follow the Java LTS (Long Term Support) versions.
 Note that for the moment Spincast does not follow the Semantic Versioning.
The major version is only incremented when a very important change is made (for example the Java version supported by Spincast changes).
A minor version increment can contain a breaking change.
Note that for the moment Spincast does not follow the Semantic Versioning.
The major version is only incremented when a very important change is made (for example the Java version supported by Spincast changes).
A minor version increment can contain a breaking change.
We may switch to a more semantic versioning friendly approach in the future if this is what developers using Spincast ask! But,
for now, being able to include some breaking changes helps us improve Spincast very fast.
 Quick Start application
The easiest way to try Spincast is to download the Quick Start application,
which also can be used as a template to start a new application. This application already has in
place most of the boilerplate code suggested to develop a solid and flexible Spincast application.
How to run :
-
-
Decompress the zip file, go inside the "spincast-quick-start"
root directory using a command prompt and run :
mvn clean package
This will compile the application and produce an executable .jar file
containing an embedded HTTP server.
-
Start the application using :
java -jar target/spincast-quickstart-1.0.0-SNAPSHOT.jar
-
-
The next step would probably be to import the project in your favorite IDE and start debugging it to see
how it works. The entry point of a standard Spincast application is the classic main(...)
method. You'll find this method in class
org.spincast.quickstart.App.
 Note that the Quick Start application is not a simple
"Hello World!" application. It contains some advanced (but
recommended) features, such as a custom
Note that the Quick Start application is not a simple
"Hello World!" application. It contains some advanced (but
recommended) features, such as a custom Request Context type
and a custom WebSocket Context type! To learn Spincast from scratch, you may first want to
read the three "Hello World!" tutorials
before trying to understand the code of the Quick Start application.
Installing Spincast from scratch
If you want to start from scratch, without using the Quick Start application
as a template, you first add the org.spincast:spincast-default:2.2.0
artifact to your pom.xml :
<dependency>
    <groupId>org.spincast</groupId>
    <artifactId>spincast-default</artifactId>
    <version>2.2.0</version>
</dependency>
This artifact installs a set of default plugins and
provides all the required components for a Spincast application to be functional.
When this is done, you can follow the instructions of the Bootstrapping your app
section to initialize your application. This process is very simple and simply requires you to use the
Spincast.init(args) or Spincast.configure() bootstrapper in
a main(...) method.
Here's a simple Spincast application :
public class App {

    public static void main(String[] args) {
        Spincast.init(args);
    }

    @Inject
    protected void init(DefaultRouter router, Server server) {
        router.GET("/").handle(context -> context.response().sendHtml("<h1>Hello World!</h1>"));
        server.start();
    }
}
There is a tutorial page for this simple "Hello World!"
application. On that page you can download and try the application by yourself!
Spincast overview
Introduction
Spincast is based on the shoulders of a giant, Guice
(from Google).
Other Java web frameworks may claim they support Guice, and maybe even have a
section of their documentation dedicated to the topic. Spincast is one of those that is totally built on
Guice, from the ground up! If you already know Guice, Spincast will be really easy to grasp for you.
Guice is not only (in our opinion) the best dependency injection library of the Java ecosystem, but also a
fantastic base to build modular applications. Everything is divided into modules which
are swappable and overridable. Each module can declare which dependencies it requires from other
modules. In fact, Guice is so flexible that you may even find ways of using Spincast we haven't think about!
If you know another dependency injection library, like Spring, it can also help but
you'll probably have to learn one of two new tricks!
Here's what using Spincast looks like at a very high level:
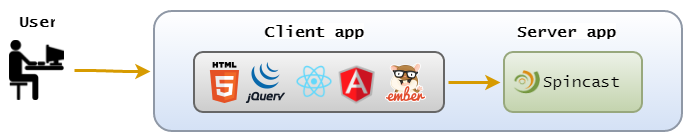
Users make requests to your web application. This application can
have an HTML interface, built using popular tools like
jQuery, React,
Ember, Angular, etc. That
HTML interface can be generated by Spincast (using a built-in templating engine) or
can be a Single Page Application where Spincast is used as a bootstrapper and a
data provider (JSON or XML) for the SPA.
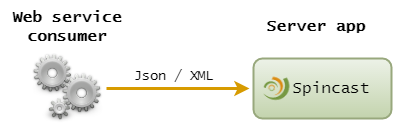
Spincast is also a good platform to build REST web services or microservices,
without any user interface, since it "talks" JSON and XML natively.
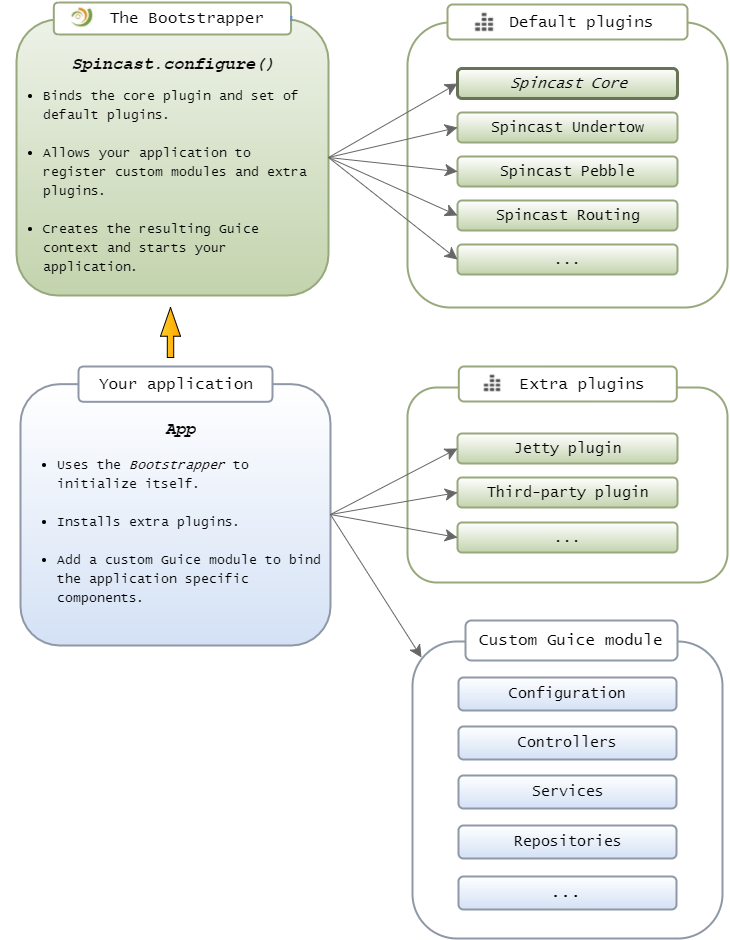
Architecture
Spincast is composed of a core plugin and a set of default
plugins. The core plugin is responsible for validating that an implementation for all the
components required in a Spincast application has been bound by other plugins. The
default plugins provide such default implementations.
You use the Bootstrapper to initialize your application. This bootstrapper
will automatically bind the core plugin and the default plugins, but will also let
you install extra plugin and custom modules for the components specific to your application :
Request handling
Here's how a request made by a user is handled by Spincast :
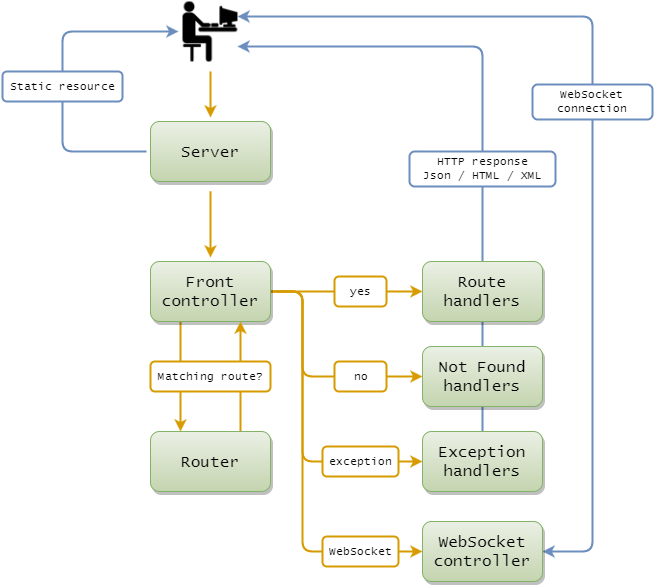
First, the embedded HTTP Server receives a request from a user. This server consists
of a Server interface and an
implementation. The default implementation is provided by
the spincast-plugins-undertow
plugin which uses the Undertow HTTP/Websocket server.
If the request is for a Static Resource, the server serves it directly without even reaching the
framework. Note that it's also possible to generate the resource, using a standard route, so the request does
enter the framework. There is even a third option which is what we call
Dynamic Resources:
if a request is made for a request which currently doesn't exist, the server will pass the request to the framework, the
framework can then create the resource and return it... The following requests for the same resource will use
the generated resource and won't reach the framework anymore!
If the request is not for a static resource, the server passes it to the core
Spincast component : the Front Controller. The Front Controller is at the very center
of Spincast! This is one of the very few components that is actually bound by the core plugin
itself.
The job of the Front Controller is to:
-
Ask the
Router for the appropriate route to use when a request arrives.
-
Call the
Route Handlers of the matching route. A route can have many handlers :
they are Filters which are run before the Main Handler, the Main Handler
itself, and some Filters which are run after the Main Handler.
-
If the request is for a
WebSocket connection, the handling of the request
is made by a WebSocket Controller instead of a Route Handler.
Also, the result is not a simple response but a permanent and full duplex connection where each side
can send messages to the other side.
Have a look at the WebSockets section for more information!
-
If no matching route is returned by the
Router, the Front Controller
will use a Not Found route. The Not Found route can be a custom
one, or the default one provided by Spincast.
-
If any exception occures during any of those steps, the
Front Controller
will use an Exception route. The Exception route can be a custom
one, or the default one provided by Spincast.
The job of the Router is to determine the appropriate
route to use, given the URL of the request, its HTTP method, etc. It will also
extract the value of the dynamic path tokens, if any. For example, a route path could be
"/user/${userId}/tasks". If a "/user/42/tasks" request is made, the router will
extract "42" as the value of the userId parameter and make this available to the rest of the
framework.
Finally:
-
The
Route Handlers receive a Request Context (which represents the request),
and decide what to return as the response. This can be anything: Json, HTML,
XML or even bytes.
or:
-
A
WebSocket Controller receives the request for a WebSocket connection, allows or
denies it, and then receives and sends messages on that connection.
The main components
The main components are those without which a Spincast application can't even run.
Any class, any plugin, can assume those components are available, so they can
inject them and use them!
Those main components are all installed by the default plugins.
Have a look at those default plugins for a quick overview of the big blocks constituting Spincast!
Spincast is very modular and you can replace any plugin, even the default one. But, when you do this,
you are responsible for providing any required components this plugin was binding.
Transitive dependencies
The spincast-core Maven artifact only has two direct dependencies which are external to Spincast:
-
Guice, which itself pulls some transitive dependencies,
such as "
Guava" and "jsr305".
-
SLF4J : The logging facade.
The versions used for those dependencies are defined in the spincast-parent
Maven artifact's pom.xml.
Spincast core also uses some Apache commons libraries,
but those are shaded, their classes have been relocated under Spincast's
org.spincast.shaded package, so they won't conflit with your own dependencies.
That said, each Plugin also adds its own dependencies! If you start with
the spincast-default Maven artifact, a bunch of transitive dependencies
will be included. If you need full control over the transitives dependencies added to
your application, start with the spincast-core Maven artifact and pick, one by one, the
plugins and implementations you want to use.
Quick Tutorial
Here, we'll present a quick tutorial on how to develop
a Spincast application : as a traditional website or as a
SPA application. We won't go into too much details
so, to dig deeper, have a look at :
-
The dedicated Demos/Tutorials section of the site.
-
The Quick Start application, which is a fully
working Spincast application.
-
The others sections of this documentation!
1. Traditional website
A "traditional website" is a web application where the server generates
HTML pages, using a Templating Engine.
This is different from the more recent
SPA approach, where the interface is generated
client side (using javascript) and where the backend only provides REST services
(by returning Json or, more rarely these days, XML).
1.1. Bootstrapping
Bootstrapping a Spincast application involves 3 main steps :
-
Using the Bootstrapper to initialize your
application. This is where you specify the components to bind and the plugins to install in
order to create the Guice context for your application.
-
Defining
Routes and Route Handlers. We're going to
see those in a minute.
-
Starting the HTTP Server.
Here's a quick example of using the bootstrapper :
Spincast.configure()
        .module(new AppModule())
        .init(args);
Please read the whole section dedicated to
bootstrapping for more information about this topic.
The quickest way to start a Spincast application is to
download the Quick Start application and to adapt it
to your needs.
1.2. Defining Routes
You define some Routes and you specify which Route Handlers should handle them. The
Route Handlers are often methods in a controller but can also be defined inline, directly
in the Route definitions.
The Routes definitions can be all grouped together in a dedicated class or can be defined in controllers
(have a look at The Router is dynamic for an example).
You can learn more about the various routing options in the Routing
section, but here's a quick example of Route definitions :
// For a GET request. Uses a method reference
// to target a controller method as the Route Handler :
router.GET("/books/${bookId}").handle(bookController::booksGet);

// For any HTTP request. Uses an inline Route Handler :
router.ALL("/hello").handle(context -> context.response().sendPlainText("Hello!"));
1.3. Route Handlers
Most of the time, a Route Handler is implemented as a method in a controller.
It receives a Request Context object as a parameter.
This Request Context is
extensible and is one
of the most interesting parts of Spincast! In this quick example, we simply use the
default Request Context implementation,
"DefaultRequestContext" :
public class BookController {

    // Route Handler dedicated to handle GET requests
    // for a book : "/books/${bookId}"
    public void booksGet(DefaultRequestContext context) {
        // ...
    }
}
1.4. Getting information about the request
In your Route Handlers, you use the Request Context object and its various
add-ons to get the information you need about the current request :
public void booksGet(DefaultRequestContext context) {

    // Path parameter
    // From "/books/${bookId}" for example
    String bookId = context.request().getPathParam("bookId");

    // QueryString parameter
    String page = context.request().getQueryStringParamFirst("page");

    // Field received from a POSTed form
    String newTitle = context.request().getFormData().getString("newTitle");

    // HTTP Header
    String authorizationHeader = context.request().getHeaderFirst("Authorization");

    // Cookie
    String localeCookieValue = context.request().getCookie("locale");

    //...
}
1.5. Building the response's model
You process the current request using any business logic you need, and you build the
model for the response. This response model
is a JsonObject accessible via
"context.response().getModel()" : it is the object
where you store all the information you want to return as the response.
You may add to this response model the variables you want
your templates to have access to :
public void booksGet(DefaultRequestContext context) {

    //...

    JsonObject book = context.json().create();
    book.set("author", "Douglas Adams");
    book.set("title", "The Hitchhiker's Guide to the Galaxy");

    // Adds the book to the response model
    context.response().getModel().set("book", book);

    //...
}
1.6. Rendering the response model using a template
When you develop a traditional website, you usually want to render a template
so HTML is going to be displayed.
To do so, you use the integrated Templating Engine :
public void booksGet(DefaultRequestContext context) {

    //... builds the response model

    // Sends the response model as HTML, using a template
    context.response().sendTemplateHtml("/templates/book.html");
}
1.7. Writing the template
Here is a template example using the syntax of the default Templating Engine,
Pebble. Notice that the variables
we added to the response model are available.
{% if book is not empty %}
    <div class="book">
        <h2>{{book.title}}</h2>
        <p>Author : {{book.author}}</p>
    </div>
{% else %}
    <div>
        Book not found!
    </div>
{% endif %}
2. SPA / REST services
The main difference between a SPA application
(or a set of plain REST services) and a
traditional website, is that in a SPA you
don't generate HTML server side.
Instead, most of the logic is client-side, and your Spincast application only acts as a provider
of REST services
to which your client-side application talks using Json
or, more rarely these days, XML.
2.1. Bootstrapping
Bootstrapping a Spincast application involves 3 main steps :
-
Using the Bootstrapper to initialize your
application. This is where you specify the components to bind and the plugins to install in
order to create the Guice context for your application.
-
Defining
Routes and Route Handlers. We're going to
see those in a minute.
-
Starting the HTTP Server.
Here's a quick example of using the bootstrapper :
Spincast.configure()
        .module(new AppModule())
        .init(args);
Please read the whole section dedicated to
bootstrapping for more information about this topic.
The quickest way to start a Spincast application is to
download the Quick Start application and to adapt it
to your needs.
2.2. Defining Routes
You define some Routes and you specify which Route Handlers should handle them. The
Route Handlers are often methods in a controller but can also be defined inline, directly
on the Route definitions.
The Routes definitions can be all grouped together in a dedicated class or can be defined in controllers
(have a look at The Router is dynamic for an example).
In general, if you are building a
SPA, you want to return a
single HTML
page : that index page is going to load
.js files and, using those, will bootstrap your
client-side application. Using Spincast, you can return that index page as a
Static Resource, or you
can generate it using a
template. Let's first see how you could return the
index page as a
Static Resource :
// The static "index.html" page that is going to bootstrap
// our SPA
router.file("/").classpath("/index.html").handle();

// The resources (.js, .css, images, etc.) will
// be located under the "/public" path :
router.dir("/public").classpath("/myResources").handle();

// ... the REST endpoints routes
As you can see, Spincast will return the
"index.html" file when a
"/" request is made.
In this
HTML page, you are going to load all the
required resources (mostly
.js files first), and
bootstrap your whole application.
You can also use a template to generate the
first index page. This allows you to dynamically tweak it, to
use variables. Here's an example :
// Inline Route Handler that evaluates
// a template to generate the HTML index page.
router.GET("/").handle(context -> {

    // Adds some variables to the response model so
    // the template has access to them.
    context.response().getModel().set("randomQuote", getRandomQuote());

    // Renders the template
    context.response().sendTemplateHtml("/index.html");
});

// The resources (.js, .css, images, etc.) will
// be located under the "/public" path :
router.dir("/public").classpath("/public").handle();

// ... the REST endpoints routes
By using such template to send your index page, you have
access to all the functionalities
provided by the
Templating Engine.
Note that if your template is quite complexe, you're
probably better creating a
controller to define the
Route Handler, instead of
defining it
inline like in our example!
Once the Route for the index page and those for the resources are
in place, you add the ones required for your REST endpoints.
For example :
// Endpoint to get a book
router.GET("/books/${bookId}").handle(bookController::booksGet);

// Endpoint to modify a book
router.POST("/books/${bookId}").handle(bookController::booksModify);

// ...
2.3. Route Handlers
Most of the time, a Route Handler is implemented as a method in a controller.
It receives a Request Context object as a parameter.
This Request Context is
extensible and is one
of the most interesting parts of Spincast! In this quick example, we simply use the
default Request Context implementation,
"DefaultRequestContext" :
public class BookController {

    // Route Handler dedicated to handle GET requests
    // for a book : "/books/${bookId}"
    public void booksGet(DefaultRequestContext context) {
        // ...
    }
}
2.4. Getting information about the request
In your Route Handlers, you use the Request Context object and its various
add-ons to get the information you need about the
current request (an AJAX request for example) :
public void booksGet(DefaultRequestContext context) {

    // The Json body of the request as a JsonObject
    JsonObject jsonObj = context.request().getJsonBody();

    // Path parameter
    // From "/books/${bookId}" for example
    String bookId = context.request().getPathParam("bookId");

    // HTTP Header
    String authorizationHeader = context.request().getHeaderFirst("Authorization");

    // Cookie
    String localeCookieValue = context.request().getCookie("locale");

    //...
}
Very often in a SPA application, or when you develop plain
REST services, you are going to receive a Json object
as the body of a request (with a "application/json" content-type).
In the previous code snippet, context.request().getJsonBody() gets
that Json from the request and creates a JsonObject
from it so it is easy to manipulate.
2.5. Creating and sending a Json / XML response
When you receive a request, you process it using any required business logic, and you then build the
Json (or XML) object to return as a response. There are two ways to achieve that.
The prefered approach, is to create a typed object,
a book created from a Book class for example, and explicitly
send this entity as Json. For example :
public void booksGet(DefaultRequestContext context) {

    String bookId = context.request().getPathParam("bookId");
    Book someBook = getBook(bookId);

    context.response().sendJson(someBook);
}
The second option, probably more useful for
traditional websites though, is to
use the response model to dynamically create the Json
object to send.
You get the response model as a JsonObject
by calling the context.response().getModel() method, you
add elements to it and you send it as Json :
public void booksGet(DefaultRequestContext context) {

    // Gets the response model
    JsonObject responseModel = context.response().getModel();

    // Gets a book
    String bookId = context.request().getPathParam("bookId");
    Book someBook = getBook(bookId);

    // Adds the book to the response model, using
    // the "data.book" key
    responseModel.set("data.book", book);

    // Adds a "code" element to the response model
    responseModel.set("code", AppCode.APP_CODE_ACCEPTED);

    // Adds a timestamp to the response model
    responseModel.set("timestamp", new Date());

    // This is going to send the response model as Json
    context.response().sendJson();
}
In this example, the generated
Json response
would have a
"application/json" content-type and
would look like this :
{
    "code" : 12345,
    "timestamp" : "2016-11-06T22:58+0000",
    "data" : {
        "book" : {
            "author" : "Douglas Adams",
            "title" : "The Hitchhiker's Guide to the Galaxy"
        }
    }
}
2.6. Consuming a Json / XML response
You consume the Json response from your client-side SPA
application whatever it is built with : Angular,
React, Vue.js,
Ember, etc. Of course, we won't go into details here since
there are so many client-side frameworks!
A Json response can also be consumed by a client
which is not a SPA : it can be a response for a Ajax request
made using Jquery
or plain javascript. Such Json response can also be consumed by a
backend application able to send HTTP requests.
Bootstrapping your app
Bootstrapping a Spincast application is very easy. Most of the time,
you start with the spincast-default Maven artifact in your
pom.xml (or build.gradle) :
<dependency>
    <groupId>org.spincast</groupId>
    <artifactId>spincast-default</artifactId>
    <version>2.2.0</version>
</dependency>
Then, in the main(...) method of your application,
you use the Spincast
class to initialize your application.
You can do this the "quick way", or use the Bootstrapper to
have more options. Let see both of those approaches...
Quick initialization
The quickest way to initialize a Spincast application is to call Spincast.init(args) :
public class App {

    public static void main(String[] args) {
        Spincast.init(args);
    }

    // ...
}
This will create a Guice context using all the default plugins,
will bind the current App class itself in that context (as a singleton) and will load the
App instance. You then simply
have to add an init method to your App class to
define Routes, add some logic, and start the HTTP Server :
public class App {

    public static void main(String[] args) {
        Spincast.init(args);
    }

    @Inject
    protected void init(DefaultRouter router, Server server) {
        router.GET("/").handle(context -> context.response().sendHtml("<h1>Hello World!</h1>"));
        server.start();
    }
}
This is a simple, but totally functional Spincast application!
There is a demo page for this very example.
On that page, you can download the sources and run the application by yourself.
Finally, note that Spincast.init(args) in fact creates a default Bootstrapper
under the hood. We will now see how you can configure this bootstrapper explicitly to have more control
over your application initialization...
The Bootstrapper
In most cases, you need more control than simply calling Spincast.init(args).
You want to be able to add custom modules to the Guice context, to add extra plugins, etc.
You do so by using Spincast.configure() instead of
Spincast.init(args). This starts a bootstrapper to help
configure your application before it is started. Let's see an example :
public static void main(String[] args) {

    Spincast.configure()
            .module(new AppModule())
            .plugin(new SpincastHttpClientPlugin())
            .requestContextImplementationClass(AppRequestContextDefault.class)
            .init(args);
    //....
}
Explanation :
-
3 : We start the bootstrapper by calling
.configure() instead of .init(args)!
-
4 : We add a custom Guice module so
we can bind our application components.
-
5 : We add an extra plugin.
-
6 : We tell Spincast that we are using a
custom Request Context type.
-
7 : We finally call
.init(args) so the Guice
context is created, the current class is bound and then loaded. We also use this method to bind
the arguments received in the main(...) method to the Guice context.
Bootstapper's options :
Let's now see the bootstrapper's options (Note that none of them is mandatory,
except requestContextImplementationClass(...) if you are using a
custom Request Context type and websocketContextImplementationClass(...) if you are using a
custom WebSocket Context type).
-
module(...) : Adds a Guice module.
It can be called multiple time to add more than one module. All the modules
added using this method are going to be combined together.
-
plugin(...) : To register a plugin.
You can add multiple plugins (in addition to the default ones). They will
be applied in the order they are added to the bootstrapper.
-
disableAllDefaultPlugins() : Disables all
the default plugins, including the core one. If you think about
using this method, you should probably start
with the spincast-core artifact
instead of spincast-default.
-
disableDefaultXXXXXXXPlugin() : Disables
a default plugin. There is a version of this method for every
default plugin. If you disable a default plugin, you are responsible for
binding the required components the plugin was in charge of!
-
requestContextImplementationClass(...) : Tells Spincast
that you are using a custom Request Context type.
You need to pass as a parameter the implementation class of your
custom Request Context type. Calling this method is mandatory if you are using
a custom Request Context type!
-
websocketContextImplementationClass(...) : Tells Spincast
that you are using a custom WebSocket Context type.
You need to pass as a parameter the implementation class of your
custom WebSocket Context type. Calling this method is mandatory if you are using
a custom WebSocket Context type!
-
bindCurrentClass(...) : By default,
the class in which the bootstrapper is created is automatically
bound in the Guice context (as a singleton) and its instance is loaded
when the context is ready. To disable this, you can call bindCurrentClass(false).
-
appClass(...) : You can specify which class should be automatically
bound and loaded when the Guice context is ready. Calling this method will disable the
binding of the current class (as calling bindCurrentClass(false) would do).
-
getDefaultModule(...) : Allows you to get the Guice module
resulting from all the default plugin. You can use this (in association with
disableAllDefaultPlugins() and module(...)) to tweak the
Guice module generated by the default plugins.
Various bootstrapping tips
-
Have a look at the code of the Quick Start application to
see how it is bootstrapped. Also read the advanced version of the
Hello world! tutorial.
-
The bootstrapping process is all about creating a regular Guice context, so make sure
you read the Guice documentation
if you didn't already!
-
Be creative! For example, you could make the
App class
extend SpincastConfigDefault
so you can override some default configurations right in that class!
Everything in Spincast is based on dependency injection so you can
easily replace/extend pretty much anything you want.
-
Split your application in controllers, services, repositories and utilities
and inject the components you need using the standard
@Inject
annotation. Don't put everything in the App class, except if
your application is very small.
-
Don't forget to register your implementation classes if you
are using a custom Request Context type or a
custom Websocket Context. You do this using
the requestContextImplementationClass(...)
method and the websocketContextImplementationClass(...)
method on the Bootstrapper.
-
Remember that by using the Quick Start application as a template,
pretty much everything discussed here has already been implemented for you!
Simply load the code in your favorite IDE, and start adjusting it to meet the needs of your
application.
Using spincast-core directly
This is an advanced topic that most applications will never need.
If you need total control over how your application is built, you
can decide to start without the default plugins
and pick, one by one, which one to add.
By using "spincast-default" you add the default plugins as
Maven artifact but also a lot of
transitive dependencies. For example, dependencies for some
Jackson artifacts
are added by the default
Spincast Jackson Json plugin. Those
dependencies may conflict with other dependencies you use in your application.
This is a situation where you may want to start without the default plugins.
To start a Spincast application from scratch, start with the "spincast-core" Maven artifact instead
of "spincast-default":
<dependency>
    <groupId>org.spincast</groupId>
    <artifactId>spincast-core</artifactId>
    <version>2.2.0</version>
</dependency>
Doing so, you start with the core code but you need to provide an implementation
for all the required components, by yourself. You generaly provide those
implementations by choosing and installing
some plugins by yourself.
For example, to provide an implementation for the
Server
and for the TemplatingEngine
components, you could use:
<dependency>
    <groupId>org.spincast</groupId>
    <artifactId>spincast-plugins-undertow</artifactId>
    <version>2.2.0</version>
</dependency>

<dependency>
    <groupId>org.spincast</groupId>
    <artifactId>spincast-plugins-pebble</artifactId>
    <version>2.2.0</version>
</dependency>

// ...
Note that by starting without spincast-default, you don't
have access to the Bootstrapper!
You'll have to create the Guice context by yourself, using the modules provided by the
different plugins.
If you fail to provide an implementation for a component that would be bound by
a default plugin, you will get this kind of error when trying to start your application :
> ERROR - No implementation for org.spincast.server.Server was bound.
Configuration
Spincast doesn't force you to configure your application in a specific way, but does
suggest a strategy. The only requirement is that
in order to modify the configurations used by the internals of Spincast itself
(for example the port the server is going to be started with), you need to bind
a custom implementation for the
SpincastConfig
interface. Spincast retrieves the values to use for its configurations through this interface.
If you don't bind a custom implementation for that SpincastConfig interface, a
default one
will be used and will provide default values.
Configuration strategy - introduction
The strategy we suggest to configure your application allows you to both modify the default configurations and add
specific configurations to your application in a single location. This strategy involves creating a
standard Java class with getter methods for each configuration that is needed.
Compared to a simple .properties based configuration strategy, a class based one
requires more work (since you do have to define a getter method for each configuration),
but comes with three big advantages :
-
The configurations are typed, preventing many errors :
// Doesn't compile! The "getServerHost()" getter returns a String.
int port = configs.getServerHost();
Compare this nice compile time error to a simple .properties based configuration
that will fail at runtime :
// Compiles... But boom at runtime!
int port = (int)properties.get("server.host");
-
The creation of a configuration value can involve complex logic
(caching the generated value is easy to implement too).
// Some configuration getter...
public int getHttpServerPort() {

	// We use another configuration to create the value
	// of this one! You can use any logic you need...
	if("local".equals(getEnvironmentName())) {
		return 12345;
	} else {
		return 80;
	}
}
-
A configuration can be of any type, not only String, Booleans and Numbers.
// A configuration getter that returns a File object
public File getSpincastWritableDir() {
	// ...
}
Configuration strategy - components
The first step is to create a custom AppConfig interface that extends
SpincastConfig :
public interface AppConfig extends SpincastConfig {

    /**
     * An app specific configuration
     */
    public String getSomeAppConfiguration();

    /**
     * Another app specific configuration
     */
    public int getAnotherAppConfiguration();
}
And then create an implementation that implements your custom interface and extends
the Spincast provided SpincastConfigDefault implementation :
public class AppConfigDefault extends SpincastConfigDefault implements AppConfig {

    /**
     * An app specific configuration
     */
    public String getSomeAppConfiguration() { ... }

    /**
     * Another app specific configuration
     */
    public int getAnotherAppConfiguration() { ... }

    /**
     * Overrides a default Spincast configuration too!
     */
    @Override
    public int getHttpServerPort() {
        return 12345;
    }
}
Finally, you add the associated bindings to your Guice module :
public class AppModule extends SpincastGuiceModuleBase {

    @Override
    protected void configure() {

        bind(AppConfig.class).to(AppConfigDefault.class).in(Scopes.SINGLETON);

        //...
    }
}
Note that Spincast will detect that a custom implementation of the SpincastConfig
interface has been bound, and will automatically adjust the binding for this interface. You can bind SpincastConfig
to AppConfigDefault by yourself if you want, but it is not required.
Have a look at the configuration
of this very website for an example of how this strategy looks like!
Be careful with the dependencies you inject in your implementation class : the configurations are
used by a lot of other components and it is therefore easy to create circular dependencies. One dependency
that you can inject without any problem, and that is often useful in a configuration
class, is the application arguments.
Configuration strategy - implementation
By using the strategy above, so by extending the SpincastConfigDefault
base class, you also extend the ConfigFinder base class
and get access to a lot of useful features to help you build your configuration. In particular, you gain
access to an easy way to externalize the values of your configurations (ie : have different configurations depending on the
environment the application runs on).
We'll see in the next section, Configuring the config plugin, that the way
Spincast searches for external configurations is fully configurable.
Making configurations externalizable
To make configurations externalizable, the first thing to do in your implementation class is
to remove any hardcoded values and, instead, use the provided getters.
Those special getters are provided by the
ConfigFinder
class, from which SpincastConfigDefault
extends. There are multiple getters, depending on the type of the configuration.
For example, in your implementation class, instead of this hardcoded value :
public class AppConfigDefault extends SpincastConfigDefault implements AppConfig {

    @Inject
    public AppConfigDefault(SpincastConfigPluginConfig spincastConfigPluginConfig) {
        super(spincastConfigPluginConfig);
    }

	/**
	 * The HTTP server port to use
	 */
    @Override
    public int getHttpServerPort() {

    	// Hardcoded value!
        return 12345;
    }

    // ...
}
You would instead use the provided getInteger(...) method, so the "port" configuration is
externalized :
public class AppConfigDefault extends SpincastConfigDefault implements AppConfig {

    @Inject
    public AppConfigDefault(SpincastConfigPluginConfig spincastConfigPluginConfig) {
        super(spincastConfigPluginConfig);
    }

	/**
	 * The HTTP server port to use
	 */
    @Override
    public int getHttpServerPort() {

    	// Makes this configuration externalizable
    	// and provides a default value in case no
    	// external value is found.
        return getInteger("server.port", 12345);
    }

    // ...
}
By using the special getters provided by the ConfigFinder
base class, your configuration is now externalized. A getter
is provided for all common types : String, Boolean, Integer,
Long, BigDecimal and Date.
Note that date configuration values must be using a valid ISO-8601 format.
The sources of configuration values
Spincast will load externalized configurations from various sources, each source overriding the previous one, if
a same configuration is found in both :
-
-
If you override a Spincast configuration, but you hardcode it in your implementation class, the configuration is
not externalizable and the hardcoded value will be used.
-
An app-config.yaml file is looked for on the classpath. This is where you generally will place
the default values of your externalizable configurations.
-
If your application is running from an executable .jar, Spincast will check if a app-config.yaml
file exists next to it. If your application is not running from an executable .jar (for example
it is launched in an IDE), Spincast will check if a app-config.yaml
file exists at the root of the project.
-
Environnement variables will be checked to see if some configurations are defined there.
An environment variable must start with "app." to be considered as a configuration
for a Spincast application. This prefix is configurable.
-
System properties will be checked to see if some configurations have been passed to the application
when launched.
An system property must start with "app." to be considered as a configuration
for a Spincast application. This prefix is configurable.
System properties have the highest priority and overrides any existing configurations (except
of course for hardcoded/non-externalized configurations).
Both environment variables and system properties can have multiple prefixes.
In association with the feature that can strip those prefixes when getting the configurations (see next section),
this allows you to define variables for more than one application on the same server. For example, you could
have those environment variables :
-
app1.admin.email.address = user1@example.com
-
app2.admin.email.address = user2@example.com
-
common.admin.email.format = html
By configuring the environment variable prefixes of a first application as being "app1" and
"common", and the prefixes of a second application as being "app2" and
"common", you can have both application specific variables and common
variables.
Configuration file example
Here's an example of a app-config.yaml file that could be used as a source of externalized configurations :
app:
	name: My Super app

	api:
	  base: https://www.myApp.com

	databases:
	  bd1:
	    host: dbHost.com
	    port: 12345
	    username: myDbUser
	    password: # Empty! Must be provided at runtime...
Then in your AppConfigDefault class, you could access the port for the
"db1" database using :
@Override
public int getDb1Port() {
    return getInteger("app.databases.bd1.port");
}
In this example, the password for the "db1" database will have to be defined as an
environment variable, or using any other mechanism that doesn't require the password to be defined as
plain text and be committed to your version control system (which would be a really bad idea)! Since the configuration
values are retrieved using standard Java methods, you can implement any mechanism you want in order to
retrieve such "secret" configurations.
Configuring the config plugin
The steps described in the sources of configuration values section are configurable.
You configure the way the Spincast Config plugin works by binding a custom implementation of
the SpincastConfigPluginConfig
interface.
If you don't bind a custom implementation for this interface, a default implementation,
SpincastConfigPluginConfigDefault,
will be used.
Those are the methods you can tweak :
-
String getClasspathFilePath()
The path to a configuration file to load from the classpath.
Defaults to "app-config.yaml". This means you can simply create that file
in your project's /src/main/resources/ folder and it
will be used.
-
String getExternalFilePath()
The path to a configuration file to load from the file system.
The path can be relative or absolute. Spincast will check this using :
File configFile = new File(thePath);
if(configFile.isAbsolute()) {
    // ...
}
If the path is relative, it is from the executable .jar or, if not run
from a .jar, from the root of the project.
Defaults to "app-config.yaml".
-
List<String> getEnvironmentVariablesPrefixes()
The allowed prefixes an environment variable can have
to be used as a configuration.
Defaults to "app." only.
-
boolean isEnvironmentVariablesStripPrefix()
Should the prefix of an environment variable be stripped?
For example, if
environmentVariablesPrefixes() indicates
that
"app." is an environment variable prefix, then "app.admin.email"
will result in a "admin.email" key.
Note that each environment variable key must be unique once the prefixes are stripped,
otherwise an exception will be thrown when the application starts!
Defaults to false.
-
List<String> getSystemPropertiesPrefixes()
The allowed prefixes a system property can have
to be used as a configuration.
Defaults to "app." only.
-
boolean isSystemPropertiesStripPrefix()
Should the prefix of an system property be stripped?
For example, if
systemPropertiesPrefixes() indicates
that
"app." is an system property prefix, then "app.admin.email"
will result in a "admin.email" key.
Note that each system properties key must be unique once the prefixes are stripped,
otherwise an exception will be thrown when the application starts!
Defaults to false.
-
boolean isExternalFileConfigsOverrideEnvironmentVariables()
If an external configuration file is used and
environment variables too, should configurations
from the file override those from environment variables?
The default is false : environment
variables have priority.
-
boolean isThrowExceptionIfSpecifiedClasspathConfigFileIsNotFound()
Should an exception be thrown if a classpath config file is specified
(is not
null) but is not found.
If set to false, a message will be logged but no
exception will be thrown.
Defaults to false.
-
boolean isThrowExceptionIfSpecifiedExternalConfigFileIsNotFound()
Should an exception be thrown if an external config file is specified
(is not
null) but is not found.
If set to false, a message will be logged but no
exception will be thrown.
Defaults to false.
Core Configurations
To know all the core configurations required by Spincast,
have a look at the SpincastConfig javadoc.
Here, we're simply going to introduce the most important ones, and their default value :
-
getPublicUrlBase() : This configuration is
very important and you should override it in your application and adjust
it from environment to environment! It tells Spincast what is the
base public URL used to reach your application.
For example, your application may be accessed using a URL such as
http://www.example.com but can in fact be behind a reverse-router
and actually started on the "localhost" host and on
port "12345".
The problem is that the public base URL ("http://www.example.com") can't be
automatically found, but Spincast still requires it to :
-
Generate an absolute URL for a link to provide to the user.
-
Set a cookie using the appropriated domain.
By default, the getPublicUrlBase() configuration
will be "http://localhost:44419". This default can be used for development
purposes, but very should be changed when releasing to another environment.
It is so important to override this configuration that Spincast has a validation
in place : when an application starts, an exception will be thrown if those
conditions are all meet :
-
The
environment name is not "local".
-
isDevelopmentMode() configuration returns false.
-
The
public host is still "localhost".
In other words, Spincast tries to catch the case where an application
is running anywhere else than locally, without the default public base URL
ajusted.
Note that you can disable this startup validation using the
isValidateLocalhostHost() configuration.
-
getServerHost() : The host/IP the HTTP Server
will listen on. The default is 0.0.0.0, which
means the Server will listen on any IP.
-
getHttpServerPort() : The port the Server
will listen to for HTTP (unsecure) requests.
If <= 0, the Server won't listen on HTTP requests.
-
getHttpsServerPort() : The port the Server
will listen to for HTTPS (secure) requests.
If <= 0, the Server won't listen on HTTPS requests.
If you use HTTPS, you also have to provide some extra
configurations related to the SSL
certificate to use.
-
isDevelopmentMode() : If true,
a development environment is taken for granted, and
internal error messages may be displayed publicly, no cache will be
used for the templates, etc. The default is true, so make
sure you change this to false before deploying to
production!
The Request Context
The Request Context is the
object associated with the current request that Spincast passes
to your matching Route Handlers. Its main purpose is to allow you to access information
about the request, and to build the response to send.
Those functionalities are provided by simple methods, or by add-ons. What
we call an "add-on" is an intermediate class containing a set of methods
made available through the Request Context parameter.
Here's an example of using the routing() add-on :
public void myHandler(DefaultRequestContext context) {

    if(context.routing().isNotFoundRoute()) {
        //...
    }
}
This routing() add-on
is available to any Route Handler, via its Request Context parameter, and
provides a set of utility methods.
Here are some add-ons and some standalone methods available by default on a
Request Context object :
public void myHandler(DefaultRequestContext context) {

    // Accesses the request information
    String name = context.request().getPathParam("name");

    // Sets the response
    context.response().sendPlainText("Hello world");

    // Gets information about the routing process and the current route
    boolean isNotFoundRoute = context.routing().isNotFoundRoute();

    // Gets/Sets request-scoped variables
    String someVariable = context.variables().getAsString("someVariable");

    // Direct access to the Json manager
    JsonObject jsonObj = context.json().create();

    // Direct access to the XML manager
    JsonObject jsonObj2 = context.xml().fromXml("<someObj></someObj>");

    // Direct access the Guice context
    SpincastUtils spincastUtils = context.guice().getInstance(SpincastUtils.class);

    // Direct access to the Templating Engine
    Map<String, Object> params = new HashMap<String, Object>();
    params.set("name", "Stromgol");
    context.templating().evaluate("Hello {{name}}", params);

    // Gets the best Locale to use for the current request
    Locale localeToUse = context.getLocaleToUse();

    // Gets the best TimeZone to use for the current request
    TimeZone timeZoneToUse = context.getTimeZoneToUse();

    // Sends cache headers
    context.cacheHeaders().cache(3600);

    // ...
}
Again, the main job of the Request Context is to allow the Route Handlers to deal with the
request and the response. But it's also an extensible object on which various functionalities can be added
to help the Route Handlers do their job! Take the "templating()" add-on, for example:
public void myRouteHandler(DefaultRequestContext context) {

    Map<String, Object> params = new HashMap<String, Object>();
    params.set("name", "Stromgol");
    String content = context.templating().evaluate("Hi {{name}}!", params);

    // Do something with the evaluated content...
}
The templating() add-on does not directly manipulate the request or the response.
But it still provides a useful set of methods for the Route Handlers.
If you have experience with Guice, or with dependency injection in general,
you may be thinking that we could simply inject a TemplatingEngine
instance in the controller and access it that way :
public class AppController {

    private final TemplatingEngine templatingEngine;

    @Inject
    public AppController(TemplatingEngine templatingEngine) {
        this.templatingEngine = templatingEngine;
    }

    protected TemplatingEngine getTemplatingEngine() {
        return this.templatingEngine;
    }

    public void myRouteHandler(DefaultRequestContext context) {

        Map<String, Object> params = new HashMap<String, Object>();
        params.set("name", "Stromgol");
        String content = getTemplatingEngine().evaluate("Hi {{name}}!", params);

        // Do something with the evaluated content...
    }
}
The two versions indeed lead to the exact same result. But, for functionalities that
are often used inside Route Handlers, or
for functionalities that should be request scoped, extending
the Request Context can be very useful.
Imagine a plugin which job is to manage authentification and autorization.
Wouldn't it be nice if this plugin could add some extra functionalities to the Request Context
object? For example :
public void myHandler(ICustomRequestContext context) {

    if(context.auth().isAuthenticated()) {
        String username = context.auth().user().getUsername();
        // ...
    }
}
There is some boilerplate code involved to get
such custom Request Context type but, when it's in place, it's pretty easy to tweak
and extend. In fact, we highly recommend that you use a custom Request Context as soon as possible
in your application. That way, you will be able to easily add add-ons when you need them.
If you use the Quick Start
as a start for your application, a custom
Request Context type is already provided.
But if you start from scratch, an upcoming section will show you how to
extend the default Request Context type, by yourself.
The default add-ons
There are add-ons which are always available on a Request Context object,
in any Spincast application. Let's have a quick look at them :
-
RequestRequestContextAddon<R> request()
The request() add-on allows access to
information about the current request: its body, its headers, its URL, etc. The default
implementation, SpincastRequestRequestContextAddon, is provided by the
Spincast Request plugin. Check this plugin's documentation
for all the available API.
Examples :
// Gets the request full URL
String fullUrl = context.request().getFullUrl();

// Gets the request body as a JsonObject
JsonObject body = context.request().getJsonBody();

// Gets a HTTP header
String authorization = context.request().getHeaderFirst(HttpHeaders.AUTHORIZATION);

// Gets a cookie value
String sesionId = context.request().getCookie("sess");

// Gets a queryString parameter
String page = context.request().getQueryStringParamFirst("page");

// Gets the value of a dynamic path token.
// For example for the route "/users/${userId}"
String userId = context.request().getPathParam("userId");
-
ResponseRequestContextAddon<R> response()
The response() add-on allows you to build
the response : its content, its content-type, its HTTP status, its headers.
The default implementation, SpincastResponseRequestContextAddon, is provided by the
Spincast Response plugin. Check this plugin's documentation
for all the available API.
Examples :
// Sets the status code
context.response().setStatusCode(HttpStatus.SC_FORBIDDEN);

// Sets a HTTP header value
context.response().setHeader(HttpHeaders.CONTENT_LANGUAGE, "en");

// Sets the content-type
context.response().setContentType(ContentTypeDefaults.JSON.getMainVariation());

// Sets a cookie
context.response().setCookie("locale", "en-US");

// Permanently redirects to a new url (the new url
// can be absolute or relative). A Flash message
// can be provided.
context.response().redirect("/new-url", true, myFlashMessage);

// Adds an element to the response model
context.response().getModel().set("name", "Stromgol");

// Sends the response model as Json
context.response().sendJson();

// Sends some bytes
context.response().sendBytes("Hello World".getBytes("UTF-8"));

// Sends a specific object as Json
context.response().sendJson(user);

// Sends HTML evaluated from a template, using the response
// model to provide the required variables
context.response().sendHtmlTemplate("/templates/user.html");
-
CacheHeadersRequestContextAddon<R> cacheHeaders()
The cacheHeaders() add-on allows you to validate the HTTP
cache headers sent by the client and
to add such headers for the requested resource. Have a look at the HTTP Caching
section for more information.
Examples :
// Tells the client to cache the resource for 3600 seconds
context.cacheHeaders().cache(3600);

// Tells the client to disable any cache for this resource
context.cacheHeaders().noCache();

// ETag and last modification date validation
if(context.cacheHeaders().eTag(resourceEtag).lastModified(modifDate).validate(true)) {
    return;
}
-
JsonManager json()
Provides easy access to the
JsonManager,
for
Json related methods.
-
XmlManager xml()
Provides easy access to the XmlManager,
for
XML related methods.
-
Injector guice()
Provides easy access to the Guice context of the application.
-
<T> T get(Class<T> clazz)
Shortcut to get an instance from the Guice context. Will also cache the instance
(as long as it is request scoped or is a singleton).
-
Locale getLocaleToUse()
The best Locale to use for the current request, as found by the
LocaleResolver.
-
TimeZone getTimeZoneToUse()
The best TimeZone to use for the current request, as found by the
TimeZoneResolver.
-
Object exchange()
The underlying "exchange" object, as provided by the HTTP
Server.
If you know for sure what the
implementation of this object is, you may cast it to access extra functionalities not provided by Spincast out of the box.
Extending the Request Context
Extending the Request Context is probably to most advanced thing to
learn about Spincast. Once in place, a custom Request Context is quite
easy to adjust and extend, but the required code to start may be somewhat challenging.
This is why we recommend that you start your application with the Quick Start!
This template already contains a custom Request Context type,
so you don't have to write the bootstrapping code by yourself! But if you start from scratch or if you
are curious about how a custom Request Context type is possible, keep
reading.
First, let's quickly repeat why we could want to extend the default Request Context type...
There may be a "translate(...)" method on some class and we frequently use it by our various
Route Handlers. Let's say this is a method helping translate a sentence from one language
to another.
Instead of injecting the class where this method is
defined each time we need to use it, wouldn't it be nice if we would have access to it
directly from a Request Context object? For example:
public class AppController {

    public void myRouteHandler(AppRequestContext context) {
        String translated = context.translate("Hello World!", Locale.ENGLISH, Locale.FRENCH);
        // ...
    }
}
Since this method doesn't exist on the default
RequestContext interface,
we'll have to create a custom type and add the method to it. In the previous snippet,
this custom type is called "AppRequestContext".
Let's create this custom Request Context type...
public interface AppRequestContext extends RequestContext<AppRequestContext> {

    public void translate(String sentense, Locale from, Locale to);

    // Other custom methods and/or add-ons...
}
Note that we extend RequestContext, which is the
base interface for any Request Context, but we parameterize it using our custom type.
This is required because the base interface needs to know about it.
Then, the implementation:
public class AppRequestContextDefault extends RequestContextBase<AppRequestContext>
                                      implements AppRequestContext {

    @AssistedInject
    public AppRequestContextDefault(@Assisted Object exchange,
                                    RequestContextBaseDeps<AppRequestContext> requestContextBaseDeps) {
        super(exchange, requestContextBaseDeps);
    }

    @Override
    public String translate(String sentense, Locale from, Locale to) {

        // More hardcoded than translated here!
        return "Salut, monde!";
    }
}
Explanation :
-
1 : We extend
RequestContextBase,
to keep the default methods implementations and simply add our custom one. We also need to parameterize
this base class with our custom AppRequestContext type.
-
2 : We implement our custom interface.
-
4-8 : The base class requires the server's
exchange object and a RequestContextBaseDeps parameter,
which are going to be injected using an
assisted factory. Don't
worry too much about this. Simply add this constructor, and things should be working.
-
10-15 : We implement our new
translate(...) method.
Last, but not the least, we need to tell Spincast about
our new custom Request Context type! This is done by using the
requestContextImplementationClass(...) of the
Bootstrapper :
public static void main(String[] args) {

    Spincast.configure()
            .module(new AppModule())
            .requestContextImplementationClass(AppRequestContextDefault.class)
            .init(args);
    //....
}
Note that it is the implementation, "AppRequestContextDefault", that we have to specify,
not the interface!
This is to simplify your job : Spincast will automatically find the associated
interface and will use it to parameterize the required components.
And that's it! From now on, when you are using a routing related component, which has to be parameterized with the
Request Context type, you use your new custom type. For example:
Router<AppRequestContext, DefaultWebsocketContext> router = getRouter();

router.GET("/").handle(context -> {
    String translated = context.translate("Hello World!", Locale.ENGLISH, Locale.FRENCH);
    // do something with the translated sentence...
});
Or, using an inline Route Handler:
Router<AppRequestContext, DefaultWebsocketContext> router = getRouter();

router.GET("/").handle(new Handler<AppRequestContext>() {

    @Override
    public void handle(AppRequestContext context) {
        String translated = context.translate("Hello World!", Locale.ENGLISH, Locale.FRENCH);
        // do something with the translated sentence...
    }
});
(You may have motice that the parameterized version of the Router doesn't simply contain
a Request Context type, but also a Websocket context type. This is
because this type can also be extended.)
This may seem like a lot of boilerplate code! But it has to be done only one time and, once in place,
it's easy to add new methods and add-ons to your Request Context objects! Also,
using a unparameterized version of those generic components, it's way nicer. Let's see how
to creat those unparameterized versions...
Using unparameterized components
You can do for your custom types what we already did for the
default ones : to create an unparameterized version for each of them.
For example, here's how the provided
DefaultRouter is defined :
public interface DefaultRouter extends Router<DefaultRequestContext, DefaultWebsocketContext> {
    // nothing required
}
This interface has no other goal than to "hide" the parameterization, to be more visually appealing,
more easy to use...
Thanks to this definition, you can inject DefaultRouter
instead of Router<DefaultRequestContext, DefaultWebsocketContext>, which is arguably nicer. Both
types are interchangeable.
You can do the exact same thing with your custom Route Context type :
public interface AppRouter extends Router<AppRequestContext, DefaultWebsocketContext> {
    // nothing required
}
Now, you can inject AppRouter instead of Router<AppRequestContext, DefaultWebsocketContext> when you
need an instance of your custom router! Here again, it's a matter of taste... Noth types are interchangeable.
For more details, have a look at the Quick Start application. It implements exactly
this.
Sending the response
The kind of responses you send to incoming requests really depends on the type of
application you're building! If you are building a traditional website, you will
most of the time use the integrated Templating Engine
to output HTML as the response to a request.
But if you are building a SPA, or if you use Spincast for
REST microservices/services, then your responses will
probably be Json or XML objects.
The response model object
Inside a Route Handler, you can (but are not forced to) use the
provided response model as an easy way to build the response. This
can be useful to build a response to be sent as Json, but is
mainly use to accumulate the various parameters required to render a template.
You get this model by using the getModel()
method on the response() add-on :
public void myRouteHandler(DefaultRequestContext context) {

    JsonObject responseModel = context.response().getModel();

    // ... adds elements to this response model

    // ... then sends the response
}
The response model is a
JsonObject so it can be manipulated as such!
You can add any type of element on it. When the added object is not
of a type native to JsonObjects, the object is converted
to a JsonObject or to a JsonArray.
You can use the json() add-on to create new
JsonObject and JsonArray elements to be added to the response model.
For example, let's add to the response model : a simple String variable, a Book object
and a JsonObject representing a user...
public void myRouteHandler(DefaultRequestContext context) {

    JsonObject responseModel = context.response().getModel();

    // Adds a simple String variable
    responseModel.set("simpleVar", "test");

    // Adds a Book : this object will automatically
    // be converted to a JsonObject
    Book book = getBook(42);
    responseModel.set("myBook", book);

    // Then adds a JsonObject representing a user
    JsonObject user = context.json().create();
    user.set("name", "Stromgol");
    user.set("age", 30);
    responseModel.set("user", user);

    // ...
}
At this point, the response model would be something like :
{
    "simpleVar": "test",
    "myBook": {
        "id": 42,
        "title": "The Hitchhiker's Guide to the Galaxy",
        "author": "Douglas Adams"
    },
    "user": {
        "name": "Stromgol",
        "age": 30
    }
}
To resume : you use any business logic required to process a request, you query
some data sources if needed, then you build the response model. When the response model is
ready, you decide how to send it. Let's see the different options...
Sending the response model as HTML, using a template
If you're building a traditional website, you will most of the time send HTML
as the response for a request. To do so, you can use the Templating Engine,
and specify which template to use to render the data contained in the response model :
public void myRouteHandler(DefaultRequestContext context) {

    JsonObject responseModel = context.response().getModel();

    // ... adds variables to the response model

    // Renders the response model using a template
    context.response().sendTemplateHtml("/templates/myTemplate.html");
}
The default templating engine is Pebble. The
template files are found on the classpath by default, but there are overload methods to find
them on the file system too. Learn more about that in the
Templating Engine section.
Sending Json or XML
If you are using Spincast to build a Single Page Application or REST services,
you will probably want to directly return a Json
(or as XML) object instead of rendering an HTML template.
Most of the time you are going to return that resource directly.
Here's an example :
public void booksGet(DefaultRequestContext context) {

    String bookId = context.request().getPathParam("bookId");
    Book someBook = getBook(bookId);

    // Sends the book as Json
    context.response().sendJson(someBook);

    // ... or as XML
    context.response().sendXML(someBook);
}
By using the
sendJson(someBook) method, the book object will
automatically be serialized to Json and sent using the
appropriated "application/json" content-type.
In some cases, it may be useful to build the object to return using the
response model, exactly as you may do when developing a traditional website.
This approach is discussed in the
SPA Quick Tutorial.
Here's an example :
public void myRouteHandler(DefaultRequestContext context) {

    JsonObject responseModel = context.response().getModel();

    JsonObject user = context.json().create();
    user.set("name", "Stromgol");
    user.set("age", 42);
    responseModel.set("user", user);

    // This will send the response model as "application/json" :
    // {"user":{"name":"Stromgol","age":42}}
    context.response().sendJson();

    // or, this will send the response model as "application/xml" :
    // <JsonObject><user><name>Stromgol</name><age>42</age></user></JsonObject>
    context.response().sendXml();
}
The sendJson() method, without any argument, takes the response model,
converts it to a Json string and sends it with the appropriate
"application/json" content-type.
Sending specific content
You can use the default response model to build the object which will be used
for the response, but you can also send any object directly. We already
saw that we can send an object using the sendJson(myObject) method, but
Spincast provides other options. You can...
-
Send
characters, using the content-type of your choice :
public void myRouteHandler(DefaultRequestContext context) {

    // Sends as "text/plain"
    context.response().sendPlainText("This is plain text");

    // Sends as "application/json"
    context.response().sendJson("{\"name\":\"Stromgol\"}");

    // Sends as "application/xml"
    context.response().sendXml("<root><name>Stromgol</name></root>");

    // Sends as "text/html"
    context.response().sendHtml("<h1>Hi Stromgol!</h1>");

    // Sends using a specified content-type
    context.response().sendCharacters("<italic>Stromgol!</italic>", "text/richtext");
}
-
Evaluate a template by yourself and send it as
HTML,
explicitly :
public void myRouteHandler(DefaultRequestContext context) {

    Map<String, Object> params = getTemplateParams();
    String result = context.templating().evaluate("/templates/myTemplate.html", params);

    // Sends the evaluated template
    context.response().sendHtml(result);
}
-
Send a specific object as
Json or as XML :
public void myRouteHandler(DefaultRequestContext context) {

    User user = getUserService().getUser(123);

    // Sends the user object as Json
    context.response().sendJson(user);

    // or, sends it as XML
    context.response().sendXml(user);
}
-
Send binary data :
public void myRouteHandler(DefaultRequestContext context) {

    byte[] imageBytes = loadImageBytes();

    // Sends as "application/octet-stream"
    context.response().sendBytes(imageBytes);

    // or sends using a specific content-type
    context.response().sendBytes(imageBytes, "image/png");
}
Redirecting
Sometimes you need to redirect a request to a new page. There are multiple cases
where that can be useful. For example when you decide to change a URL in your application,
but don't want existing links pointing to the old URL to break. In that particular case you can
use using redirection rules :
the requests for the old URL won't even reach any route handler... A redirection header
will be sent at the very beginning of the routing process.
Another case where a redirection is useful is when you are building a traditional website
and a form is submitted via a POST method. In that case, it is seen as a good practice
to redirect to a confirmation page once the form has been validated
successfully. By doing so, the form won't be submitted again if the user decides to refresh
the resulting page.
Other than redirection rules, there
are two ways of redirecting a request to a new page :
-
By using the "redirect(...)" method on the response()
add-on, in a Route Handler :
public void myRouteHandler(DefaultRequestContext context) {

    context.response().redirect("/new-url");
}
Calling this redirect(...) method simply adds redirection headers to the response,
it doesn't send anything. This means that any remaining
Route Handlers/Filters will be ran as usual
and could even, eventually, remove the redirection headers that the method added.
-
By throwing a RedirectException exception.
public void myRouteHandler(DefaultRequestContext context) {

    // Any remaing filters will be skipped
    throw new RedirectException("/new-url");
}
Unlike the redirect(...) method approach, throwing a RedirectException
will end the current routing process and immediately send the redirection
headers. Only the remaining after Filters will be run, any other remaining handler
will be skipped.
The URL parameter of a redirection can :
-
Be absolute or relative.
-
Be empty. In that case, the request will be redirected to the current URL.
-
Start with
"?". In that case, the current URL will be used but with
the specified queryString.
-
Start with
"#". In that case, the current URL will be used but with
the specified anchor.
Other redirections options :
-
You can specify if the redirection should be permanent (
301)
or temporary (302). The default is "temporary".
-
You can specify a Flash message :
public void myRouteHandler(DefaultRequestContext context) {

    // Sends a permanent redirection (301) with
    // a Flash message to be displayed on the target page
    context.response().redirect("/new-url",
                                true,
                                FlashMessageLevel.WARNING,
                                "This is a warning message!");
}
Forwarding
Forwarding the request doesn't send anything, it's only a way of
changing the current route. By forwarding a request, you restart the
routing process from scratch,
this time using a new, specified route instead of the original one.
Forwarding is very different than
Redirecting since
the client can't know that the request endpoint has been changed...
The process is entirely server side.
Since forwarding the request ends the current routing process and skips any
remaining Route Handlers/Filters, it is done by throwing an exception,
ForwardRouteException :
public void myRouteHandler(DefaultRequestContext context) {

    throw new ForwardRouteException("new-url");
}
Flushing the response
Flushing the response consists in sending the HTTP headers
and any data already added to the response buffer. You only start to actually send
something to the user when the response is flushed!
It is important to know that the first time the response is flushed,
the HTTP headers are sent and therefore can't be modified
anymore. Indeed, the HTTP headers are only sent once, during the first flush
of the response.
Note that explicitly flushing the response is not required : this is automatically done
when the routing process is over. In fact, you don't need to explicitly flush the response
most of the time. But there are some few cases where you may need to do so, for example for the user starts receiving
data even if you are still collecting more of it on the server.
So, how do you flush the response? The first option is by using the dedicated
flush() method :
public void myRouteHandler(DefaultRequestContext context) {

    context.response().flush();
}
A second option is to use the "flush" parameter available
on many sendXXX(...) methods of the response()
add-on. For example...
public void myRouteHandler(DefaultRequestContext context) {

    // true => flushes the response
    context.response().sendPlainText("Hello world!", true);
}
Note that flushing the response
doesn't prevent any remaining Route Handlers/Filters to be run, it simply
send the response as it currently is.
Finally, note that you can also use the end() method
of the response() add-on if you want the response to be flushed and be closed. In that case,
remaining Route Handlers/Filters will still run,
but they won't be able to send any more data :
public void myRouteHandler(DefaultRequestContext context) {

    context.response().end();
}
Skipping remaining handlers
Most of the time you want to allow the main Route Handler
and all its associated filters to be run. A filter may modify some headers, may
log some information, etc. But in the rare cases where you want to make sure the response
is sent as is and that anything else is skipped, you can throw a
SkipRemainingHandlersException.
public void myRouteHandler(DefaultRequestContext context) {

    context.response().sendPlainText("Hello world!");

    throw new SkipRemainingHandlersException();
}
Unlike simply flushing and ending the response (using the end() method),
throwing a SkipRemainingHandlersException skips any remaining handlers : the
response will be sent as is, and the routing process will be over. This means that
even the after filters will be skipped!
Routing
Let's learn how the routing process works in Spincast, and how to create
Routes and Filters.
The Routing Process
When an HTTP request arrives, the Router is asked to find what Route Handlers should be used to handle it.
There can be more than one Route Handler for a single request because of Filters :
Filters are standard Route Handlers, but that run before or after the main Route Handler.
There can be only one main Route Handler but multiple
before and after Filters. Even if multiple Route Handlers would match
a request, the router will only pick one as the main one (by default, it keeps the first one matching).
Those matching Routes Handlers are called in a
specific order. As we'll see in the Filters section, a
Filter can have a position which indicates when the Filter should run. So it is
possible to specify that we want a Filter to run before or after another one.
This initial routing process has a routing process type called "Found".
The "Found" routing
type is the one active when at least one main Route Handler matches the request. This is the most frequent case,
when valid requests are received, using URLs that are managed by our application.
But what if no main Route Handler matches? What if we receive a request that uses an invalid URL? Then,
we enter a routing process with a routing process type called "Not Found" (404). We'll see in the
Routing Types section that we can define some routes
for the Not Found routing process. Those routes are the ones that are
going to be considered when a Not Found routing process occures.
So when we receive a request for an invalid URL, the Not Found routing process
is triggered and the dedicated Routes are considered as potential handlers.
Note that the Not Found routing process is also activated if a
NotFoundException is
thrown in our application! Suppose you have a "/users/${userId}" Route, and a
request for "/users/42" is received... Then a main Route Handler may be found and called,
but it is possible that this particular user, with id "42", is not found in the system...
Your can at this point throw a NotFoundException exception : this is going to stop the initial
"Found" routing process, and start a new Not Found routing process, as if the request
was using an invalid URL in the first place!
The third and final routing process type (with "Found" and "Not Found") is "Exception".
If an exception occurs during a "Found" or a "Not Found"
routing process, then a new "Exception" routing process is started. This
enables you to create some Routes explicitly made to manage exceptions.
It's important to note that there are some special exceptions which may have a different
behavior though. The best example is the NotFoundException exception we already discussed : this exception,
when throw, doesn't start a new "Exception" routing process, but a new "Not Found"
routing process.
Also note that if you do not define custom "Not Found" and "Exception"
Routes Handlers, some basic ones are provided. It is still highly recommended that you
create custom ones.
There are two important things to remember about how a routing process works :
-
When a routing process starts, the process of finding the matching Routes is restarted from the beginning.
For example, if you have some "before" Filters that
have already been run during an initial "Found" routing process, and then your main Route Handler
throws an exception, the routing process will be restarted (this time of type "Exception") and
those already ran Filters may be run again if they are also part of the new routing process!
The only difference between the initial routing process and the
second one is the type which will change the Routes that are going to
be considered. Only the Routes that have been configured to support the
routing process type of the current routing process may match.
-
When a new routing process starts, the current response is reset : its
buffer is emptied, and the HTTP headers are reset... But this is only true if the response
has not already been flushed though!
Finally, note that Spincast also supports WebSockets, which involve a totally
different routing process! Make sure you read the dedicated section about
WebSockets to learn more about this.
Adding a Route
Now, let's learn how to define our Routes!
First, you have to get the Router instance. If you use the default router, this
involves injecting the DefaultRouter
object. For example, using constructor injection :
public class AppRouteDefinitions {

    private final DefaultRouter router;

    @Inject
    public AppRouteDefinitions(DefaultRouter router) {
        this.router = router;
    }

    //...
}
On that Router,
there are methods to create a
Route Builder. As its name indicates,
this object uses a
builder pattern to help you create a Route. Let's see that in details...
HTTP method and path
You create a Route Builder by choosing the
HTTP methods
and the
path you want your Route to handle :
router.GET("/") ...

router.POST("/users") ...

router.DELETE("/users/${userId}") ...

// Handles all HTTP methods
router.ALL("/books") ...

// Handles POST and PUT requests only
router.methods("/books", HttpMethod.POST, HttpMethod.PUT) ...
Route id
You can assign an
id to a route. This id can be useful later, for example
to validate at runtime what the route of the current request is.
router.GET("/users").id('users') ...
Dynamic parameters
In the paths of your route definitions, you can use what we call
"dynamic parameters",
which syntax is
"${paramName"}.
For example, the following Route Builder will generate a Route matching any request for an
URL starting with
"/users/" and that is followed by another token:
router.GET("/users/${userId}")
By doing so, your associated Route Handlers can later access the actual value of this
dynamic parameter. For example :
public void myHandler(AppRequestContext context) {

    String userId = context.request().getPathParam("userId");

    // Do something with the user id...
}
If a "/users/42" request is received, then the userId would be "42", in this
example.
Note that this "/users/${userId}" example will only match
URLs containing exactly two tokens! An URL like "/users/42/book/123"
won't match!
If you want to match more than one path tokens using a single variable, you have to use a
Splat parameter, which syntax is "*{paramName}".
For example, the Route generated in following example
will match both "/users/42" and "/users/42/book/123" :
router.GET("/users/${userId}/*{remaining}")
In this example, the Route Handlers would have access to two path parameters :
userId will be "42", and remaining will
be "book/123".
A dynamic parameter can also contain a regular expression pattern. The
syntax is "${paramName:pattern}", where "pattern" is the regular expression
to use. For example :
router.GET("/users/${userId:\\d+}")
In this example, only requests starting with
"/users/" and followed by a
numeric value
will match. In other words,
"/users/1" and
"/users/42" would match,
but
not "/users/abc".
Finally, a dynamic parameter can also contain what we call a pattern alias.
Instead of having to type the regular expression pattern each time you need it, you can
use an alias for it. The syntax to use an alias is "${paramName:<alias>}".
Spincast has some built-in aliases :
// Matches only alpha characters (A to Z)
router.GET("/${param1:<A>}")

// Matches only numeric characters (0 to 9)
router.GET("/${param1:<N>}")

// Matches only alphanumeric characters (A to Z) and (0 to 9)
router.GET("/${param1:<AN>}")

// Matches only alpha characters (A to Z), "-" and "_"
router.GET("/${param1:<A+>}")

// Matches only numeric characters (0 to 9), "-" and "_"
router.GET("/${param1:<N+>}")

// Matches only alphanumeric characters (A to Z), (0 to 9), "-" and "_"
router.GET("/${param1:<AN+>}")
You can of course create your own aliases.
You do that using the addRouteParamPatternAlias(...) method
on the Router. For example :
// Registers a new alias
router.addRouteParamPatternAlias("USERS", "user|users|usr");

// Uses the alias!
router.GET("/${param1:<USERS>}/${userId}")
The Route generated using this pattern would match "/user/123", "/users/123"
and "/usr/123", but not "/nope/123".
Routing Process Types
You can specify of which type the current
routing process
must be for your route to be considered.
The three routing process types are:
-
Found
-
Not Found
-
Exception
If no routing process type is specified when a Route is created, "Found" is used by default.
This means the Route won't be considered during a Not Found or Exception routing process.
Here's a example of creating Routes using routing process types :
// Only considered during a "Found" routing process
// (this is the default, so it is not required to specify it)
router.GET("/").found() ...

// Only considered during a "Not Found" routing process
router.GET("/").notFound() ...

// Only considered during an "Exception" routing process
router.GET("/").exception() ...

// Always considered!
router.GET("/").allRoutingTypes() ...

// Considered both during a "Not Found"
// or an "Exception" routing process
router.GET("/").notFound().exception() ...
There are some shortcuts to
quickly define a Route for a "Not Found"
or an "Exception" type, wathever the
URL is :
// Synonym of :
// router.ALL("/*{path}").notFound().handle(handler)
router.notFound(handler);

// Synonym of :
// router.ALL("/*{path}").exception().handle(handler)
router.exception(handler);
Content-Types
You can specify for acceptable content-types for a Route to
be considered. For example, you may have a Route Handler for a
"/users" URL that will
produce Json, and another Route Handler that will produce
XML, for the very same URL. You could also have a single handler
for both content-types, and
let this handler decide what to return as the response : both approaches are valid.
If no content-type is specified when building a Route,
the route is always considered in that regard.
Let's see some examples :
// Only considered if the request accepts HTML
router.GET("/users").html() ...

// Only considered if the request accepts Json
router.GET("/users").json() ...

// Only considered if the request accepts XML
router.GET("/users").xml() ...

// Only considered if the request accepts HTML or plain text
router.GET("/users").accept(ContentTypeDefaults.HTML, ContentTypeDefaults.TEXT) ...

// Only considered if the request accepts PDF
router.GET("/users").acceptAsString("application/pdf") ...
HTTP Caching route options
Soon in the documentation, you will find a dedicated HTTP Caching section,
containing all the information about HTTP Caching using Spincast. Here, we're only going to list the options
available when building a Route.
For both regular Routes and Static Resources Routes, you can use the
cache(...) method to send appropriate cache headers
to the client :
// Default cache headers will be sent (this default is configurable).
router.GET("/test").cache() ...

// Sends headers so the client caches the resource for 60 seconds.
router.GET("/test").cache(60) ...

// Sends headers so the client caches the resource for 60 seconds.
// Also specifies that this cache should be *private*.
// See : https://goo.gl/VotTdD
router.GET("/test").cache(60, true) ...

// Sends headers so the client caches the resource for 60 seconds,
// but so a CDN (proxy) caches it for 30 seconds only.
router.GET("/test").cache(60, false, 30) ...

// The "cache()" method is also available on Static Resources Routes!
router.file("/favicon.ico").cache(86400).classpath("/public/favicon.ico") ...
On a standard route, it is also possible to use the noCache()
method to send headers asking the client to disable any caching :
router.GET("/test").noCache().handle(handler);
Again, make sure you read the dedicated HTTP Caching section for
the full documentation about caching.
Saving the route
When your Route definition is complete, you save the generated Route to the router by passing
a last parameter to the handle(...) method : the Route Handler to use to handle the
Route. With Java 8, you can use a method handler or a lambda for this parameter :
// A method handler
router.GET("/").handle(controller::indexHandler);

// A lambda expression
router.GET("/").handle(context -> controller.indexHandler(context));
Here's a complete example of a Route creation :
// Will be considered on a GET request accepting Json or XML, when a
// requested user is not found.
// This may occure if you throw a "NotFoundException" after you validated
// the "userId" path parameter...
router.GET("/users/${userId}").notFound().json().xml().handle(usersController::userNotFound);
Filters
Filters are plain Route Handlers, with the exception
that they run before or after the single main Route Handler.
You can declare a Filter exactly like you would declare a
standard Route, but using the extra "pos" ("position") property! The
Filter's position indicate when the Filter should be run. The lower
that position number is, the sooner the Filter will run. Note that the
main Route Handlers are considered as having a position of "0", so Filters
with a position below "0" are before Filters, and those with a
position greater than "0" are after Filter.
An example :
// This Filter is a "before" Filter and
// will be run first.
router.GET("/").pos(-3).handle(ctl::filter1);

// This Filter is also a "before" Filter and
// will be run second.
router.GET("/").pos(-1).handle(ctl::filter2);

// This is not a Filter, it's a main Route Handler
// and the ".pos(0)" part is superfluous!
router.GET("/").pos(0).handle(ctl::mainHandler);

// This Filter is an "after" Filter and will run
// after the main Route Handler
router.GET("/").pos(100).handle(ctl::filter3);
A Route definition can disable a Filter that would otherwise be run, by
using the skip(...) method. The target Filter must have
been declared with an "id" for this to be possible though. He're
an example :
// This "myFilter" Filter will be applied on all Routes by default
router.ALL().pos(-100).id("myFilter").handle(ctl::filterHandler);

// ... but this Route disables it!
router.GET("/test").skip("myFilter").handle(ctl::testHandler);
A Route definition can also disable a Filter that would otherwise be run
when a Dynamic Resource is generated. To
do so, simply call skipResourcesRequests():
// This Filter will be applied on all routes
router.ALL().pos(-100).handle(ctl::someHandler);

// This one on all routes but dynamic resources ones!
router.ALL().pos(-100).skipResourcesRequests().handle(ctl::someHandler);
You can also add inline Filters that are run only on
on a specific Route, using the before() and
after() methods :
// This route contains four "handlers" :
// two "before" Filters, the main Route Handler,
// and one "after" Filter.
router.GET("/users/${userId}")
      .before(ctl::beforeFilter1)
      .before(ctl::beforeFilter2)
      .after(ctl::afterFilter)
      .handle(ctl::mainHandler);
The inline Filters don't have a position: they are
run in the order they are declared! Also, they always run just before
or just after the main Route Handler. In other words, they are always run closer to the
main Route Handler than the global Filters.
The inline filters have access to the same request information than their
associated main Route Handler: same
path parameters, same queryString parameters, etc.
Finally, note that a Filter can decide by itself if it will run or not,
at runtime. For example, using the routing() add-on,
a Filter can know if the current Routing Process Type is
"Found", "Not Found"
or "Exception", and decide to run or not depending on that information.
For example :
public void myFilterHandler(AppRequestContext context) {

    // The current Routing Process Type is "Exception",
    // we don't run the Filter.
    if(context.routing().isExceptionRoute()) {
        return;
    }

    // Or, using any other information from the request...

    // Some Cookie is set, we don't run the Filter.
    if(context.request().getCookie("someCookie") != null) {
        return;
    }

    // Actually run the Filter...

}
WebSockets
Because of the particular nature of WebSockets, we decided
to aggregate all the documentation about them
in a dedicated WebSockets section.
Make sure you read that section to learn everything about WebSockets... Here's we're only
going to provide a quick WebSocket route definition example, since we're talking about routin.
To create a WebSocket Route, you use the Router object, the same way you do for a regular Route. The big
difference is the type of controller that is going to receive the WebSocket request. Here's the quick example :
router.websocket("/chat").before(someFilter).handle(chatWebsocketController);
Static Resources
You can tell Spincast that some files and directories are
Static Resources.
Doing so, those files and directories will be served by the HTTP Server directly :
the requests for them won't even reach the framework.
Note that queryStrings are ignored when a request is made for a Static Resource. If you need
queryStrings to make a difference, have a look at Dynamic Resources.
Static Resources can be on the classpath or on the file system. For example:
// Will serve all requests starting with the
// URL "/public" with files under the classpath
// directory "/public_files".
router.dir("/public").classpath("/public_files").handle();

// Uses an absolute path to a directory on the file system
// as a static resources root.
router.dir("/public").pathAbsolute("/user/www/myprojet/public_files").handle();

// Uses a path relative to the Spincast writable directory,
// on the file system, as the root for the static resources.
router.dir("/public").pathRelative("/public_files").handle();

// Will serve the requests for a specific file,
// here "/favicon.ico", using a file from the classpath.
router.file("/favicon.ico").classpath("/public/favicon.ico").handle();

// Uses an absolute path to a file on the file system
// as the static resource target.
router.file("/favicon.ico").pathAbsolute("/user/www/myprojet/public_files/favicon.ico").handle();

// Uses a path relative to the Spincast writable directory,
// on the file system, as the static resource target file.
router.file("/favicon.ico").pathRelative("/public_files/favicon.ico").handle();
Be aware that since requests for Static Resources don't reach the framework, Filters don't apply to them! Even a
"catch all" Filter such as router.ALL().pos(-1).handle(handler)
won't be applied...
For the same reason, there are some limitations about the dynamic parameters
that the Route definition of a Static Resource can contain... For standard Static Resources, only a dir(...)
definition can contain a dynamic part, and it can only be
a splat parameter, located at the very end of its route. For example :
-
This is valid! :
dir(/one/two/*{remaining})
-
This is not valid :
dir(/one/*{remaining}/two)
-
This is not valid :
dir(/${param})
-
This is not valid :
file(/one/two/*{remaining})
Finally, note that the Static Resource route definitions have precedence over any other
Routes, so if you declare router.dir("/", "/public") for example, then
no Route at all will ever reach the framework, everything would be considered
as static!
This is, by the way, a quick and easy way to serve a purely static
website using Spincast!
Hotlinking protection
Hotlinking is the process of embedding in a website a resource that comes from
another domain. The typical example is an image from your site that someone
embeds in his own website, without copying it to his server first. This would cost
you bandwidth for an image that won't even be seen by your visitors!
Spincast provides a way of protecting your static resources from hotlinking. For the
default protection, you simply have to add .hotlinkingProtected() on your
static resources' routes:
getRouter().file("/some-file")
           .classpath("someFile.txt")
           .hotlinkingProtected()
           .handle();
The default behavior of the hotlinking protection is simply to return a FORBIDDEN HTTP status. So if
someone hotlinks one of your resource, it won't be displayed at all on his website.
You can also tweak the way the protection work. You do this by passing an instance
of HotlinkingManager.
The HotlinkingManager lets you change:
-
boolean mustHotlinkingProtect(...)
To determine if the resource needs to be protected or not. By default, the protection will be triggered
if at least one of those is true:
-
HotlinkingStategy getHotlinkingStategy(...)
The strategy to use to protect the resource. This can be:
-
FORBIDDEN: a 403 HTTP status would be returned.
-
REDIRECT: the current request will be redirected to the URL generated by
#getRedirectUrl(...).
-
String getRedirectUrl(...)
The URL to redirect to, when the strategy is
REDIRECT.
For example, you can redirect the request to an URL where a
watermarked version
of the resource would be served.
Here's an example of a custom HotlinkingManager, redirecting
a single image to its watermarked version:
HotlinkingManager manager = new HotlinkingManagerDefault(getSpincastConfig()) {

    @Override
    public HotlinkingStategy getHotlinkingStategy(Object serverExchange,
                                                  URI resourceURI,
                                                  StaticResource<?> resource) {
        return HotlinkingStategy.REDIRECT;
    }

    @Override
    public String getRedirectUrl(Object serverExchange,
                                 URI resourceURI,
                                 StaticResource<?> resource) {
        return "/public/images/cat-watermarked.jpg";
    }
};

getRouter().file("/public/images/cat.jpg")
           .classpath("/images/cat.jpg")
           .hotlinkingProtected(manager)
           .handle();
In summary, you decide if you want the hotlinked resource to be totally unavailable if it is embedded
on a foreign website, or if you want to serve a different version for it. You can combine the hotlinking
protection with the Spincast Watermarker plugin when
dealing with images: it allows you to serve the hotlinked images with a piece of additional information
added to them (in general your logo or your website URL).
Dynamic Resources
A variation on Static Resources is what we call Dynamic Resources. When you
declare a Static Resource, you can provide a "generator". The generator is a
standard Route Handler that is going to receive
the request if a requested Static Resource is not found. The job of this generator is to
generate the missing Static Resource and to return it as the response. Spincast will then automatically
intercept the body of this response, save it, and next time this Static Resource is requested,
it is going to be served directly by the HTTP server, without reaching the framework anymore!
Here's an example of a Dynamic Resource definition :
router.dir("/images/tags/${tagId}").pathAbsolute("/generated_tags")
      .handle(new DefaultHandler() {

          @Override
          public void handle(DefaultRequestContext context) {

              String tagId = context.request().getPathParam("tagId");
              byte[] tagBytes = generateTagImage(tagId);

              context.response().sendBytes(tagBytes, "image/png");
          }
      });
Or, for a single file :
router.file("/css/generated.css")
      .pathAbsolute("/user/www/myprojet/public_files/css/generated.css")
      .handle(new DefaultHandler() {

          @Override
          public void handle(DefaultRequestContext context) {

              String css = generateCssFile(context.request().getRequestPath());
              context.response().sendCharacters(css, "text/css");
          }
      });
Dynamic Resources definitions must be define using .pathAbsolute(...) or
.pathRelative(...), and not .classpath(...) since the
resource will be written to disk once generated. For the same reason, Spincast must have
write permissions on the target directory!
By default, if the request for a Dynamic Resource contains a
queryString, the resource is always generated, no cached version is used!
This allows you to generate a Static Resource which is going to be cached, but also to
get a variation on this resource if required, by passing some parameters.
Using the previous example, "/css/generated.css" requests would always return the
same generated resource (only reaching the framework the first time),
but a "/css/generated.css?test=123" request
would not use any cached version and would always reach your generator.
If you don't want a queryString to make a difference, if you always
want the first generated resource to be cached and served, you can set the
"ignoreQueryString" parameter to true :
router.file("/css/generated.css")
      .pathAbsolute("/user/www/myprojet/public_files/css/generated.css")
      .handle(new DefaultHandler() {

          @Override
          public void handle(DefaultRequestContext context) {

              String css = generateCssFile(context.request().getRequestPath());
              context.response().sendCharacters(css, "text/css");
          }
      }, true);
Doing so,
"/css/generated.css" and
"/css/generated.css?test=123"
would both always return the same cached resource.
The Route of a Dynamic Resource can contain
dynamic parameters, but there are some rules :
-
The Route of a
file(...) based Dynamic Resource can contain
dynamic parameters but no splat parameter.
For example :
router.file("/test/${fileName}").pathAbsolute("/usr/someDir/${fileName}").handle(generator);
-
The Route of a
dir(...) based Dynamic Resource can only contain a splat parameter, at its end.
For example :
router.dir("/generated/*{splat}").pathRelative("/someDir").handle(generator);
-
The target path of a
file(...) based Dynamic Resource can use the dynamic parameters
from the URL. For example this is valid :
router.file("/test/${fileName}").pathAbsolute("/usr/someDir/${fileName}").handle(generator);
-
But the target path of a
dir(...) based Dynamic Resource can not use
the splat parameter
from the URL :
// This is NOT valid!
router.dir("/generated/*{splat}").pathAbsolute("/someDir/*{splat}").handle(generator);
Finally, note that when a dynamic resource is generated (in other words when its
generator is called), the filters will be applied,
as with any reguar route!
If you don't want a specific filter to be applied when a dynamic resource is
generated, you can use .skipResourcesRequests()
on the route of that filter.
CORS
CORS, Cross-Origin Resource Sharing, allows you to
specify some resources in your application that can be accessed by a browser from another domain. For example,
let's say your Spincast application runs on domain http://www.example1.com, and you want to allow another
site, http://www.example2.com, to access some of your APIs, or some of your files. By default,
browsers don't allow such cross domains requests. You have to enable CORS
for them to work.
There is a provided Filter to enable CORS on regular Routes. Since Filters
are not applied to Static Resources, there is also a special configuration to add
CORS to those :
// Enable CORS for every Routes of the application,
// except for Static Resources.
getRouter().cors();

// Enable CORS for all Routes matching the specified path,
// except for Static Resources.
getRouter().cors("/api/*{path}");

// Enable CORS on a Static Resource directory.
getRouter().dir("/public").classpath("/public_files")
           .cors().handle();

// Enable CORS on a Static Resource file.
getRouter().file("/public/test.txt").classpath("/public_files/test.txt")
           .cors().handle();
Here are the available options when configuring CORS on a Route :
// The default :
// - Allows any origins (domains)
// - Allows cookies
// - Allows any HTTP methods (except for Static Resources,
//   which allow GET, HEAD and OPTIONS only)
// - Allows any headers to be sent by the browser
// - A Max-Age of 24h is specified for caching purposes
//
// But :
// - Only basic headers are allowed to be read from the browser.
.cors()

// Like the default, but also allows some extra headers
// to be read from the browser.
.cors(Sets.newHashSet("*"),
      Sets.newHashSet("extra-header-1", "extra-header-2"))

// Only allows the domains "http://example2.com" and "https://example3.com" to access
// your APIs.
.cors(Sets.newHashSet("http://example2.com", "https://example3.com"))

// Like the default, but only allows the specified extra headers
// to be sent by the browser.
.cors(Sets.newHashSet("*"),
      null,
      Sets.newHashSet("extra-header-1", "extra-header-2"))

// Like the default, but doesn't allow cookies.
.cors(Sets.newHashSet("*"),
      null,
      Sets.newHashSet("*"),
      false)

// Like the default, but only allows the extra "PUT" method
// in addition to GET, POST, HEAD and OPTIONS
// (which are always allowed). Not applicable to
// Static Resources.
.cors(Sets.newHashSet("*"),
      null,
      Sets.newHashSet("*"),
      true,
      Sets.newHashSet(HttpMethod.PUT))

// Like the default, but specifies a Max-Age of 60 seconds
// instead of 24 hours.
.cors(Sets.newHashSet("*"),
      null,
      Sets.newHashSet("*"),
      true,
      Sets.newHashSet(HttpMethod.values()),
      60)
HTTP Authentication
If you need a section of your application to be protected so only privileged users
can access it, one of the options is to use
HTTP Authentication. With HTTP Authentication, the Server itself
manages the authentication, so no request will ever reach the
framework or a protected resource unless the correct username/password is given.
Here's a  Protected page example. To access it, you have
to provide the correct username/password combination:
Protected page example. To access it, you have
to provide the correct username/password combination: Stromgol/Laroche.
You enable HTTP Authentication in two steps :
-
You use the
httpAuth(...) method on the Router
object to indicate which sections of the application to protect. This method requires
the base URL of the section to protect and a name for the realm
(a synonym for "a protected section") :
// Protects the "/admin" section of the website and associates
// a realm name
router.httpAuth("/admin", "Protected Admin Section");
Note that the name of the realm will be
displayed to the user when the server asks for the username/password!
-
You add a set of acceptable username/passwords combinaisons for that
realm, using the
addHttpAuthentication(...) on the
Server object :
// Adds a username/password combinaison to the
// "Protected Admin Section" realm
getServer().addHttpAuthentication("Protected Admin Section", "Stromgol", "Laroche")
If you fail to add any username/password combinaisons,
no one will be able to see the protected section!
You can have a look at the Javadoc of the
server
to see more methods related to HTTP Authentication.
Finally, note that HTTP Authentication is a quick and easy way to protect a section
of your application but, if you need more flexibility, a form based authentication is often
preferred.
Redirection rules
Using the Router, you can specify that a Route must automatically be redirected
to another one. This is
useful, for example, when you change the URL of a resource but don't want the
existing links to break.
To add a redirection rule, simply use the redirect(...) method on the Router:
router.redirect("/the-original-route").to("/the-new-route");
Here are the available options when creating such redirection rule:
-
redirect(originalRoute): starts the creation of the direction rule
by specifying the original Route's path.
-
temporarily(): specifies that the redirection must be temporary (302).
-
permanently(): specifies that the redirection must be permanent (301). This
is the default and it is not required to specify it.
-
to(newRoute): saves the redirection rule by specifying the new Route's path.
Note that if the path of the original Route contains dynamic parameters
(splat parameters included), you can use those in the definition of the new Route!
For example, this redirection rule will redirect
"/books/42" to "/catalog/item/42" :
router.redirect("/books/${bookId}").to("/catalog/item/${bookId}");
Those dynamic parameters can be used anywhere in the new Route definition, not
just as "full" tokens. For example, this redirection rule will redirect
"/types/books/42" to "/catalog-books/42":
router.redirect("/types/${typeId}/${itemId}").to("/catalog-${typeId}/${itemId}");
If you need more control over the URL to redirect to, you can also
specify a RedirectHandler
in order to dynamically generate it:
router.redirect("/test").to(context, originalPath) -> originalPath + "/en";
Finally, note that a redirection rule is implemented as a "before" Filter and
must, in general, be the very first one to run! Its position is configurable using
SpincastRouterConfig and
its default value is "-1000".
When this Filter runs, any other Filters or Route Handlers are skipped,
and the redirection header is sent to the client immediately.
Special exceptions
You can throw any exception and it is going to trigger a new "Exception" routing process.
But some exceptions provided by Spincast have a special behavior :
-
RedirectException : This exception
will stop the current routing process (as any exception does),
will send a redirection header to the user, and will end the exchange. Learn
more about that in the Redirecting section.
Here's an example :
public void myHandler(AppRequestContext context) {

    // Redirects to "/new-url"
    throw new RedirectException("/new-url", true);

    // You can also provide a Flash message :
    throw new RedirectException("/new-url", true, myFlashMessage);
}
-
ForwardRouteException :
This exception allows
you to change the Route, to forward the request
to another Route without any client side redirection. Doing so, a new
routing process is started, but this time using the
newly specified URL.
Learn more about this in the Forwarding section.
Here's an example :
public void myHandler(AppRequestContext context) {

    throw new ForwardRouteException("/new-url");
}
-
SkipRemainingHandlersException :
This exception stops
the current
routing process, but without starting any new one. In other words, the
remaining Filters/Route Handlers won't be run, and the response will be
sent as is, without any more modification. Learn more about this in the
SkipRemainingHandlersException section.
Here's an example :
public void myHandler(AppRequestContext context) {

    context.response().sendPlainText("I'm the last thing sent!");
    throw new SkipRemainingHandlersException();
}
-
CustomStatusCodeException :
This exception allows you to set an
HTTP status to return. Then, your custom
Exception Route Handler can check this code and display something
accordingly. Also, in case you use the provided Exception Route Handler,
you still at least have control over the HTTP status sent to the user.
Here's an example :
public void myHandler(AppRequestContext context) {

    throw new CustomStatusCodeException("Forbidden!", HttpStatus.SC_FORBIDDEN);
}
-
PublicException :
This exception allows you to
specify a message that will be displayed to the user. This is
mainly useful if you use the provided Exception Route Handler because
in a custom handler you would have full control over what you send
as a response anyway... Here's an example :
public void myHandler(AppRequestContext context) {

    throw new PublicException("You don't have the right to access this page",
                              HttpStatus.SC_FORBIDDEN);
}
The Router is dynamic
Note that the Spincast Router is dynamic, which means you can always add new Routes to it. This
also means you don't have to define all your Routes at the same place, you can let the
controllers (or even the plugins) define their own Routes!
For example:
public class UserControllerDefault implements UserController {

    @Inject
    protected void init(DefaultRouter router) {
        addRoutes(router);
    }

    protected void addRoutes(DefaultRouter router) {
        router.GET("/users/${userId}").handle(this::getUser);
        router.POST("/users").handle(this::addUser);
        router.DELETE("/users/${userId}").handle(this::deleteUser);
    }

    @Override
    public void getUser(DefaultRequestContext context) {
        //...
    }

    @Override
    public void addUser(DefaultRequestContext context) {
        //...
    }

    @Override
    public void deleteUser(DefaultRequestContext context) {
        //...
    }
}
Explanation :
-
3-6 : The Router is injected in an
init() method.
-
8-12 : The controller adds its own Routes. Here, the
UserController is responsible to add Routes related to users.
Templating Engine
The Templating Engine (also called view engine, or template engine), is the component that you
use to generate dynamic text content. It can be used for multiple purposes but its
most frequent use is to generate HTML pages.
The default Templating Engine included with Spincast by default is Pebble.
Using the Templating Engine
To evaluate a template, you can inject the TemplatingEngine
component anywhere you need it. But the preferred way to generate HTML pages is to use the
sendTemplateXXX(...) methods on the response() add-on :
public void myRouteHandler(AppRequestContext context) {

    JsonObject model = context.response().getModel();

    // ... adds variables to the model

    // Renders the response model using a template
    // and sends the result as HTML
    context.response().sendTemplateHtml("/templates/myTemplate.html");
}
You can also evaluate a template without sending it as the response. The
templating() add-on give you direct access to the Templating Engine.
Here's an example where you manually evaluate a template to generate the content
of an email :
public void myRouteHandler(AppRequestContext context) {

    User user = getUser();

    JsonObject params = context.json().create();
    params.set("user", user);

    String emailBody = context.templating().fromTemplate("/templates/email.html", params);

    // ... do something with the content
}
Note that, by default, the path to a template is a classpath path. To
load a template from the file system instead, use false as the
"isClasspathPath" parameter :
public void myRouteHandler(AppRequestContext context) {

    User user = getUser();

    JsonObject params = context.json().create();
    params.set("user", user);

    String emailBody = context.templating().fromTemplate("/templates/email.html",
                                                         false, // From the file system!
                                                         params);

    // ... do something with the content
}
Finally you can evaluate an inline template :
public void myRouteHandler(AppRequestContext context) {

    // We can use a standard Map<String, Object> instead
    // of a JsonObject for the parameters
    Map<String, Object> params = new HashMap<String, Object>();
    params.set("name", "Stromgol");

    // This will be evaluated to "Hi Stromgol!"
    String result = context.templating().evaluate("Hi {{name}}!", params);

    // ... do something with the result
}
Templates basics (using Pebble)
The syntax to use for your templates depends on the Templating Engine implementation.
Here, we'll show some examples using the default Templating Engine, Pebble.
Make sure you read the Pebble documentation
if you want to learn more...
Using the response model
If you are using the default way to render an HTML page, suing the
response().sendTemplateHtml(...) method, you can use the
response model as a container for the
parameters your template needs. The response model becomes the root of all
available variables when your template is rendered. For example, your
Route Handler may look like :
public void myRouteHandler(AppRequestContext context) {

    // Gets the response model
    JsonObject model = context.response().getModel();

    // Creates a "user" on adds it to the
    // response model
    JsonObject user = context.json().create();
    user.set("name", "Stromgol");
    model.set("user", user);

    // Renders a template and sends it as HTML
    context.response().sendTemplateHtml("/templates/myTemplate.html");
}
The template, located on the classpath (at
"src/main/resources/templates/myTemplate.html"
in a Maven project) may look like this :
<!doctype html>
<html>
    <head>
        <meta charset="UTF-8">
        <title>My application</title>
    </head>
    <body>
        <h1>Hello {{user.name}}!</h1>
    </body>
</html>
Using JsonPaths
When accessing the variables in a template, you can use JsonPaths.
Here are some examples :
-
{{user.name}} : The "name" attribute on the user object.
-
{{user.books[2].title}} : The "title" attribute of the third book of the user object.
-
{{user['some key']}} or {{user["some key"]}} : The "some key" attribute
of the user object. Here brackets are required because of the space in the key.
Default templating variables
Spincast automatically provides some variables that can be used
when rendering a template. Those variables will always be available
to any template rendering (except if you are not in the scope of an HTTP request).
Spincast adds those variables using a "before" Filter :
addDefaultGlobalTemplateVariables(...)
The provided variables are :
-
"spincast.pathParams" : The parameters parsed from the path of the request. To be used
like
{{pathParams.myParam}}.
-
"spincast.qsParams" : The parameters parsed from the queryString of the request. Note that
a single queryString variable may contain more than one values. To access the first value, use something like :
{{qsParams.myParam[0]}}.
-
"spincast.cookies" : The current
Cookies. To be used
like
{{cookies.myCookie.value}}.
-
"spincast.requestScopedVars" : The request scoped variables added by the
various Route Handlers. To be used
like
{{requestScopedVars.myVar}}.
-
"spincast.langAbrv" : The abreviation of the current Locale to use. For example :
"en".
-
"spincast.cacheBuster" : The current cache buster code.
-
"spincast.routeId" : The id of the current route (of its main Route Handler).
-
"spincast.fullUrl" : The full URL of the current request.
-
"spincast.isHttps" : Is the current URL secure (HTTPS)?
-
"spincast.alerts" : The Alert messages, if any. Those
also include Flash messages (Spincast automatically converts Flash messages
to Alert messages). They also contain Alert messages that you may have
explictly added using the
addAlert(...) method of the response()
add-on. For example :
public void myRouteHandler(AppRequestContext context) {

    context.response().addAlert(AlertLevel.ERROR, "Some message");
}
Layout
If you are building a traditional website and use templates to render HTML,
make sure you read the
"Template Inheritance",
"extends" and
"include" sections
of the Pebble documentation to learn how to create a layout for your website! This is an important foundation for
a scalable website structure.
You can browse this
Spincast website sources
themselves to see how we use such layout using some {% block %}.
The layout.html
file is the root of our layout.
Provided functions and filters
Spincast provides some
functions
and
filters
for Pebble out of the box. They are defined in the
SpincastMainPebbleExtensionDefault class.
Functions
-
get(String pathExpression)
This function receives the path to an element as a string, evaluates it, and
returns the element if it exists or null otherwise.
In other words, it allows you to dynamically create the path to an element. For example :
{% set user = get("myForm.users[" + generateRandomPosition() + "]") %}
{% if user is not null %}
    <p>The name of the random user is {{user.name}}</p>
{% endif %}
-
msg(String messageKey, ...params)
This function displays a localized message taken from the
Dictionary.
Only the message key is required, but you can also pass some parameters to be
evaluated.
Example, without any parameters :
<h1>{{ msg('app.home.title') }}</h1>
With parameters :
<div>{{ msg('welcome.user', 'firstName', user.firstName, 'lastName', user.lastName) }}</div>
Note that each parameter's key must have an
associated value or an exception will be thrown (the number of parameters must be even).
Finally, if the first parameters is true, the evaluation of the message
will be forced, even if no parameters are provided. Indeed, to improve performance, by default a message
from the dictionary is only evaluated using the Templating Engine
if at least one parameter is provided.
Example of forcing the evaluation:
<h1>{{ msg('app.display.date', true) }}</h1>
-
jsOneLine(String code)
This function allows the output of javascript code inside quotes.
It removes newlines and properly escapes the quotes in the code.
let js="{{jsOneLine(code)}}";
You can pass true as a second parameter if single quotes needs to be
escaped instead of double quotes:
let js='{{jsOneLine(code, true)}}';
-
querystring(String querystring)
This function will add the specified querystring
to the existing one. In other words, the querystring of the current
request will be kept, but the specified one will be concatenated to it.
If a parameter name already exist in the current querystring, it is overwritten.
<a href="{{ querystring('?offset=' + newOffset) }}">link</a>
If the previous example was evaluated part of a
"https://example.com?limit=10" request,
the resulting content would be something like
"<a href="?limit=10&offset=10">link</a>"
Finally, note that if this function is called without being inside a
request context, the specified querystring will simply be used as is.
-
querystringToHiddenFields(String querystring)
This function takes all the parameters of the current querystring and converts
them to hidden fields (ie: <input type="hidden" name="xxx" value="yyy" />).
This mainly allows a GET form to keep current parameters when it is submitted.
For example:
<form class="resultsCtrlWrap" method="get">
    {{ querystringToHiddenFields() }}

    <input type="submit" value="Submit!" />
</form>
If this form was displayed on a /myPage?someKey=someValue url,"someKey=someValue" would
be on the url the form would be submitted to.
The function takes an optional parameter which is a list of parameters to ignore. For example:
{{ querystringToHiddenFields(['orderBy', 'filter']) }}
-
isRoute(String path, [boolean isRegEx, boolean allowSubPaths])
This function returns true if the specified path matches the
route of the current request.
For example:
<span class="menu {% if isRoute('/users') %}active{% endif %}"</span>
If the second parameter is "true", the specified path will
be considered as a regular expression:
<span class="menu {% if isRoute('/(user|users)', true) %}active{% endif %}"</span>
Finally, if the third parameter is "true", any subpath of the specified
path will also match! If the specified path is a regular expression,
then "(/?$|/.*)" will be concatenated to it. If the path is not
a regular expression, Spincast will use "startWith(path)" instead of
"equals(path)" to validate the current route:
// Will match "/users", "users/123", "users/123/books/456"
<span class="menu {% if isRoute('/users', false, true) %}active{% endif %}"</span>

// Will match "/user", "/user/123/books/456", "/users/", "/users/123/books/456"
<span class="menu {% if isRoute('/(user|users)', true, true) %}active{% endif %}"</span>
If this function is evaluated outside of a request context (for example from a scheduled task),
then false is returned.
-
isRouteId(String routeId)
This function returns true if the specified id is the
id of the current route.
For example:
<span class="menu {% if isRouteId('myUsersRouteId') %}active{% endif %}"</span>
If this function is evaluated outside of a request context (for example from a scheduled task),
then false is returned.
Filters
-
pathExpression | get()
This filter does the same as the get() function :
it receives the path to an element as a string, evaluates it, and
returns the element if it exists or null otherwise.
The difference with the get() function is that you can use undefined
elements with this filter and no exception is going to be thrown, even if
strictVariables
is on.
{% set user = "may.not.exist.users[" + generateRandomPosition() + "]" | get() %}
{% if user is not null %}
    <p>The name of the random user is {{user.name}}</p>
{% endif %}
-
someText | newline2br()
This filter will replace the newlines of the text with <br />\n. This is
useful when you want to display some text in an HTML template while
respecting the newlines.
{{ someText | newline2br }}
By default, the rest of the text will be properly escaped. For example, "<em>a\nb</em>" will
become "<em>a<br />\nb</em>".
To disable the escaping, pass false as a parameter:
{{ someText | newline2br(false) }}
This would result in "<em>a<br />\nb</em>".
-
someVar | boolean()
This filter converts a "true" or "false" string to
a proper boolean. This allows the string variable to be used in if
statements.
// Let's say val is "true" (a string) here...

{% if val | boolean %}ok{% endif %}
The main use case for this filter is when a form is submitted and contains a boolean
field which is transformed to a string value. When redisplaying the form, you
may need to interpret the value of the field as a true boolean to perform logic.
If the variable is already a boolean, it will also work fine.
-
someElements | checked(String[] matchingValues)
This filter outputs the string "checked" if at least
one element from someElements matches one of the element from
the matchingValues. Both sides can either be a single element or
an array of elements. For example :
<label for="drinkTea">
    <input type="radio"
           id="drinkTea"
           name="user.favDrink"
           {{user.favDrink | checked("tea")}}
           value="tea"/> Tea</label>
Note that the elements are compared using
equivalence,
not using equality. So the String "true"
matches the true boolean and "123.00" matches 123, for example.
-
someElements | selected(String[] matchingValues)
This filter outputs the string "selected" if at least
one element from someElements matches one of the element from
the matchingValues. Both sides can either be a single element or
an array of elements. For example :
<select name="user.favDrink" class="form-control">
    <option value="tea" {{user.favDrink | selected("tea")}}>Tea</option>
    <option value="coffee" {{user.favDrink | selected("coffee")}}>Coffee</option>
    <option value="beer" {{user.favDrink | selected("beer")}}>WBeer</option>
</select>
Note that the elements elements are compared using
equivalence,
not using equality. So the String "true"
matches the true boolean and "123.00" matches 123, for example.
The remaining filters are all about validation. Make sure you read
the dedicated Validation Filters section to learn more
about them and to see some examples!
-
ValidationMessages | validationMessages()
This filter uses a template fragment to output the
Validation Messages associated with a field.
-
ValidationMessages | validationGroupMessages()
This filter is similar to validationMessages() but uses a different
template. It is made to output the Validation Messages of a group of fields,
instead of a single field.
-
ValidationMessages | validationClass()
The validationClass(...) filter checks if there are
Validation Messages and, if so, it outputs a class name.
-
ValidationMessages | validationFresh()
ValidationMessages | validationSubmitted()
Those two filters are used to determine if a form is displayed for the first time,
or if it has been submitted and is currently redisplayed with
potential Validation Messages.
-
ValidationMessages | validationHasErrors()
ValidationMessages | validationHasWarnings()
ValidationMessages | validationHasSuccesses()
ValidationMessages | validationIsValid()
Those four filters check if there are Validation Messages of a
certain level and return true or false.
JsonObjects
JsonObject (and JsonArray)
are components provided by Spincast to mimic real Json objects.
You can think of JsonObjects as Map<String, Object> on steroids!
JsonObjects provide methods to get elements from them in a typed manner
They also support JsonPaths, which is an easy
way to navigate to a particular element in the JsonObject.
JsonObjects are also very easy to
validate.
Here's a quick example of using a JsonObject :
// Creates a new JsonObject
JsonObject jsonObj = getJsonManager().create();

// Adds an element
jsonObj.set("myElement", "42");

// Gets the element as a String
String asString = jsonObj.getString("myElement");

// Gets the same element as an Integer
Integer asInteger = jsonObj.getInteger("myElement");
JsonObject supports those types, natively :
-
String
-
Integer
-
Long
-
Float
-
Double
-
BigDecimal
-
Boolean
-
byte[] (serialized as a base 64 encoded String)
-
Date
-
Instant
-
Other
JsonObjects and JsonArrays
Getters are provided for all of those native types :
-
String getString(String key)
-
Integer getInteger(String key)
-
JsonObject getJsonObject(String key)
-
...
Every Getter has an overloaded version that you can use to provide a default value in case
the requested element if not found (by default, null is returned if the element is not found).
Let's see an example :
// Creates an empty JsonObject
JsonObject jsonObj = getJsonManager().create();

// Tries to get an inexistent element...
// "myElement" will be NULL
String myElement = jsonObj.getString("nope");

// Tries to get an inexistent element, but also specifies a default value...
// "myElement" will be "myDefaultValue"!
String myElement = jsonObj.getString("nope", "myDefaultValue");
When you add an object of a type that is not managed natively, the object
is automatically converted
to a JsonObject (or to a JsonArray,
if the source is an array or a Collection). Spincast does this
by using the
SpincastJsonManager#convertToNativeType(...)
method, which is based on Jackson by default.
For example :
// Gets a typed user
User user = getUser(123);

// Adds this user to a JsonObject
JsonObject jsonObj = getJsonManager().create();
jsonObj.set("myUser", user);

// Gets back the user... It is now a JsonObject!
JsonObject userAsJsonObj = jsonObj.getJsonObject("myUser");
Note that you can have control over how an object is converted to a JsonObject by implementing
the ToJsonObjectConvertible
interface. This interface contains a convertToJsonObject() method that you implement to
convert your object to a JsonObject the way you want. There is a similar
ToJsonArrayConvertible
interface to control how an object is converted to a JsonArray.
Creating a JsonObject
You can create an JsonObject (or an JsonArray) by using the JsonManager
component. This JsonManager can be injected where you want, or it can be accessed through the
json() add-on, when you are inside a Route Handler :
public void myHandler(AppRequestContext context) {

    // JsonObject creation
    JsonObject obj = context.json().create();
    obj.set("name", "Stromgol");
    obj.set("lastName", "Laroche");

    // JsonArray creation
    JsonArray array = context.json().createArray();
    array.add(111);
    array.add(222);

    // Or, using the JsonManager directly (if
    // injected in the current class) :
    JsonObject obj2 = getJsonManager().create();

    //...
}
Cloning and Immutability
By default, any JsonObject (or JsonArray) added to another JsonObject
is added as is, without
being cloned. This means that any external modification to the added element
will affect the element inside the JsonObject, and vice-versa, since they
both refere to the same instance. This allows you to do something like :
JsonArray colors = getJsonManager().createArray();
JsonObject obj = getJsonManager().create();

// Adds the array to the obj
obj.set("colors", colors);

// Only then do we add elements to the array
colors.add("red");
colors.add("blue");

// This returns "red" : the array inside the JsonObject
// is the same instance as the external one.
String firstColor = obj.getArrayFirstString("colors");
Sometimes this behavior is not wanted, though. You may need the external object and the added object
to be two distinct instances so modifications to one don't affect the other!
In those cases, you can call the "clone()" method on the original
JsonObject object, or you can use "true"
as the "clone" parameter when calling set(...)/add(...) methods.
Both methods result in the original object being cloned. Let's see an example :
JsonArray colors = getJsonManager().createArray();
JsonObject obj = getJsonManager().create();

// Add a *clone* of the array to the object
obj.set("colors", colors, true);

// Or :
obj.set("colors", colors.clone());

// Then we add elements to the original array
colors.add("red");
colors.add("blue");

// This will now return NULL since a *new* instance of the
// array has been added to the JsonObject!
String firstColor = obj.getArrayFirstString("colors");
Note that when you clone a JsonObject, a deep copy of the original object is made,
which means the root object and all the children are cloned. The resulting JsonObject is guaranteed to
share no element at all with the original object.
We also decided to make JsonObject and JsonArray objects
mutable by default. This is a
conscious decision to make those objects easy to work with : you can add and remove elements from them at any time.
But if you need more safety, if you work in a complex multi-threaded environment for example, you can
get an immutable version
of a JsonObject object by calling its .clone(false) method, using
false as the "mutable" parameter :
JsonObject obj = getJsonManager().create();
obj.set("name", "Stromgol");

// "false" => make the clone not mutable!
JsonObject immutableClone = obj.clone(false);

// This will throw an exception!
immutableClone.set("nope", "doesn't work");
When you create an immutable clones, the root element and all the children are cloned as immutable.
In fact, JsonObject objects are always fully mutable or fully
immutable! Because of this, if you try to add an immutable JsonObject to a mutable one,
a mutable clone will be created from the immutable object before being added. Same thing
if you try to add an mutable JsonObject to an immutable one :
an immutable clone will be created from the mutable object before being added.
At runtime, you can validate if a JsonObject is mutable or not using :
if(myJsonObj.isMutable()).
JsonObject methods
Have a look at the JsonObject Javadoc
for a complete list of available methods. Here we're simply going to introduce some interesting ones,
other than set(...), getXXX(...) and clone(...) we already saw :
-
int size()
The number of properties on the object.
-
boolean contains(String jsonPath)
Does the
JsonObject contain an element at the specified
JsonPath?
-
JsonObject merge(JsonObject jsonObj, boolean clone)
JsonObject merge(Map<String, Object> map, boolean clone)
Merges a external JsonObject or a plain Map<String, Object>
into the JsonObject.
You can specify if the added elements must be cloned or
not (in case some are JsonObject or JsonArray).
-
JsonObject remove(String jsonPath)
Removes an element using its jsonPath.
-
JsonObject getJsonObjectOrEmpty(String jsonPath)
JsonArray getJsonArrayOrEmpty(String jsonPath)
Returns the
JsonObject or
JsonArray at the specified
JsonPath or returns
an empty instance if it's not found.
This allows you to try to get a deep element without any potential
NullPointerException. For
example :
// This won't throw any NPE, even if the "myArrayKey"
// array or its first element don't exist
String value = obj.getJsonArrayOrEmpty("myArrayKey")
                  .getJsonObjectOrEmpty(0)
                  .getString("someKey", "defaultValue");
-
[TYPE] getArrayFirst[TYPE](String jsonPath, String defaultValue)
For all types native to
JsonObject, a
getArrayFirst[TYPE](...)
method exists. With those methods, you can get the first element of a
JsonArray
located at the specified
JsonPath. This is useful in situations where you
know the array only contains a single element :
// This :
String value = obj.getArrayFirstString("myArrayKey", "defaultValue")

// ... is the same as :
String value = obj.getJsonArrayOrEmpty("myArrayKey").getString(0, "defaultValue")
-
void transform(String jsonPath, ElementTransformer transformer)
Applies an
ElementTransformer
to the element located at the specify
JsonPath. This is used to modify an element without
having to extract it first. For example, the provided
JsonObject#trim(String jsonPath)
method exactly does this : it internally calls
transform(...) and pass it
an
ElementTransformer which trims the target element.
-
String toJsonString(boolean pretty)
Converts the JsonObject object to a Json string.
If pretty is true, the resulting Json will be formatted.
-
Map<String, Object> convertToPlainMap()
If you need to use the elements of a JsonObject in some code that doesn't
know how to handle JsonObjects, you can convert it to a plain Map<String, Object>.
Spincast does this, for example, to pass the elements of the
response model to the Template Engine
when it's time to evaluate a template and send an HTML page.
Pebble, the default templating Engine, knows nothing about
JsonObjects but can easily deal with a plain Map<String, Object>.
Note that all JsonObject children will be converted to
Map<String, Object> too, and all JsonArray children to
List<Object>.
JsonArray extra methods
Have a look at the JsonArray Javadoc
for a complete list of available methods. Here are some interesting ones, other than the
ones also available on JsonObjects :
-
List<Object> convertToPlainList()
Converts the JsonArray to a plain List<Object>.
All JsonObject children will be converted to
Map<String, Object>, and all JsonArray children to
List<Object>.
-
List<String> convertToStringList()
Converts the JsonArray to a List<String>.
To achieve this, the toString() method will be called on any non null
element of the array.
JsonPaths
In Spincast, a JsonPath is a simple way of expressing the location
of an element inside a JsonObject (or a JsonArray).
For example :
String title = myJsonObj.getString("user.books[3].title");
In this example,
"user.books[3].title" is
a
JsonPath targetting the title of the fourth
book from a user element of the
myJsonObj
object.
Without using a JsonPath, you would need to write something like
that to retrieve the same title :
JsonObject user = myJsonObj.getJsonObjectOrEmpty("user");
JsonArray books = user.getJsonArrayOrEmpty("books");
JsonObject book = books.getJsonObjectOrEmpty(3);
String title = book.getString("title");
As you can see, a
JSonPath allows you to easily navigate a
JsonObject
without having to extract any intermediate elements.
Here is the syntax supported by JsonPaths :
-
To access a child you use a
".".
For example : "user.car".
-
To access the element of a
JsonArray
you use "[X]", where X is the position of the element in
the array (the first index is 0).
For example : "books[3]".
-
If a key contains spaces, or a reserved character
(
".", "[" or "]"), you need to surround it
with brackets. For example : "user['a key with spaces']".
-
That's it!
You can also use JsonPaths to
insert elements at specific positions! For example :
// Creates a book object
JsonObject book = getJsonManager().create();
book.set("title", "The Hitchhiker's Guide to the Galaxy");

// Creates a "myJsonObj" object and adds the book to it
JsonObject myJsonObj = getJsonManager().create();
myJsonObj.set("user.books[2]", book);
The myJsonObj object is now :
{
    "user" : {
        "books" : [
            null,
            null,
            {
                "title" : "The Hitchhiker's Guide to the Galaxy"
            }
        ]
    }
}
Notice that, in that example, the user object
didn't exist when we inserted the book! When you add
an element using a JsonPath, all the
parents are automatically created, if required.
If you really need to insert an element
in a JsonObject using a key containing some of the JsonPaths
special characters (which are ".", "[" and "]"),
and without that key being parsed as a JsonPath, you can do so by
using the setNoKeyParsing(...) method. For example :
// Creates a book object
JsonObject book = getJsonManager().create();
book.set("title", "The Hitchhiker's Guide to the Galaxy");

// Creates a "myJsonObj" object and adds the book to it
// using an unparsed key!
JsonObject myJsonObj = getJsonManager().create();
myJsonObj.setNoKeyParsing("user.books[2]", book);
The myJsonObj object is now :
{
    "user.books[2]" : {
        "title" : "The Hitchhiker's Guide to the Galaxy"
    }
}
As you can see, the "user.books[2]" key has been taken
as is, without being parsed as a JsonPath.
Forms
This section is about HTML Forms, as used on traditional websites.
If you use a SPA client-side, you in general don't use such
POSTed forms, you rather use javascript to send and receive Json objects.
Both approaches are supported out of the box by Spincast but this specific section is about
traditional HTML forms and their validation!
We're going to learn :
-
How to populate a form and bind its fields to an underlying
Form object.
-
How to validate a form that has been submitted.
-
How to redisplay a validated form with resulting
validation messages.
A form always has a backing model to represent its data. This form
model is sometimes called "form backing object", "form backing bean"
or "command object". It's the object used to transfer the values
of a form from the server to the client (to populate the form's fields) and vice versa.
On the server-side, this form model is represented using the
Form class.
A Form object is simply a JsonObject
with extra validation features! You can manipulate a Form
object exactly as a JsonObject and even cast it as one.
The validation pattern
The validation pattern shows how you create a form to
be displayed, validate the form when it is submitted, and
redisplay it again, with validation messages, if it is invalid...
First, let's start with the GET handler, which is the one called to display a form
for the first time :
// GET handler
public void myHandlerGet(AppRequestContext context) {

    Form form = context.request().getForm("userForm");
    if (form == null) {
        form = context.request().getFormOrCreate("userForm");
        context.response().addForm(form);

        User user = getUser(...);
        form.set("name", user.getName());
    }

    context.response().sendTemplateHtml("/templates/userEdit.html");
}
Explanation :
-
5 : We check if the form already exist
in the response model. This may be the case if this
GET
handler is called from an associated POST handler, because some validation
failed.
-
7 : If the form doesn't exist yet, we create
an new one.
-
8 : We add the form to the response model, so it
is available to the templating engine.
-
10-11 : We populate the form with the initial values,
if required.
-
14 : We send the response by evaluating a template which will
display the form.
When the form is submitted, we retrieve its data inside a POST handler:
// POST handler
public void myHandlerPost(AppRequestContext context) {

    Form form = context.request().getFormOrCreate("userForm");
    context.response().addForm(form);

    validateForm(form);

    if (!form.isValid()) {
        myHandlerGet(context);
        return;
    } else {

        processForm(form);

        context.response().redirect("/success",
                                    FlashMessageLevel.SUCCESS,
                                    "The user has been processed!");
    }
}
Explanation :
-
5 : We retrieve the posted form from the request.
-
6 : We immediately add the form to the response model.
This will make the form available to the templating engine but will also provide a
"validation" element containing any validation messages to display.
-
8 : We validate the form and
add error, warning or success validation messages to it.
-
10 : Once the validation is done, we check if the form is valid.
-
11-12 : if the form contains errors, we simply call the
GET
handler so the form is displayed again, with the validation messages we added to it.
-
15 : if the form is valid, we process it. This may involve calling
services, editing entities, etc.
-
17-19 : we redirect the page with a Flash message
to indicate that the form was processed successfully!
The important part to understand is how the GET handler first checks in the response model
to see if the form already exists in it... Indeed, this handler may be called by the POST handler if
a posted form is invalid... When it's the case, you do not want to populate the form with some default/initial
values, you want to keep the submitted values!
Displaying the Form
By using a dynamic JsonObject/Form object as the form model, a benefit is
that you don't have to create in advance all the elements required
to match the fields of the HTML form. Simply by using a valid
JsonPath as the "name" attribute of a
field, the element will automatically be created on the form model.
As an example, let's again use a form dedicated to editing a user. This form will
display two fields : one for a username and one for an email. Our initial form
model doesn't have to specify those two elements when it is first created :
// GET handler
public void myHandlerGet(AppRequestContext context) {

    Form userForm = context.request().getForm("userForm");
    if (userForm == null) {

        // Empty form!
        // No username and no email elements are specified.
        userForm = context.request().getFormOrCreate("userForm");

        context.response().getModel().set("userForm", userForm);
    }

    context.response().sendTemplateHtml("/templates/userEdit.html");
}
Here's what the HTML for that form may look like (we are using the syntax for
the default Templating Engine, Pebble):
<form method="post">
    <div class="form-group">
        <input type="text"
               class="form-control"
               name="userForm.username"
               value="{{userForm.username | default('')}}" />
    </div>
    <div class="form-group">
        <input type="text"
               class="form-control"
               name="userForm.email"
               value="{{userForm.email | default('')}}" />
    </div>
    <input type="submit" />
</form>
Notice that even if the form model doesn't contain any
"username" or
"email" elements, we still bind them to the HTML elements using their
JsonPaths [
6] and here [
12].
This is possible in part because we use the
default('')
filter : this filter tells Pebble to use an empty string if the element doesn't exist.
The "name" attributes of the HTML elements are very important : they represent
the JsonPaths that Spincast is going to use to
dynamically create the Form object, when the page is submitted.
So let's say this form is submitted. You would then access the values of the fields like so,
in your POST handler:
// POST handler
public void myHandlerPost(AppRequestContext context) {

    Form userForm = context.request().getFormOrCreate("userForm");
    context.response().addForm(userForm);

    // The "username" and "email" elements have been
    // automatically created to represent the submitted
    // fields.
    String username = userForm.getString("username");
    String email = userForm.getString("email");

    //...
}
As you can see, Spincast uses the "name" attribute
of an HTML element as a JsonPath to dynamically create an
associated model element.
This gives you a lot of flexibility client-side
since you can dynamically generate new fields or even entire forms,
using javascript.
Text based fields
Text based fields, such as text, password,
email and textarea are
very easy to manipulate :
-
You use the
JsonPath you want for their associated model element as their
"name" attribute.
-
You use that same
JsonPath to target
the current value of the element on the model,
and you output it in the "value" attribute.
-
You use the
default('') filter to make sure not exception
is thrown if the model element doesn't exist yet.
Quick example :
<input type="text"
       name="userForm.email"
       value="{{userForm.email | default('')}}" />
Text based field groups
Sometimes we want multiple text fields to be grouped together. For example, let's say we
want various "tags" to be associated with an "articleForm" object. Each of those
"tags" will have its own dedicated field on the form, but we want all the "tags" to
be available as a single array when they are submitted. To achieve that :
-
We use the same
"name" attribute for every field, but we suffix this name with the
position of the tag inside the final array.
For example : "articleForm.tags[0]" or "articleForm.tags[1]"
-
We also use that same
"[X]" suffixed name to get and display the "value"
attributes.
What we are doing, again, is to use the JsonPath to target each element!
For example :
<form method="post">
    <input type="text" class="form-control" name="articleForm.tags[0]"
           value="{{articleForm.tags[0] | default('')}}" />

    <input type="text" class="form-control" name="articleForm.tags[1]"
           value="{{articleForm.tags[1] | default('')}}">

    <input type="text" class="form-control" name="articleForm.tags[2]"
           value="{{articleForm.tags[2] | default('')}}">
    <input type="submit" />
</form>
When this form is submitted, you have access to the three "tags" as
a single JsonArray :
public void manageArticle(AppRequestContext context) {

    Form form = context.request().getFormOrCreate("articleForm");
    context.response().addForm(form);

    // Get all the tags of the article, as an array
    JsonArray tags = form.getJsonArray("tags");

    // You could also access one of the tag directly, using
    // its full JsonPath
    String thirdTag = form.getString("tags[2]");

    //...
}
Select fields
The select fields come in two flavors : single value or multiple values. To use them :
-
You specify the
JsonPath of the associated element in the
"name" attribute of the select HTML element.
-
For every
option elements of the field you
use the selected(...) filter to check if the option
should be selected or not.
Here's an example for a single value select field :
<select name="userForm.favDrink" class="form-control">
    <option value="tea" {{userForm.favDrink | selected("tea")}}>Tea</option>
    <option value="coffee" {{userForm.favDrink | selected("coffee")}}>Coffee</option>
    <option value="beer" {{userForm.favDrink | selected("beer")}}>WBeer</option>
</select>
In this example, the values of the option elements are hardcoded, they were
known in advance : "tea", "coffee" and "beer". Here's a version where the option elements
are dynamically generated :
<select name="userForm.favDrink" class="form-control">
    {% for drink in allDrinks %}
        <option value="{{drink.id}}" {{userForm.favDrink | selected(drink.id)}}>{{drink.name}}</option>
    {% endfor %}
</select>
In this example, the selected(...) filter
compares the current favorite drink
of the user ("userForm.favDrink") to the value of every
option element and outputs the "selected"
attribute if there is a match.
To select a default option, you can specify null as one of its accepted values:
<select name="userForm.favDrink" class="form-control">
    <option value="tea" {{userForm.favDrink | selected("tea")}}>Tea</option>
    <option value="coffee" {{userForm.favDrink | selected([null, "coffee"])}}>Coffee</option>
    <option value="beer" {{userForm.favDrink | selected("beer")}}>WBeer</option>
</select>
Displaying a multiple values select field is similar, but :
-
You use
"[]" after the "name" attribute of the select
field. This tells Spincast that an array of values is expected when the form
is submitted.
-
The left side of a
selected(...)
filter will be a list of values (since more than one option may have been
selected). The filter will output the "seleted" attribute as long as the value
of an option matches any of the values from the list.
For example :
<select multiple name="userForm.favDrinks[]" class="form-control">
    <option value="tea" {{userForm.favDrinks | selected("tea")}}>Tea</option>
    <option value="coffee" {{userForm.favDrinks | selected("coffee")}}>Coffee</option>
    <option value="beer" {{userForm.favDrinks | selected("beer")}}>WBeer</option>
</select>
Radio Buttons
To display a radio buttons group :
-
You use the
JsonPath of the associated model element as the
"name" attributes.
-
You output the
"value" of each radio button. Those values can be
hardcoded, or they can be dynamically generated inside a loop (we'll see an example
of both).
-
You use the
checked(...)
filter provided by Spincast determine if a radio button should be checked or
not.
Let's first have a look at an example where the values of the radio buttons are hardcoded :
<div class="form-group">
    <label for="drinkTea">
        <input type="radio"
               id="drinkTea"
               name="userForm.favDrink"
               {{userForm.favDrink | checked("tea")}}
               value="tea"/> Tea</label>

    <label for="drinkCoffee">
        <input type="radio"
               id="drinkCoffee"
               name="userForm.favDrink"
               {{userForm.favDrink | checked("coffee")}}
               value="coffee"> Coffee</label>

    <label for="drinkBeer">
        <input type="radio"
               id="drinkBeer"
               name="userForm.favDrink"
               {{userForm.favDrink | checked("beer")}}
               value="beer"> Beer</label>
</div>
Let's focus on the first radio button of that group. First,
its "name" attribute :
<label for="drinkTea">
    <input type="radio"
           id="drinkTea"
           name="userForm.favDrink"
           {{userForm.favDrink | checked("tea")}}
           value="tea"/> Tea</label>
As we already said, the "name" attribute of a field is very important. Spincast uses it
to create the element on the form model, when the form is submitted. This "name"
will become the JsonPath of the element on the form model.
In our example, the form model would contain a "favDrink" element.
Let's now have a look at the checked(...) filter :
<label for="drinkTea">
    <input type="radio"
           id="drinkTea"
           name="userForm.favDrink"
           {{userForm.favDrink | checked("tea")}}
           value="tea"/> Tea</label>
We don't know in advance if a radio button should be checked or not, this depends
on the current value of the "userForm.favDrink" element. That's why we use
"checked(...)". This filter will compare the current
value of the "userForm.favDrink" model element to the value
of the radio button ("tea" in our example). If there is a match, a "checked"
attribute is printed!
Note that the parameter of the "checked(...)" filter
can be an array. In that case, the
filter will output "checked" if the current value
matches any of the elements. For example :
<label for="drinkTea">
    <input type="radio"
           id="drinkTea"
           name="userForm.favDrink"
           {{userForm.favDrink | checked(["tea", "ice tea", chai"])}}
           value="tea"/> Tea</label>
This feature is mainly useful when the radio buttons are dynamically generated.
If you need a default radio button to be checked, without providing this information
in the initial form model, you simply have to add "null" as an accepted
element for the checkbox:
<label for="drinkTea">
    <input type="radio"
           id="drinkTea"
           name="userForm.favDrink"
           {{userForm.favDrink | checked(["tea", null])}}
           value="tea"/> Tea</label>
Speaking of dynamically generated radio buttons, let's see an example of those! The creation
of the response model, in your Route Handler, may look like this :
public void myRouteHandler(AppRequestContext context) {

    //==========================================
    // Creates the available drink options and add them
    // to the reponse model directly.
    // There is no need to add them to the form
    // itself (but you can!).
    //==========================================
    JsonArray allDrinks = context.json().createArray();
    context.response().getModel().set("allDrinks", allDrinks);

    JsonObject drink = context.json().create();
    drink.set("id", 1);
    drink.set("name", "Tea");
    allDrinks.add(drink);

    drink = context.json().create();
    drink.set("id", 2);
    drink.set("name", "Coffee");
    allDrinks.add(drink);

    drink = context.json().create();
    drink.set("id", 3);
    drink.set("name", "Beer");
    allDrinks.add(drink);

    //==========================================
    // Creates the form, if it doesn't already exist.
    //==========================================
    JsonObject form = context.response().getModel().getJsonObject("userForm");
    if (userForm == null) {
        form = context.json().create();
        context.response().getModel().set("userForm", form);

        // Specifies the initial favorite drink of the user.
        User user = getUser(...);
        JsonObject user = context.json().create();
        form.set("favDrink", user.getFavDrink());
    }

    context.response().sendTemplateHtml("/templates/userTemplate.html");
}
With this response model in place, we can dynamically generate the radio buttons
group and check the current favorite one of the user :
<div class="form-group">
    {% for drink in allDrinks %}
        <label for="drink_{{drink.id}}">
            <input type="radio"
                   id="drink_{{drink.id}}"
                   name="userForm.favDrink"
                   {{userForm.favDrink | checked(drink.id)}}
                   value="{{drink.id}}"/> {{drink.name}}</label>
    {% endfor %}
</div>
Checkboxes
Checkboxes are often used in one of those two situations :
-
To allow the user to select a single boolean value. For example :
[ ] Do you want to subscribe to our newsletter?
-
To allow the user to select multiple values for a single preference. For example :
Which drinks do you like?
[ ] Tea
[ ] Coffee
[ ] Beer
First, let's look at a single checkbox field :
<label for="tosAccepted">
    <input type="checkbox"
           id="tosAccepted"
           name="myForm.tosAccepted"
           {{myForm.tosAccepted | checked(true)}}
           value="true" /> I agree to the Terms of Service</label>
Note that, even if the value of the checkbox is "true" as a string,
you can use true as a boolean as the filter parameter.
This is possible because the checked(...)
filter (and the selected(...)
filter) compares elements using
equivalence,
not equality. So "true"
would match true and "123.00" would match 123.
When this field is submitted, you would be able to access
the boolean value associated with it using :
public void myRouteHandler(AppRequestContext context) {

    Form form = context.request().getFormOrCreate("myForm");
    context.response().addForm(form);

    boolean tosAccepted = form.getBoolean("tosAccepted");

    //...
}
Now, let's see an example of a group of checkboxes :
<div class="form-group">
    <label for="drinkTea">
        <input type="checkbox"
               id="drinkTea"
               name="userForm.favDrinks[0]"
               {{userForm.favDrinks[0] | checked("tea")}}
               value="tea"/> Tea</label>

    <label for="drinkCoffee">
        <input type="checkbox"
               id="drinkCoffee"
               name="userForm.favDrinks[1]"
               {{userForm.favDrinks[1] | checked("coffee")}}
               value="coffee"> Coffee</label>

    <label for="drinkBeer">
        <input type="checkbox"
               id="drinkBeer"
               name="userForm.favDrinks[2]"
               {{userForm.favDrinks[2] | checked("beer")}}
               value="beer"> Beer</label>
</div>
Here, the checkboxes are grouped together since they share the same "name"
attribute, name that is suffixed with the position of the element in the group.
Again, their "name" is the JsonPath
of their associated element on the form model.
With this in place, we can access all the checked "favorite drinks" as a single array,
in our handler.
In the following example, we will retrieve such array without
using a proper Form object, but by using request.getFormData() directly,
to show this is also an option! But note that if you do it that way, you won't have access to the
built-in validation features a Form provide... You are manipulating the
form data as a raw JsonObject! :
public void myRouteHandler(AppRequestContext context) {

    JsonObject model = context.request().getFormData();

    // The checked favorite drinks, as an array!
    JsonArray favDrinks = model.getJsonArray("userForm.favDrinks");

    //...
}
Finally, note that the positions used in the "name" HTML attributes
are kept when we receive the array! This means that if the
user only checked "beer" for example (the last option), the array
received in our handler will be [null, null, "beer"], not ["beer"]!
This is a good thing because the
JsonPath we use for an element always stays valid ("userForm.favDrinks[2]"
here).
File upload
Uploading a file is very easy using Spincast. The main difference between a "file" element
and the other types of elements is that the uploaded file
will not be available as a form data when submitted. You'll have to use a dedicated method to
retrieve it.
The HTML part is very standard :
<form action="/upload" method="post" enctype="multipart/form-data">
    <input type="file" class="form-control" name="fileToUpload">
    <button type="submit">Submit</button>
</form>
To retrieve the uploaded file, you use one of the getUploadedFileXXX(...)
methods on the request() add-on. For example :
public void myRouteHandler(AppRequestContext context) {

    File uploadedFile = context.request().getUploadedFileFirst("fileToUpload");
}
Note that even if the uploaded file is not part of the form data, you can still
perform validation, as we'll see in the next section.
Form validation introduction
Validating a submitted form involves three main steps :
-
Retrieving the submitted form data.
-
Validating the form, and adding resulting
validation messages to it.
-
Redisplaying the form with the
validation messages resulting
from the validation.
If the form is valid, you may instead want to redirect the user to
a confirmation page where a success Flash Message will be
displayed.
Retrieving the submitted form
When an HTML form is submitted, Spincast treats the
"name" attributes of the fields as JsonPaths in order to create
a Form (a plain JsonObject
with extra validation features)
representing the form model. In other words,
Spincast converts the submitted data to a Form instance so you can easily validate and manipulate it.
You access that Form representing the submitted data by using the
getFormOrCreate(...) method of the request() add-on:
// POST handler
public void myHandlerPost(AppRequestContext context) {

    Form userForm = context.request().getFormOrCreate("userForm");
    context.response().addForm(userForm);

    //...
}
If you have more than one form on the same HTML page, you simply give them different names, and check
which one has been submitted, by looking for the presence of a field which should always be submitted:
// POST handler
public void myHandlerPost(AppRequestContext context) {

    Form userForm = context.request().getFormOrCreate("userForm");
    if(userForm.getString("userFormBtn") != null) {
        context.response().addForm(userForm);
        processUserForm(context, userForm);
        return;
    }

    Form bookForm = context.request().getFormOrCreate("bookForm");
    if(bookForm.getString("bookFormBtn") != null) {
        context.response().addForm(bookForm);
        processBookForm(context, bookForm);
        return;
    }

    //...
}
Performing validations
Once you have the Form representing the submitted data, you can start validating it.
Forms implement the ValidationSet
interface and allow you to store validation results directly in them.
Here's an example where we validate that a submitted "email" is valid, and add an error to the form if
it's not:
// POST handler
public void myHandlerPost(AppRequestContext context) {

    Form form = context.request().getFormOrCreate("userForm");
    context.response().addForm(form);

    String email = form.getString("email");

    if (!form.validators().isEmailValid(email)) {
        form.addError("email",
                      "email_invalid",
                      "The email is invalid");
    }

    //...
}
Explanation :
-
5 : We retrieve the submitted
form from the request.
-
6 : We immediately add the
form back to the response model.
-
8 : We get the "email" from
the form.
-
10 : We validate the email using
a validator provided on the Form object itself!
-
11-13 : If the email is invalid,
we add an error validation message to the form.
-
11 : The first parameter, "email" is the
JsonPath of the validated element.
-
12 : The second parameter, "email_invalid" is a
code representing the error. This can be used client-side to know what
exact error occured.
-
13 : The third parameter is the message
to display to the user.
To validate an element of the form, you can use any method you need. Some validators,
such as isEmailValid(...) are provided by the
form.validators()
method. But, most of the time, you're going to use custom code for your validations. For example:
Form form = context.request().getFormOrCreate("userForm");

String name = form.getString("name");
if(StringUtils.isBlank(name)) {
    form.addError("name",
                  "name_empty",
                  "The name is required!");
}
Finally, note that there are "success" and "warning"
validation messages too, in addition to the "error" ones.
Displaying Validation Messages
When you add the form to the response model, using context.response().addForm(form),
you are in fact adding two elements :
-
The form itself, using its name as the key in the response model.
-
A
Validation element, containing the validation messages added on the form.
By default, the Validation element containing the messages of a validated form is called
"validation". You can choose a different name for this element when adding
the form to the response model. For example:
// POST handler
public void myHandlerPost(AppRequestContext context) {

    Form userForm = context.request().getFormOrCreate("userForm");

    // Uses "userFormValidation" as the name for the
    // validation element.
    context.response().addForm(userForm, "userFormValidation");

    // validation...
}
When it reaches the templating engine, the Validation element associated
with a form will contain:
-
An object for every validation message added to the form, with the
JsonPath of the validated element as the key and three fields, "level",
"code" and "text":
"userForm.name" : {
    "level" : "ERROR",
    "code" : "name_empty",
    "text" : "The name is required!"
}
-
A special "
_" element that summarizes all the validations
performed on the form:
"userForm._" : {
    "hasErrors" : true,
    "hasWarnings" : false,
    "isValid" : false,
    "hasSuccesses" : false
}
This "_" element can be used in a template to display something if the
form contains errors, for example.
Here's a bigger chunk of the model the templating engine will have access to
to redisplay an invalid form :
{
    // The form itself
    "userForm" : {
        "name" : ""
        "email" : "abc"
        "books": [
            {
                "title" : "Dune",
                "author": "Frank Herbert"
            },
            {
                "title" : "The Hitchhiker's Guide to the Galaxy",
                "author" : ""
            }
        ]
    },

    // The "validation" element
    "validation" : {
        "userForm._" : {
            "hasErrors" : true,
            "hasWarnings" : false,
            "isValid" : false,
            "hasSuccesses" : false
        },
        "userForm.name" : {
            "level" : "ERROR",
            "code" : "name_empty",
            "text" : "The name is required!"
        },
        "userForm.email" : {
            "level" : "ERROR",
            "code" : "email_invalid",
            "text" : "The email is invalid"
        },
        "userForm.books[1].author" : {
            "level" : "ERROR",
            "code" : "author_empty",
            "text" : "The author is required!"
        }
    }

    // ...
}
The important things to notice are :
-
In the form object, each element is positioned at its JsonPath. For example,
the author of the second book is located at
userForm.books[1].author.
-
In the "validation" element, each keys is the string representation of
the JsonPath of the validated element! For example :
validation['userForm.books[1].author'].
It is easy to find the validation messages associated with a specific element since the JsonPath
of that element will be the key to use to retrieve them. For example:
<div class="form-group">
    <input type="text"
           class="form-control"
           name="userForm.email"
           value="{{userForm.email | default('')}}" />
    {{validation['userForm.email'] | validationMessages()}}
</div>
Note that when you add a validation message, you can specify some options on how to
render the message. You do this by passing a
ValidationHtmlEscapeType
parameter:
form.addError("email",
              "email_invalid",
              "Invalid email: <em>" + email + "</em>",
              ValidationHtmlEscapeType.NO_ESCAPE);
The possible values of ValidationHtmlEscapeType are:
-
ESCAPE: escapes the message to display. This is the default value.
-
NO_ESCAPE: does not escape the message to display. Any HTML will be rendered.
-
PRE: displays the message inside "<pre></pre>" tags.
Validation Filters
Spincast provides utilities to display the validation messages with the default Templating Engine,
Pebble. But, as we saw, the template model is a
simple Map<String, Object> so no magic is involved and any other Templating Engine
can be used.
Have a look at the Forms + Validation demos
section to see the following validation filters in action!
-
ValidationMessages | validationMessages()
This filter uses a HTML template fragment to output the Validation Messages associated with an element.
Here's an example :
<div class="form-group">
    <input type="text"
           class="form-control"
           name="myForm.email"
           value="{{myForm.email | default('')}}" />
    {{validation['myForm.email'] | validationMessages()}}
</div>
The path to the template fragment is configurable using the
SpincastPebbleTemplatingEngineConfig#getValidationMessagesTemplatePath()
method. The default path is "/spincast/spincast-plugins-pebble/spincastPebbleExtension/validationMessagesTemplate.html" which points
to a template fragment provided by Spincast.
-
ValidationMessages | validationGroupMessages()
This filter is similar to validationMessages() but uses a different template fragment.
Its purpose is to output the Validation Messages of a group of elements.
Here's an example :
<div id="tagsGroup" class="form-group {{validation['demoForm.tags'] | validationClass()}}">

    <div class="col-sm-4">
        <label class="control-label">Tags *</label>
        {{validation['demoForm.tags'] | validationGroupMessages()}}
    </div>

    <div class="col-sm-8">
        <input type="text" name="demoForm.tags[0]"
               class="form-control {{validation['demoForm.tags[0]'] | validationClass()}}"
               value="{{demoForm.tags[0] | default('')}}" />
        {{validation['demoForm.tags[0]'] | validationMessages()}}

        <input type="text" name="demoForm.tags[1]"
               class="form-control {{validation['demoForm.tags[1]'] | validationClass()}}"
               value="{{demoForm.tags[1] | default('')}}">
        {{validation['demoForm.tags[1]'] | validationMessages()}}
    </div>
</div>
In this example, we ask the user to enter two tags. If one is invalid, we may want to display
a "This tag is invalid" message below the invalid field, but we may also want to
display a global "At least one tag is invalid" below the group title, "Tags *".
This is exactly what the validationGroupMessages() filter is for.
As you may notice, "demoForm.tags" is, in fact, the JsonPath to the
tags array itself.
The path to the template fragment used by this filter is
configurable using the SpincastPebbleTemplatingEngineConfig#getValidationGroupMessagesTemplatePath()
method. The default path is "/spincast/spincast-plugins-pebble/spincastPebbleExtension/validationGroupMessagesTemplate.html" which is
a template fragment provided by Spincast.
-
ValidationMessages | validationClass()
The validationClass(...) filter checks if there are
Validation Messages and, if so, it outputs a class name.
The default class names are :
-
"has-error" : when there is at least one Error Validation Message.
-
"has-warning" : when there is at least one Warning Validation Message.
-
"has-success" : when there is at least one Success Validation Message.
-
"has-no-message" : when there are no Validation Messages at all.
For example :
<div id="tagsGroup" class="form-group {{validation['demoForm.tags'] | validationClass()}}">

    <div class="col-sm-4">
        <label class="control-label">Tags *</label>
        {{validation['demoForm.tags'] | validationGroupMessages()}}
    </div>

    <div class="col-sm-8">
        <input type="text" name="demoForm.tags[0]"
               class="form-control {{validation['demoForm.tags[0]'] | validationClass()}}"
               value="{{demoForm.tags[0] | default('')}}" />
        {{validation['demoForm.tags[0]'] | validationMessages()}}

        <input type="text" name="demoForm.tags[1]"
               class="form-control {{validation['demoForm.tags[1]'] | validationClass()}}"
               value="{{demoForm.tags[1] | default('')}}">
        {{validation['demoForm.tags[1]'] | validationMessages()}}
    </div>
</div>
The
validationClass() filter can be used both on single fields and
on a
group of fields. It is up to you to tweak the
CSS of your application
so the generated class are used properly.
-
ValidationMessages | validationFresh()
ValidationMessages | validationSubmitted()
Those two filters are used to determine if a form is displayed for the first time,
or if it has been submitted and is currently redisplayed with
potential Validation Messages. When one of those filters returns true,
the other necessarily returns false.
Most of the time, you are going to use the special
"_" element, representing the validation as a whole, as the element
passed to those filters.
For example :
 {% if validation['myForm._'] | validationFresh() %}
     <div>This form is displayed for the first time!</div>
 {% endif %}
and :
 {% if validation['myForm._'] | validationSubmitted() %}
     <div>This form has been validated!</div>
 {% endif %}
-
ValidationMessages | validationHasErrors()
ValidationMessages | validationHasWarnings()
ValidationMessages | validationHasSuccesses()
ValidationMessages | validationIsValid()
Those four filters check if there are Validation Messages of a
particular level and return true or false.
For example, you could use those filters to determine if you have to display an element
or not, depending of the result of a validation.
-
validationHasErrors() : returns true if there is at least
one Error Validation Message.
-
validationHasWarnings() : returns true if there is at least
one Warning Validation Message.
-
validationHasSuccesses() :returns true if there is at least
one Success Validation Message.
-
validationIsValid() : returnstrue if there is
no Validation Message at all.
For example :
 {% if validation['myForm.email'] | validationHasErrors() %}
     <div>There are errors associated with the email field.</div>
 {% endif %}
An important thing to know is that you can also use those filters to see if the
form itself, as a whole, contains Validation Messages
at a specific level. To do that, you use the special "_" element representing
the form itself. For example :
 {% if validation['myForm._'] | validationHasErrors() %}
     <div>The form contains errors!</div>
 {% endif %}
It is also important to know that those filters will often be used
in association with the validationSubmitted(...) filter.
The reason is that when a form is displayed
for the first time, it doesn't contain any Validation Messages, so
the validationIsValid(...) filter will return true.
But if you want to know if the form is valid after having been validated,
then you need to use the validationSubmitted(...) filter too :
 {% if validation['myForm._'] | validationSubmitted() and validation['myForm.email'] | validationIsValid() %}
     <div>The email has been validated and is ok!</div>
 {% endif %}
Forms are generic
You may have noticed that we are not using a dedicated class to represent the form
model (a "UserForm" class, for example) : we use plain JsonObject objects
(which Form object are based on).
Here's why:
-
You may be thinking about reusing an existing Entity class for the model of your form.
For example, you may want to use an existing "User" Entity class for the model of a form
dedicated to the creation of a new user. This seems logical at first since a lot
of fields on the form would have a matching field on that User Entity class...
But, in practice, it's very rare that an existing Entity class contains all the fields
required to model the form.
Let's say our form has a "name" field and a "email" field and uses those to create
a new user : those fields would probably indeed have matching fields on a "User" Entity.
But what about a captcha? Or an option to "subscribe to our newsletter"? Those two
fields on the form have nothing to do with a "user"
and there won't be matching fields for them on a "User" Entity class...
So, what you do then? You have to create a new class that contains all the required
fields. For that, you may be tempted to extend the "User" Entity and simply add
the missing fields, but our opinion is that this is hackish at best and clearly not a good
practice.
-
You may also feel that using a dedicated class for such form model is more robust, since that model
is then typed. We understand this feeling since we're huge fans of statically typed code! But,
for this particular component, for the model of a form, our opinion is that a
dedicated class is not very beneficial...
As soon as your form model leaves your controller, it
is pretty much converted to a simple and dumb Map<String, Object>, so the Templating Engine
can use it easily. At that moment, your typed form model is no more!
And, at the end of the day, the model becomes plain HTML fields : nothing
is typed there either.
In other words, if you use a dedicated class for your form model, this model is going to be
typed for a very short period, and we feel this doesn't worth the effort. That said, when your form
has been validated and everything is fine, then you may want to convert the
JsonObject/Form object to a dedicated Entity class and pass it to
services, repositories, etc.
-
Last but not least : using an existing
Entity class as a form model can lead to
security vulnerabilities (PDF)
if you are not careful.
In case you still want to use a dedicated class to back your forms, you are free to do so,
and here's a quick example.... First, you would create a dedicated class for the model :
public class UserCreationForm {

    private String username;
    private String email;
    private String captcha;

    //... Getters
    //... Setters
}
You would then create a model instance like so :
public void displayUserForm(AppRequestContext context) {

    // A typed form model
    UserCreationForm userForm = new UserCreationForm();

    // ... that is quickly converted to a
    // JsonObject anyway when added to the response model!
    context.response().getModel().set("userForm", userForm);

    sendMyTemplate();
}
When the form is submitted, you would then convert the form,
which is a JsonObject under the hood, to an instance of your
UserCreationForm class :
public void manageUserForm(AppRequestContext context) {

    // Back to a typed version of the form model!
    UserCreationForm userForm = context.request()
                                       .getFormOrCreate("userForm")
                                       .convert(UserCreationForm.class);

   // ...
}
HTTP Caching
Spincast supports many HTTP caching features, as described in the
HTTP 1.1 specification :
-
Cache-Control headers
-
Last modification dates
-
Etag headers
-
"No Cache" headers
Finally, Spincast also provides a mechanism for Cache Busting.
Cache-Control
The Cache-Control header (and the similar, but older, Expires header) is used to
tell a client how much time (in seconds) it should use its cached copy of a resource
before asking the server for a fresh copy.
This Cache-Control header can first be specified when you build a route (see
HTTP Caching route options), using the cache(...)
method.
For example :
router.GET("/test").cache(3600).handle(handler);
There are three options available when using this cache(...) method :
-
The number of seconds the client should uses its cached version without
asking the server again.
-
Is the cache
public (default) or private. The private
option means an end client can cache the resource but not an intermediate proxy/CDN
(more information).
-
The number of seconds a proxy/CDN should use its cached version without
asking the server again. Only use this option if it must be different than the
number of seconds for regular end clients.
This cache(...) method can also be used dynamically,
in a route handler, using the cacheHeaders()
add-on :
@Override
public void myHandler(AppRequestContext context) {
    context.cacheHeaders().cache(3600);
    context.response().sendPlainText("This will be cached for 3600 seconds!");
}
Default caching
When you do not explicitly set any caching options for a Static Resource, some defaults are automatically used. Those
defaults are configurable using the SpincastConfig
class.
There are two variations for those Static Resources default caching configurations :
-
One for plain Static Resources. The default is to send headers so the resource
is cached for
86400 seconds (1 day).
-
One for Dynamic Resources. The default is to send headers so the resource
is cached for
3600 seconds (1 hour).
When a resource can be generated, it often means that the resource may change more frequently. This is why
dynamic resources have their own default caching configuration.
When a Static/Dynamic Resource is served, a Last-Modified header is also automatically
sent. This means that even when the client does ask for a fresh copy of a resource, it will often
receive a "304 - Not Modified" response and will therefore again use its
cached copy, without unnecessary data being transferred over the network.
Finally, note that no default caching headers are sent for regular Routes. You have to explictly use
cache(...) to send some. But if you use cache() as is, without any parameter, then
default values will be used (still configurable using the SpincastConfig
class).
No Cache
Even when no explicit caching headers are sent, some clients (browsers, proxies, etc.) may use a default
caching strategy for the resources they download. For example, if you press the "back" button,
many browsers will display a cached version of the previous page, without requesting
the server for a fresh copy... Even if no caching headers were sent for that page!
If you want to tell the client that it should disable any kind of caching for a resource,
you can use the noCache(...) method. This can be done when building a Route :
router.GET("/test").noCache().handle(handler);
Or can be used dynamically, in a Route Handler :
@Override
public void myHandler(AppRequestContext context) {
    context.cacheHeaders().noCache();
    context.response().sendPlainText("This will never be cached!");
}
Finally, note that you can not use the noCache() options on a Static Resource since
this would defeat the notion of a "static" resource.
Cache Busting
Cache busting is the process of adding a special token to the URL of a resource in a way that simply
by changing this token you invalidate any cache a client may have.
For example, let's say that in a HTML page you reference a .css file that you want
the client to cache (since it won't frequently change) :
<link rel="stylesheet" href="/public/css/main.css">
The associated Route may be :
router.file("/public/css/main.css").cache(86400).classpath("/css/main.css").handle();
As you now know, when this resource is served a Cache-Control header will
be sent to the client so it caches it for 24 hours. And this is great! But what happens if you release
a new version of your application? You may then have changed "main.css" and you want all clients
to use the new, fresh, version. How can you do that if many clients already have the old version in cache
and you specified them that they can use that cached version for 24 hours? This is where cache busting become handy!
To enable cache busting for a particular resource, you add the "cacheBuster" template
variable to its URL. This template variable is provided by Spincast, you simply need to add
it in your HTML pages. For example, if you use Pebble,
which is the default
Templating Engine provided with Spincast, you need to use
"{{cacheBuster}}" as the cache buster token.
We recommend that you add this token right before the file name of the resource :
<link rel="stylesheet" href="/public/css/{{cacheBuster}}main.css">
When the HTML is rendered, the result will look something like this :
<link rel="stylesheet" href="/public/css/spincastcb_1469634250814_main.css">
When Spincast receives a request, it automatically removes any cache busters from the URL. So
-
"/public/css/spincastcb_1111111111111_main.css"
-
"/public/css/spincastcb_2222222222222_main.css"
will both result in the exact same URL, and will both target the same resource :
But (and that's the trick!) the client will consider both URLs as different, targeting different resources, so
it won't use any cached version when a cache buster is changed!
By default, the cache busting code provided by Spincast will change every time the application is restarted. You can modify
this behavior and/or the format of the token by overriding the getCacheBusterCode() and
removeCacheBusterCodes(...) methods from
SpincastUtils.
Finally, note that the cache busting tokens are removed before the routing is done, so they don't affect it in any way.
Etag and Last Modification date
The Etag and Last modification date headers are two ways of validating if the cached version
a client already has of a resource is still valid or not. We will call them "Freshness headers".
The client, when it wants to retrieve/modify/delete a resource it already has a copy of, sends a request
for that resource by passing the Etags and/or Last modification date it currently has for that
resource. The Server validates those values with the current information of the resource and decides if the
current resource should be retrieved/modified/deleted. Some variations using those headers are even used to
validate if a client can create a new resource.
Note that freshness headers management is not required on all endpoints. For example, an endpoint that would compute
the sum of two numbers has no use for cache headers or for freshness validation! But when a REST endpoint deal with
a resource, by Creating, Retrieving, Updating or Deleting it, then freshness validation is a must
to respect the HTTP specification.
Proper use of the freshness headers is not trivial
The most popular use for freshness headers is to return a 304 - Not Modified response when a
client asks for a fresh copy of a resource but that resource has not changed. Doing so, the response
is very fast since no unnecessary data is actually transmitted over the network : the client simply continue to use its
cached copy.
This "304" use case if often the only one managed by web frameworks. The reason is that it can
be automated, to some extent. A popular way of automating it is
to use an "after" filter to generate a hash from the body of a resource returned as the response to a
GET request. This hash is used as an ETag header and compared with any existing
If-None-Match header sent by the client. If the ETag matches, then the generated resource is
not sent, a "304 - Not Modified" response is sent instead.
This approach may be attractive at first because it is very simple and doesn't require you to do anything
except registering a filter. The problem is that this HTTP caching management is very, very, limited
and only addresses one aspect of the caching mechanism described in the
HTTP specification.
First, it only addresses GET requests. Its only purpose is to return a 304 - Not Modified
response instead of the actual resource on a GET request. But, freshness headers should be used
for a lot more than that. For example :
-
If a request is received with an
"If-Match" (Etag) or an "If-Unmodified-Since"
(Last modification date) header, and the resource has changed, then the request must fail
and a 412 - Precondition Failed response must be
returned. (specification)
-
If a request with an
"If-None-Match: *" header is received on a PUT
request, the resource must not be created if any version of it already exists.
(specification)
Also, to hash the body of the resource to create an ETag may not always be
appropriate. First, the resource must be generated for this hash to be computed.
But maybe you shouldn't have let the request access the resource in the first place! Also, maybe there is
a far better way to generate a unique ETag for your resource than to hash its body, using one of its
field for example. Finally, what happens if you need to "stream" that resource?
If you need to flush the response more than once when
serving it? In that case, the "after" filter wouldn't be able to hash the body properly and
send it as an ETag header.
All this to say that Etags and Last modification date may seem easy to manage
at first, but in fact, they require some work from you. If you simply want to manage the GET
use case where a 304 - Not Modified response can be returned instead of the resource itself,
then creating your own "after" filter should be quite easy (we may even provide one in a future release). But if you want
your REST endpoints to be more compliant with the HTTP specification, then keep reading
to learn how to use the cacheHeaders() add-on and its validate() method!
Freshness management using the cacheHeaders() add-on
There are three methods on the cacheHeaders() add-on made to deal with freshness headers in a
Route Handler :
-
.etag(...)
-
.lastModified(...)
-
.validate(...)
The
first two are used to set the Etag and Last modification date headers
for the current version of the resource. For example :
// Set the ETag
context.cacheHeaders().eTag(resourceEtag);

// Set the Last modification date
context.cacheHeaders().lastModified(resourceModificationDate);
But setting those freshness headers doesn't make sense if you do not validate them when they are sent
back by a client! This is what the .validate(...) method is made for. It validates the current
ETag and/or Last modification date of the resource to the ones sent by the client.
Here's an example of what using this method looks like :
if(context.cacheHeaders().eTag(resourceEtag)
                         .lastModified(resourceModificationDate)
                         .validate(resource != null)) {
    return;
}
We will look in details how to use the validate() method, but the important thing to remember is
that if this method returns true, then your route handler should return immediately,
without returning/modifying/creating
or deleting the associated resource. It also
means that the response to return to the client has already been set and should be returned as is : you
don't have to do anything more.
Note that, in general, you will use ETags or Last modification dates,
not both. Since ETags are more generic (you can even use a modification date as an ETag!), our following
example will only focus on ETags. But using the validate(...) method is the same, that you use
ETags or Last modification dates.
Using the "validate(...)" method
Let's first repeat that, as we previously said,
the Static Resources have their
Last modification date automatically managed. The Server simply validates the modification
date of the resource's file on disk and use this information to decide if a new copy of the resource should be
returned or not. In other words, the validation pattern we are going to explain here only concerns regular Routes, where
Route Handlers manage the target resources.
The freshness validation pattern looks like this, in a Route Handler :
public void myRouteHandler(AppRequestContext context) {

	// 1. Gets the current resource, if any
    MyResource resource = getMyResource();
    String resourceEtag = computeEtag(resource);

	// 2. Sets the current ETag and validates the freshness of the
	// headers sent by the client
	if(context.cacheHeaders().eTag(resourceEtag)
	                         .validate(resource != null)) {
	    return;
	}

	// 3. Validation done!
	// Now the core of the handler can run :
	// it can create/return/update/delete the resource.

    // ...
};
Explanation :
-
4 : We get the actual resource (from a
service for example). Note that
it can be
null if it doesn't exist or if it has been deleted.
-
5 : We compute the
ETag
for the resource. The ETag
can be anything : it is specific to your application how to generate it.
Note that the ETag can be null if the resource doesn't exist!
-
9 : By using the
cacheHeaders()
add-on, we set the ETag
of the current resource. This will add the appropriate headers to the response :
those headers will be sent, whatever the result of the validate(...)
method is.
-
10 : We call the
validate(...) method.
This method takes one parameter : a boolean indicating if the resource currently exists
or not. The method will validate the current ETag and/or the Last modification date
with the ones received by the client. If any HTTP freshness rule is matched, some appropriate headers
are set in the response ("304 - Not Modified" or "412 - Precondition Failed")
and true is returned. If no freshness rule is matched, false is returned.
-
11 : If the
validate(...) method returns
true, our Route Handler should return immediately, without further processing!
-
14-18 : If the
validate(...) method returns
false, the main part of our Route Handler can run, as usual.
As you can see, the validation pattern consists in comparing the ETag and/or
Last modification date of the actual resource to the headers
sent by the client. A lot of validations are done in that validate(...) method,
we try to follow as much as possible the full HTTP specification.
Note that if the resource doesn't currently exist, you should not create it before calling
the validate(...) method! You should instead pass false to the validate(...) method.
If the request is a PUT asking to create the resource,
this creation can be done after the cache headers validation, and only if the validate(false)
method returns false. In that case, the ETag
and/or Last modification date will have to be added to the response by calling eTag(...)
and/or lastModified(...) again :
public void createHandler(AppRequestContext context) {

	// Let's say the resource is "null" here.
	MyResource resource = getMyResource();

	// The ETag will be "null" too.
	String resourceEtag = computeEtag(resource);

	if(context.cacheHeaders().eTag(resourceEtag)
	                         .validate(resource != null)) {
	    return;
	}

	// The validation returned "false" so we can
	// create the resource!
	resource = createResourceUsingInforFromTheRequest(context);

	// We add the new ETag to the response.
	resourceEtag = computeEtag(resource);
	context.cacheHeaders().eTag(resourceEtag);
}
If the resource doesn't exist and the request is a GET, you can return
a 404 - Not Found after the freshness validation. In fact, once the
validation is done, your handler can be processed as usual, as if there was no prior validation...
For example :
public void getHandler(AppRequestContext context) {

	MyResource resource = getMyResource();
	String resourceEtag = computeEtag(resource);
	if(context.cacheHeaders().eTag(resourceEtag)
	                         .validate(resource != null)) {
	    return;
	}

    if(resource == null) {
        throw new NotFoundException();
    }

    return context.response().sendJson(resource);
}
To conclude, you may now see that proper management of HTTP freshness headers
sadly can't be fully automated. A Filter is simply not enough!
But, by using the
cacheHeaders() add-on and its validate(...) method, a
REST endpoint can follow the HTTP specification and be very
performant. Remember that not all endpoints require that freshness validation, though! You can
start your application without any freshness validation at all and add it on endpoints
where it makes sense.
HTTP/2
Spincast supports HTTP/2 in two ways:
-
Natively - the embedded server (for example the default Undertow server)
manages the HTTP/2 connections by itself.
-
Behind a reverse proxy - the Spincast application is behind a reverse proxy such
as Nginx or Apache
which manages HTTP/2 requests before they even hit Spincast.
As you will learn in the next section, you can use server push in both situations!
HTTP/2 is now enabled by default in Spincast (since version 1.5.0). If you want
to disable it, you can set the SpincastConfig#isEnableHttp2
configuration to false.
There is nothing more to do! Enabling HTTP/2 is very easy for an application developer as it is the server
that has to deal with all the details. You can validate that your application is actually served using HTTP/2 by
using your browser's dev tools, or by using a browser add-on (information).
Server Push
Server Push is a feature of HTTP/2 allowing
you to send extra resources to the client before they are even requested! It can be used to send resources such
as .js or .css that you know will be required.
You specify the extra resources you want to push during a request by using
the push(...)
method of the response() addon, in your route handler.
For example:
// Handler for GET "/"
public void handle(DefaultRequestContext context) {
    context.response()
           .push(HttpMethod.GET,
                 "/public/main.js",
                 SpincastStatics.map("someHeader", "someHeaderValue"))
           .sendTemplateHtml("/templates/index.html");
}
Explanation :
-
4 : We call the
push(...) method on the
response() addon. The resource to push should be requested using a GET
HTTP method.
-
5 : The absolute path to the resource to push.
-
6 : Headers to send to request the resource.
Those can be
null.
There are a couple of things to know when using the push(...) method:
-
The path of the resource must be absolute (it must start with "
/". Otherwise one will be automatically added).
-
The path may contain a querystring and may contain a special "${cacheBuster}"
placeholder (see Cache Busting for more information). The "${cacheBuster}"
placeholder will be automatically replaced with the current cache buster code of your application.
For example, let's say you have a .css specified like this
in your HTML:
<link rel="stylesheet" href="/public/css/{{spincast.cacheBuster}}main.css?theme=blue">
You could specify this .css resource to be pushed using:
context.response().push(HttpMethod.GET,
                        "/public/css/${cacheBuster}main.css?theme=blue",
                        null)
-
Server push works even if your application is running behind a reverse proxy managing the HTTP/2 connections!
In that case, Spincast will send some special
Link headers to ask the proxy to push the extra resources
(read more about this).
-
The headers you specify will only be used if it is the embedded server
that actually pushes the resources. If it's a reverse proxy in front of the application
that manages the HTTP/2 connections, those headers won't be used... But Spincast will still
tell the reverse proxy about the content-type to use by adding a
special "AS"
attribute in the Link header sent to the proxy!
If you use the default server, Undertow, you can enable an extra feature called LearningPushHandler by setting
the SpincastUndertowConfig#isEnableLearningPushHandler()
configuration to true. More information here.
Note that this feature only works when Undertow manages the HTTP/2 connections by itself, not when it is behind
a reverse proxy managing HTTP/2.
Make sure you read about server pushing before using this feature since it will not always improve
performance and may lead to wasted bandwidth (the client may decide to not use the pushed resources)!
Nginx as a reverse proxy managing HTTP/2
Here are some useful information if you plan on running your Spincast application behind Nginx and you
want to enable HTTP/2:
-
You need a version of Nginx equal or greater than
1.9.5 (the support for HTTP/2 was
introduced in that version).
-
You need to add "
http2" on your listen rule. For example:
-
If you want to be able to use server push, you also have to add "
http2_push_preload on;"
inside the "location" block where your application is configured. For example:
location / {
    proxy_pass http://localhost:44444;
    http2_push_preload on;

    //...
More information:
Finally, note that Nginx currently does not allow HTTP/2 traffic to reach your
application! It insists to manage the protocol by itself. That means you don't
need (or can) enable HTTP/2 on your embedded server if you are behind an HTTP/2 aware
Nginx reverse proxy. Server push will still work though, but the actual push will be done
by Nginx itself!
More information:
WebSockets
WebSockets allow you to
establish a permanent connection between your application and your users. Doing so,
you can receive messages from them, but you can also send messages to
them, at any time. This is very different than standard HTTP which
is: one request by the user => one response by the application.
WebSockets are mostly used when...
-
You want your application to be able to push messages to the connected
users, without waiting for them to make requests.
-
You need your application to be the central point where multiple users can share real-time data. The classic example
is a chat room: when a user sends a message, your application echoes that message back to the other Peers.
WebSockets's terminology is quite simple: an Endpoint is a group
of Peers (users) connected together and that your application manages.
A WebSocket Endpoint can receive and send text messages
and binary messages from and to the Peers.
Your application can manage multiple Endpoints, each of them with its own set of Peers.
Grouping Peers into separate Endpoints can be useful so you can easily send a specific message
to a specific group of Peers only. Also, each Endpoint may have some different level of
security associated with it:
some users may be allowed to connect to some Endpoints, but not to some others.
Quick Example
Here's a quick example on how to use WebSockets. Each part of this example will be explained in more details
in following sections. You can try this example live on the
WebSockets demo page.
The source code for this example is:
First, we define a WebSocket Route:
router.websocket("/chat").handle(chatWebsocketController);
The "chatWebsocketController" is an instance of a class that implements the WebsocketController
interface. This component is responsible for handling all the WebSocket events:
public class ChatWebsocketController
        implements WebsocketController<DefaultRequestContext, DefaultWebsocketContext> {

    private WebsocketEndpointManager endpointManager;

    protected WebsocketEndpointManager getEndpointManager() {
        return this.endpointManager;
    }

    @Override
    public WebsocketConnectionConfig onPeerPreConnect(DefaultRequestContext context) {

        return new WebsocketConnectionConfig() {

            @Override
            public String getEndpointId() {
                return "chatEndpoint";
            }

            @Override
            public String getPeerId() {
                return "peer_" + UUID.randomUUID().toString();
            }
        };
    }

    @Override
    public void onEndpointReady(WebsocketEndpointManager endpointManager) {
        this.endpointManager = endpointManager;
    }

    @Override
    public void onPeerConnected(DefaultWebsocketContext context) {
        context.sendMessageToCurrentPeer("Your peer id is " + context.getPeerId());
    }

    @Override
    public void onPeerMessage(DefaultWebsocketContext context, String message) {
        getEndpointManager().sendMessage("Peer '" + context.getPeerId() +
                "' sent a message: " + message);
    }

    @Override
    public void onPeerMessage(DefaultWebsocketContext context, byte[] message) {
    }

    @Override
    public void onPeerClosed(DefaultWebsocketContext context) {
    }

    @Override
    public void onEndpointClosed(String endpointId) {
    }
}
Explanation :
-
10-25 : Without going into too many details (we will do
that in the following sections),
onPeerPreConnect(...) is a method called
before a new user is connected. In this example, we specify that this user should
connect to the "chatEndpoint" Endpoint and that
its Peer id will be "peer_" followed by a random String.
-
27-30 : When a WebSocket Endpoint is ready to receive and send
messages, the onEndpointReady(...) method is called and gives us access
to an
Endpoint Manager.
We keep a reference to this manager since we are going to use it to send messages.
-
32-35 : When the connection with a new Peer is established,
the
onPeerConnected(...) method is called. In this example, as soon as the Peer is connected,
we send him a message containing his Peer id.
-
37-40 : When a Peer sends a message,
the onPeerMessage(...) method is called.
In this example, we use the
Endpoint Manager (which was received in the onEndpointReady(...)
method [27-30])
and we broadcast this message to all the Peers of the Endpoint.
Here's a quick client-side HTML/javascript code example, for a user to connect
to this Endpoint:
<script>
    var app = app || {};

    app.showcaseInit = function() {

        if(!window.WebSocket) {
            alert("Your browser does not support WebSockets.");
            return;
        }

        // Use "ws://" instead of "wss://" for an insecure
        // connection, without SSL.
        app.showcaseWebsocket = new WebSocket("wss://" + location.host + "/chat");

        app.showcaseWebsocket.onopen = function(event) {
            console.log("WebSocket connection established!");
        };

        app.showcaseWebsocket.onclose = function(event) {
            console.log("WebSocket connection closed.");
        };

        app.showcaseWebsocket.onmessage = function(event) {
            console.log(event.data);
        };
    };

    app.sendWebsocketMessage = function sendWebsocketMessage(message) {

        if(!window.WebSocket) {
            return;
        }
        if(app.showcaseWebsocket.readyState != WebSocket.OPEN) {
            console.log("The WebSocket connection is not open.");
            return;
        }

        app.showcaseWebsocket.send(message);
    };

    app.showcaseInit();

</script>

<form onsubmit="return false;">
    <input type="text" name="message" value="hi!"/>
    <input type="button" value="send"
           onclick="app.sendWebsocketMessage(this.form.message.value)"/>
</form>
WebSocket Routing
The WebSocketRroutes are defined similarly to regular Routes, using
Spincast's Router. But, instead of beginning the creation
of the Route with the HTTP method, like
GET(...) or POST(...), you use websocket(...):
router.websocket("/chat") ...
There are fewer options available when creating a WebSocket Route compared to a regular HTTP Route. Here are
the available ones...
You can set
an id for the Route. This allows you to identify the Route so you can refer to it
later on, delete it, etc:
router.websocket("/chat")
      .id("chat-endpoint") ...
You can also add "before" Filters, inline. Note that you can not add
"after" Filters to a WebSocket Route because, as soon as the
WebSocket connection is established, the HTTP request is over.
But "before" Filters are perfectly fine since they applied to the
HTTP request before it is upgraded to a WebSocket connection. For the
same reason, global "before" Filters (defined using something like
router.ALL(...).pos(-10)) will be applied during a
WebSocket Route processing, but not the global "after" Filters (defined using
a position greater than "0").
Here's an example of inline "before" Filters, on a WebSocket Route:
router.websocket("/chat")
      .id("chat-endpoint")
      .before(beforeFilter1)
      .before(beforeFilter2) ...
Finally, like you do during the creating of a regular Route, you save the WebSocket Route. The
handle(...) method for a WebSocket Route takes a WebSocket Controller,
not a Route Handler as regular HTTP Routes do.
router.websocket("/chat")
      .id("chat-endpoint")
      .before(beforeFilter1)
      .before(beforeFilter2)
      .handle(chatWebsocketController);
WebSocket Controllers
WebSocket Routes require a dedicated Controller as an handler. This Controller
is responsible for receiving the various WebSocket events occurring during the
connection.
You create a WebSocket Controller by implementing the
WebsocketController interface.
The WebSocket events
Here are the methods a WebSocket Controller must implement, each of them associated with a specific WebSocket event:
-
WebsocketConnectionConfig onPeerPreConnect(R context)
Called when a user requests a WebSocket connection. At this moment, the connection is not
yet established and you can allow or deny the request. You can also decide on which Endpoint
to connect the user to, and which Peer id to assign him.
-
void onEndpointReady(WebsocketEndpointManager endpointManager)
Called when a new Endpoint is created within your application. The
Endpoint Manager is passed
as a parameter on your should keep a reference to it. You'll use this Manager to send messages, to close
the connection with some Peers, etc.
Note that this method
should not block! More details
below...
-
void onPeerConnected(W context)
Called when a new Peer is connected. At this point, the WebSocket connection is established with the
Peer and you can send him messages.
-
void onPeerMessage(W context, String message)
Called when a Peer sends a text message.
-
void onPeerMessage(W context, byte[] message)
Called when a Peer sends a binary message.
-
void onPeerClosed(W context)
Called when the connection with a Peer is closed.
-
void onEndpointClosed(String endpointId)
Called when the whole Endpoint is closed.
The onPeerPreConnect(...) event
The onPeerPreConnect(...) is called before the WebSocket connection is
actually established with the user. The request, here, is still the original HTTP one, so you receive a
request context as regular Route Handlers do.
In that method, you have access to the user's cookies and to all the information about the initial
HTTP request. This is a perfect place to decide if the requesting user should be allowed
to connect to a WebSocket Endpoint or not. You may check if he is authenticated, if he has enough
rights, etc.
If you return null from this method, the WebSocket connection process will
be cancelled, and you are responsible for sending a response that makes sense to the user.
For example:
public WebsocketConnectionConfig onPeerPreConnect(DefaultRequestContext context) {

    String sessionId = context.request().getCookie("sessionId");
    if(sessionId == null || !canUserAccessWebsocketEndpoint(sessionId)) {
        context.response().setStatusCode(HttpStatus.SC_FORBIDDEN);
        return null;
    }

    return new WebsocketConnectionConfig() {

        @Override
        public String getEndpointId() {
            return "someEndpoint";
        }

        @Override
        public String getPeerId() {
            return "peer_" + encrypt(sessionIdCookie.getValue());
        }
    };
}
Explanation :
-
1 : When a user requests a WebSocket connection,
the
onPeerPreConnect(...)
method of the associated Controller is called. Note that here we receive the default DefaultRequestContext
request context, but if you are using a
custom request context type, you would
receive an object of your custom type (AppRequestContext, for example).
-
3 : We get the session id of the current user using
a "sessionId" cookie (or any other way).
-
4-7 : If the "sessionId" cookie is not found or if
the user associated with this session doesn't have enough rights to
access a WebSocket Endpoint, we set the response status as
Forbidden
and we return null. By returning null, the WebSocket connection
process is cancelled and the HTTP response is sent as is.
-
9-20 : If the user is allowed to access a WebSocket Endpoint, we
return the information required for that connection. We'll look at that
WebsocketConnectionConfig
object in the next section.
The WebsocketConnectionConfig(...) object
Once you decided that a user can connect to a WebSocket Endpoint, you return an instance of
WebsocketConnectionConfig from
the onPeerPreConnect(...) method.
In this object, you have to specify two things:
-
The
Endpoint id to which the user should be connected to.
Note that you can't use the id of an Endpoint that
is already managed by another Controller, otherwise an exception is thrown. If you use null
here, a random Endpoint id will be generated.
-
The
Peer id to assign to the user. Each Peer id must be unique inside a
given Endpoint, otherwise an exception is thrown. If you return null
here, a random id will be generated.
Multiple Endpoints
Note that a single WebSocket Controller can manage multiple Endpoints. The Endpoints are
not hardcoded when the application starts, you dynamically create them, on demand. Simply by connecting
a first Peer using a new Endpoint id, you create the required Endpoint. This allows your Controller
to "group" some Peers together, for any reason you may find useful. For example, you may have a
chat application with multiple "rooms": each room would be a specific Endpoint, with a set of Peers
connected to it.
If the Endpoint id you return in the WebsocketConnectionConfig object is the
one of an existing Endpoint, the user will be
connected to it. Next time you send a message using the associated Manager, this new Peer will
receive it.
If your Controller creates more than one Endpoint, you have to keep the Managers for
each of those Endpoints!
For example:
public class MyWebsocketController
        implements WebsocketController<DefaultRequestContext, DefaultWebsocketContext> {

    private final Map<String, WebsocketEndpointManager>
            endpointManagers = new HashMap<String, WebsocketEndpointManager>();

    protected Map<String, WebsocketEndpointManager> getEndpointManagers() {
        return this.endpointManagers;
    }

    protected WebsocketEndpointManager getEndpointManager(String endpointId) {
        return getEndpointManagers().get(endpointId);
    }

    @Override
    public WebsocketConnectionConfig onPeerPreConnect(DefaultRequestContext context) {

        return new WebsocketConnectionConfig() {

            @Override
            public String getEndpointId() {
                return "endpoint_" + RandomUtils.nextInt(1, 11);
            }

            @Override
            public String getPeerId() {
                return null;
            }
        };
    }

    @Override
    public void onEndpointReady(WebsocketEndpointManager endpointManager) {
        getEndpointManagers().set(endpointManager.getEndpointId(), endpointManager);
    }

    @Override
    public void onPeerMessage(DefaultWebsocketContext context, String message) {
        getEndpointManager(context.getEndpointId()).sendMessage(message);
    }

    @Override
    public void onEndpointClosed(String endpointId) {
        getEndpointManagers().remove(endpointId);
    }

    @Override
    public void onPeerConnected(DefaultWebsocketContext context) {
    }

    @Override
    public void onPeerMessage(DefaultWebsocketContext context, byte[] message) {
    }

    @Override
    public void onPeerClosed(DefaultWebsocketContext context) {
    }
}
Explanation :
-
4-5 : Here, our Controller will manage more than one
Endpoints, so we create a
Map to keep the association between each Endpoint
and its WebSocket Manager.
-
20-23 : As the
Endpoint id to use, this example
returns a random id between 10 different possibilities, randomly distributed to the connecting Peers.
In other words, our Controller is going
to manage up to 10 Endpoints, from "endpoint_1" to "endpoint_10".
-
25-28 : By returning
null as the
Peer id, a random id will be generated.
-
32-35 : When an Endpoint is created, we receive its
Manager and we add it to our endpointManagers map, using the
Endpoint id as the key. Our onEndpointReady method may be called up
to 10 times, one time for each Endpoint our Controller may create.
-
37-40 : Since we manage more than one Endpoints,
we have to use the right
Manager when sending a message!
Here, we echo back any message received by a Peer, to all Peers connected to the same
Endpoint.
-
42-45 : When an Endpoint is closed, we don't need its
Manager anymore so we remove it from our endpointManagers map.
Finally, note that a Controller can manage multiple WebSocket Endpoints, but only one Controller
can create and manage a given WebSocket Endpoint! If a Controller tries to connect a Peer to an Endpoint
that is already managed by another Controller, an exception is thrown.
The onEndpointReady(...) method should not block
It's important to know that the onEndpointReady(...) method is called
synchronously by Spincast, when the connection with the very first Peer
is being established. This means that this method should not block
or the connection with the first Peer will never succeed!
Spincast calls onEndpointReady(...) synchronously to make sure you have access
to the Endpoint Manager before
the first Peer is connected and therefore before you start receiving
events from him.
You may be tempted to start some kind of loop in this onEndpointReady(...) method, to
send messages to the connected Peers, at some interval. Instead, start
a new Thread to run the loop, and let the current thread continue.
In the following example, we will send the current time to all Peers connected to the Endpoint, every second.
We do so without blocking the onEndpointReady(...) method :
public void onEndpointReady(WebsocketEndpointManager endpointManager) {

    getEndpointManagers().set(endpointManager.getEndpointId(), endpointManager);

    final String endpointId = endpointManager.getEndpointId();

    Thread sendMessageThread = new Thread(new Runnable() {

        @Override
        public void run() {

            while(true) {

                WebsocketEndpointManager manager = getEndpointManager(endpointId);
                if(manager == null) {
                    break;
                }

                manager.sendMessage("Time: " + new Date().toString());

                try {
                    Thread.sleep(1000);
                } catch(InterruptedException e) {
                    break;
                }
            }
        }
    });
    sendMessageThread.start();

}
Automatic pings and other configurations
By default, pings are automatically sent to each Peer every 20 seconds or so. This
validates that the Peers are still connected. When those pings find that a connection has been
closed, onPeerClosed(...) is called on the WebSocket Controller.
You can turn on/off those automatic pings and change other configurations, depending on the
Server implementation you use.
Here are the configurations
available when using the default Server, Undertow.
The WebSocket context
Most methods of a WebSocket Controller receive a WebSocket context.
This context object is similar to a Request Context received
by a regular Route Handler :
it gives access to information about the event (the
Endpoint, the Peer, etc.) and also provides easy access to
utility methods and add-ons.
WebSocket specific methods :
-
getEndpointId(): The id of the Endpoint the current Peer is connected to.
-
getPeerId(): The id of the current Peer.
-
sendMessageToCurrentPeer(String message): Sends a text message to the
current Peer.
-
sendMessageToCurrentPeer(byte[] message): Sends a binary message to the
current Peer.
-
closeConnectionWithCurrentPeer(): Closes the connection with the
current Peer.
Utility methods and add-ons:
-
getLocaleToUse(): The best Locale to use for this Peer, as resolved during the
initial HTTP request.
-
getTimeZoneToUse(): The best TimeZone to use for this Peer.
-
json(): Easy access to the JsonManager.
-
xml(): Easy access to the XMLManager.
-
templating(): Easy access to the TemplatingEngine.
-
guice(): Easy access to the application's Guice context.
Extending the WebSocket context
The same way you can extend the Request Context type, which is the
object passed to your Route Handlers for regular HTTP requests, you can also extend the
WebSocket Context type, passed to your WebSocket Controller, when an event occurs.
First, make sure you read the Extending the Request Context section : it
contains more details and the process of extending the WebSocket Context is very similar!
The first thing to do is to create a custom interface for the new WebSocket Context type :
public interface AppWebsocketContext extends WebsocketContext<AppWebsocketContext> {
    public void customMethod(String message);
}
Explanation :
-
1 : A custom WebSocket context type extends the
base WebsocketContext
interface and parameterizes it using its own type.
Then, we provide an implementation for that custom interface:
public class AppWebsocketContextDefault extends WebsocketContextBase<AppWebsocketContext>
implements AppWebsocketContext {
@AssistedInject
public AppWebsocketContextDefault(@Assisted("endpointId") String endpointId,
@Assisted("peerId") String peerId,
@Assisted WebsocketPeerManager peerManager,
WebsocketContextBaseDeps<AppWebsocketContext> deps) {
super(endpointId,
peerId,
peerManager,
deps);
}
@Override
public void customMethod(String message) {
sendMessageToCurrentPeer("customMethod: " + message);
}
}
Explanation :
-
1-2 : The implementation extends
WebsocketContextBase
so all the default methods/add-ons are kept. Of course, it also implements
our custom
AppWebsocketContext.
-
4-13 : Don't worry about this scary constructor too much,
just add it as such and it should work. For the curious, the annotations indicate
that this object will be created using
an assisted factory.
-
15-18 : We implement our custom method. This dummy example simply
sends a message to the current Peer, prefixed with "customMethod: ". Note that the
sendMessageToCurrentPeer(...) method is inherited from WebsocketContextBase.
Finally, you must let Spincast know about your custom WebSocket Context type.
This is done by using the
websocketContextImplementationClass(...) of the
Bootstrapper :
public static void main(String[] args) {
Spincast.configure()
.module(new AppModule())
.requestContextImplementationClass(AppRequestContextDefault.class)
.websocketContextImplementationClass(AppWebsocketContextDefault.class)
.init(args);
//....
}
If you both extended the Request Context type and the WebSocket Context type, the
parameterized version of your Router would look like :
Router<AppRequestContext, AppWebsocketContext>.
But you could also create an unparameterized version of it, for easier usage! :
public interface AppRouter extends Router<AppRequestContext, AppWebsocketContext> {
// nothing required
}
Note that if you use the Quick Start to start your application, both
the Request Context type and the WebSocket Context type have
already been extended and the unparameterized routing components have already been created for you!
Testing
Spincast provides some nice testing utilities. You
obviously don't have to use those to test your Spincast application,
you may already have your favorite testing toolbox and be happy with it.
But those utilities are heavily used to test
Spincast itself, and we think they are an easy, fun, and very solid testing foundation.
First, Spincast comes with a custom JUnit runner which allows testing
using a Guice context really easily. But, the biggest feature is to be able
to test your real application itself, without even changing the
way it is bootstrapped. This is possible because of the Guice Tweaker
component which allows to indirectly mock or extend some components.
Installation
Add this Maven artifact to your project to get access to the Spincast testing utilities:
<dependency>
<groupId>org.spincast</groupId>
<artifactId>spincast-testing-default</artifactId>
<version>2.2.0</version>
<scope>test</scope>
</dependency>
Then, make your test classes extend SpincastTestBase
or one of its children classes.
Most of the time, you'll want to extend
AppBasedTestingBase, or
AppBasedDefaultContextTypesTestingBase
if your application uses the default request context types.
Demo
In this demo, we're going to test a simple application which only has
one endpoint : "/sum". The Route Handler
associated with this endpoint is going to receive two numbers, will
add them up, and will return the result as a
Json object. Here's the response we would be expecting from the "/sum" endpoint when sending the
parameters "first" = "1" and "second" = "2" :
You can download that Sum application [.zip]
if you want to try it by yourself or look at its code directly.
First, let's have a quick look at how the demo application is bootstrapped :
public class App {
public static void main(String[] args) {
Spincast.configure()
.module(new AppModule())
.init(args);
}
@Inject
protected void init(DefaultRouter router,
AppController ctrl,
Server server) {
router.POST("/sum").handle(ctrl::sumRoute);
server.start();
}
}
The interesting lines to note here are
4-6 : we
use the standard
Bootstrapper to start
everything! We'll see that, without modifying
this bootstrapping process, we'll still be able to tweak the Guice context, to mock
some components.
Let's write a first test class :
public class SumTest extends AppBasedDefaultContextTypesTestingBase {
@Override
protected void callAppMainMethod() {
App.main(null);
}
@Override
protected AppTestingConfigs getAppTestingConfigs() {
return new AppTestingConfigs() {
@Override
public boolean isBindAppClass() {
return true;
}
@Override
public Class<? extends SpincastConfig> getSpincastConfigTestingImplementationClass() {
return SpincastConfigTestingDefault.class;
}
@Override
public Class<?> getAppConfigTestingImplementationClass() {
return null;
}
@Override
public Class<?> getAppConfigInterface() {
return null;
}
};
}
@Inject
private JsonManager jsonManager;
@Test
public void validRequest() throws Exception {
// TODO...
}
}
Explanation :
-
2 : Our test class extends
AppBasedDefaultContextTypesTestingBase.
This class is a child of SpincastTestBase and therefore allows
us to use all the tools Spincast testing provides. Note there are other base classes you can extend, we're going to
look at them soon.
-
4-7 : The base class we are using requires that we implement the
callAppMainMethod() method. In this method we have to initialize the application to test. This is
easily done by calling its main(...) method.
-
9-33 : We also have to implement the
getAppTestingConfigs()
method. This is to provide Spincast informations about the configurations we want to use when running
this test class. Have a look at the Testing configurations
section for more information!
-
35-36 : Here we can see Spincast testing in action! Our
test class has now full access to the Guice context of the application. Therefore, we
can inject any component we need. In this test class, we are going to
use the JsonManager.
-
38-41 : a first test to implement.
As you can see, simply by extending AppBasedDefaultContextTypesTestingBase, and by starting our
application using its main(...) method, we can write integration tests targeting
our running application, and we can use any components from its Guice context. There is some boilerplate
code to write though (you nee to implement the getAppTestingConfigs() method, for example), and this why
you would in general create a base class to serve as a parent for all your test classes!
Let's implement our first test. We're going to validate that the "/sum" endpoint
of the application works properly :
//...
@Test
public void validRequest() throws Exception {
HttpResponse response = POST("/sum").addFormBodyFieldValue("first", "1")
.addFormBodyFieldValue("second", "2")
.addJsonAcceptHeader()
.send();
assertEquals(HttpStatus.SC_OK, response.getStatus());
assertEquals(ContentTypeDefaults.JSON.getMainVariationWithUtf8Charset(),
response.getContentType());
String content = response.getContentAsString();
assertNotNull(content);
JsonObject resultObj = this.jsonManager.fromString(content);
assertNotNull(resultObj);
assertEquals(new Integer(3), resultObj.getInteger("result"));
assertNull(resultObj.getString("error", null));
}
Explanation :
-
6-9 : the Spincast HTTP Client
plugin is fully integrated into Spincast testing utilities. This allows us to
very easily send requests to test our application. We don't even have to
configure the host and port to use : Spincast will
automatically find and use those of our application.
-
11-13 : we validate that the response is a success
(
"200") and that the content-type is the expected
"application/json".
-
15-16 : we get the content of the response as a String and we validate that
it is not
null.
-
18-19 : we use the
JsonManager
(injected previously) to convert the content to a JsonObject.
-
21-22 : we finally validate the result of the sum
and that no error occured.
Note that we could also have retrieved the content of the response as a JsonObject
directly, by using response.getContentAsJsonObject() instead of
response.getContentAsString(). But we wanted to demonstrate the use of
an injected component, so bear with us!
If you look at the source
of this demo, you'll see two more tests in that first test class : one that
tests the endpoint when a parameter is missing, and one that tests the endpoint when the sum overflows
the maximum Integer value.
Let's now write a second test class. In this one, we are going to show how
easy it is to replace a binding, to mock a component.
Let's say we simply want to test that the responses returned by our application
are gzipped. We may not care about the actual result of calling the
"/sum" endpoint, so we are going to "mock" it. This is a simple
example, but the process involved is similar if you need to mock a
data source, for example.
Our second test class will look like this :
public class ResponseIsGzippedTest extends AppBasedDefaultContextTypesTestingBase {
@Override
protected void callAppMainMethod() {
App.main(null);
}
@Override
protected AppTestingConfigs getAppTestingConfigs() {
return new AppTestingConfigs() {
@Override
public boolean isBindAppClass() {
return true;
}
@Override
public Class<? extends SpincastConfig> getSpincastConfigTestingImplementationClass() {
return SpincastConfigTestingDefault.class;
}
@Override
public Class<?> getAppConfigTestingImplementationClass() {
return null;
}
@Override
public Class<?> getAppConfigInterface() {
return null;
}
};
}
public static class AppControllerTesting extends AppControllerDefault {
@Override
public void sumRoute(DefaultRequestContext context) {
context.response().sendPlainText("42");
}
}
@Override
protected Module getExtraOverridingModule() {
return new SpincastGuiceModuleBase() {
@Override
protected void configure() {
bind(AppController.class).to(AppControllerTesting.class).in(Scopes.SINGLETON);
}
};
}
@Test
public void isGzipped() throws Exception {
// TODO...
}
}
Explanation :
-
2 : this test class also extends
AppBasedDefaultContextTypesTestingBase.
-
4-7 : we start our application.
-
9-33 : if we had created a base class for our tests, we could have
define the
getAppTestingConfigs() there instead of having to repeat it in all test
files!
-
35-41 : we create a mock controller by extending
the original one and replacing the
sumRoute(...) Route Handler
so it always returns "42".
-
43-52 : We specify an overriding module to change the implementation
that will be used for the
AppController binding. Under the hood, this is done
by the Guice Tweaker.
And let's write the test itself :
//...
@Test
public void isGzipped() throws Exception {
HttpResponse response = POST("/sum").addFormBodyFieldValue("toto", "titi")
.addJsonAcceptHeader()
.send();
assertTrue(response.isGzipped());
assertEquals(HttpStatus.SC_OK, response.getStatus());
assertEquals(ContentTypeDefaults.TEXT.getMainVariationWithUtf8Charset(),
response.getContentType());
assertEquals("42", response.getContentAsString());
}
Explanation :
-
6-8 : We can send pretty much anything here as the
parameters since the controller is mocked : they won't be validated.
-
10 : We validate that the response was gzipped.
-
12-15 : just to make sure our tweaking
is working properly.
Being able to change bindings like this is very powerful : you are testing your real application,
as it is bootstrapped, without even changing its code. All is done indirectly, using
the Guice Tweaker.
Guice Tweaker
As we saw in the previous demo, we can tweak the Guice context of our application
in order to test it. This is done by the
GuiceTweaker,
a component which is part of the Spincast testing machanism.
The Guice Tweaker is in fact a plugin. This plugin is special because
it is applied even if it's not registered during the bootstrapping of the application.
It's important to know that the Guice Tweaker only works if you are using the
standard Bootstrapper. It is implemented
using a ThreadLocal that the bootstrapper will look for.
The Guice Tweaker is created in the SpincastTestBase
class. By extending this class or one of its children, you have access to it.
By default, the Guice Tweaker automatically modifies the SpincastConfig
binding of the application when tests are run. This allows you to use testing configurations very easily
(for example to make sure the server starts on a free port). The implementation class used
for those configurations are specified in the getAppTestingConfigs()
method you have to implement. The Guice tweaker will use those informations and will create the required binding
automatically. The default implementation for the SpincastConfig interface is
SpincastConfigTestingDefault.
Those are the methods available, in a test file, to tweak your application :
The testing configurations (getAppTestingConfigs())
When running integration tests, you don't want to use the same configurations than the ones
you would when running the application directly. For example, you may want to provide a
different connection string to use a mocked database instead of the real one.
As we saw in the previous section, the Guice Tweaker allows you to
change some bindings when testing your application. But configurations is such an important component
to modify, when running tests, that Spincast forces you to specify which implementations to use for
those!
You specify the testing configurations by implementing the
getAppTestingConfigs()
method. This method must return an instance of
AppTestingConfigs. This
object tells Spincast :
-
getSpincastConfigTestingImplementationClass() : The implementation class to use for
the
SpincastConfig binding. In other words, this hook allows you to easily mock the
configurations used by Spincast core components. The default testing implementation is the provided
SpincastConfigTestingDefault
class. You can use this provided class directly, or at least you may want to have a look at it when writing
your own since it shows how to implement some useful things, such as finding a free port to use when starting the HTTP server
during tests.
-
getAppConfigInterface() : The interface of your custom app configurations
class. You can return
null if you don't have a custom configurations class.
-
getAppConfigTestingImplementationClass() : The implementation class to use for
your custom app configurations. You can return
null if you don't have a custom configurations class.
-
isBindAppClass() : Should the App class itself (the class in which
Spincast.init() or Spincast.configure() is called) be bound?
In general, if you are running
unit tests and don't need to start any HTTP server, you are going to
return false... That way, your main class
(in general named "App") won't be bound and therefore won't start the
server.
Spincast will use the informations returned by this object and will add all the required bindings
automatically. You don't need to do anything by yourself, for example by using the Guice Tweaker, to change the
bindings for the configurations when running integration tests. You just need to implement the
getAppTestingConfigs() method.
In most applications, the testing implementation to use for the SpincastConfig interface and
the one for your
custom configurations interface will be the same! Indeed, if you follow
the suggested way of configuring your application, then your custom
configurations interface AppConfig extends SpincastConfig.
In that case, Spincast will automatically intercept calls to methods made on the
AppConfig instance, but that are defined
in the parent SpincastConfig interface, and will route them to the
SpincastConfig testing implementation (as
returned by getSpincastConfigTestingImplementationClass(). Doing so, you can specify a config
in the testing implementation (the HTTPS port to use, for example), and that config
will be used in your app.
Note that you can annotate a method with
@DontIntercept if you don't want it to
be intercepted.
Your testing configurations can often be shared between multiple tests classes.
It is therefore a good idea to create an abstract base class, named "AppTestingsBase" or something similar,
to implement the getAppTestingConfigs() method there, and use
this base class as the parent for all your integration test classes. Have a look at
this base class
for an example.
While mocking some configurations is often required, it's still a good
idea to make testing configurations as close as possible as the ones that are going to be used
in production. For example, returning false for the
isDevelopmentMode()
method is suggested. That way, you can be confident that once your tests pass, your application will do well
in production.
You can mock some Environment Variables used as configurations, by overriding the
getEnvironmentVariables()
method in your configurations implementation class.
Testing base classes
Multiple base classes are provided, depending on the needs of your test class. They all ultimately extend
SpincastTestBase,
they all use the Spincast JUnit runner and
all give access to Guice Tweaker.
Those test base classes are split into two main categories : those based on your actual application and those
that are not. Most of the time, you do want to test using the Guice context of your application! But you may
sometimes have components that can be unit tested without the full Guice context of your application.
Those are the main testing base classes provided by Spincast. All of them can be modify using the Guice Tweaker :
App based
Not based on an app
-
NoAppTestingBase : base class
to use to test components using the default Guice context (the default plugins only). No application class is involved.
-
NoAppStartHttpServerTestingBase :
as
NoAppTestingBase, but if you also need the HTTP server to be started! This base class will be responsible to
start and stop the server.
Spincast JUnit runner
Spincast's testing base classes all use a custom JUnit runner:
SpincastJUnitRunner.
This custom runner has a couple of differences as compared with the default JUnit runner,
but the most important one is that instead of creating a new instance of the test class
before each test, this runner only creates one instance.
This way of running the tests works very well when a Guice context is involved.
The Guice context is created when the test class is initialized, and then this context is used to run all the tests
of the class. If Integration testing is used, then the HTTP Server
is started when the test class is initialized and it is used to run
all the tests of the class.
Let's see in more details how the Spincast JUnit runner works :
-
First, if your test class (or a parent) implements
the CanBeDisabled
interface and the
isTestClassDisabledPreBeforeClass() method returns true, the
test class is ignored (the Guice context is not even created).
-
The
beforeClass() method is called. As opposed to a classic
JUnit's @BeforeClass annotated method, Spincast's beforeClass() method is
not static. It is called when the test class is initialized.
-
The
createInjector() method is called in the beforeClass() method. This is where
the Guice context will be created, by starting an application or explictly.
-
The dependencies are automatically injected from the Guice context into the instance of the test class.
All your
@Inject annotated fields and methods are fulfilled.
-
If an exception occures during the execution of the
beforeClass() method,
the beforeClassException(...) method will be called, the process will be stop and the tests won't be run.
-
If your test class (or a parent) implements
the CanBeDisabled
interface and the
isTestClassDisabledPostBeforeClass() method returns true, the
tests are all ignored (but the Guice context is created and you have access to it to perform the logic required
to determine if tests must be ignored or not).
-
The tests are run.
-
The
afterClass() method is called. Like the beforeClass() method, this
method is not static. Note that the afterClass() method won't be called if an exception occurred
in the beforeClass() method.
Since the Guice context is shared by all the tests of a test class, you have to make sure you reset everything
required before running a test. To do this, use JUnit's
@Before annotation, or
the beforeTest() and afterTest() method.
Spincast JUnit runner features
-
If your test class is annotated with
@ExpectingBeforeClassException
then the
beforeClass() method is expected to throw an exception! In other words, the test class will be
shown by JUnit as a "success" only of the beforeClass() method throws an exception. This is useful,
in integration testing, to validate that your application refuses some invalid configuration when
it starts, for example.
-
If your test class (or a parent) implements
TestFailureListener
then the
testFailure(...) method will be called each time a test fails. This
allows you to add a breakpoint or some logs, and to inspect the context of the failure.
-
The @RepeatUntilFailure annotation
makes your test class loop until an error occurs or the specified number of loops is reached. This can be useful to debug
tests that sometimes fail and you need a way to run them over and over until they do fail.
Note that the beforeClass() and afterClass() methods will also be called X number of time, so the
Guice context will be recreated each time.
You can specify a number of milliseconds to sleep between two loops, using the sleep parameter.
This annotation can also be used on a single test method too. In that case, only the annotated test method will be looped over.
-
The @RepeatUntilSuccess annotation
makes your test class loop until all tests pass or the specified number of loops is reached.
It is a bad practice to use this annotation without good reasons! Tests should always be replicable. You should not
have to run a test multiple time for it to actually pass! But, in seldom situations where you are not able to
make a test pass 100% of the time, and you consciously decide that the test is ok like it is, then this annotation
can help.
You can specify a number of milliseconds to sleep between two loops, using the sleep parameter.
This annotation can also be used on a single test method.
In that case, only the annotated test method will be looped until it passes or the maximum number of loops is reached.
-
The @ExpectingFailure annotation
will make your test class pass when at least one test fails. It will make the test class fails
if all tests pass.
-
If your test class (or a parent) implements
RepeatedClassAfterMethodProvider
then the
afterClassLoops() method will be called when all the loops of the test class have been
run.
Managing cookies during tests
A frequent need during integration testing is to be able to keep cookies across
multiple requests... By doing so, the behavior of a real browser is simulated.
To keep the cookies sent by a response, simple call
saveResponseCookies(...)
when a valid response is received. Then, you can add back those cookies to a new request using
.setCookies(getPreviousResponseCookies()):
// First request, we save the cookies from the response...
HttpResponse response = GET("/one").send();
assertEquals(HttpStatus.SC_OK, response.getStatus());
saveResponseCookies(response);
// Second request, we resend the cookies!
response = GET("/two").setCookies(getPreviousResponseCookies()).send();
assertEquals(HttpStatus.SC_OK, response.getStatus());
saveResponseCookies(response);
Embedded databases for testing
Two embedded databases are provided for testing: H2
and a PostgreSQL.
Those two allow you to run your tests on a real but ephemeral database.
Use the H2 database if your queries are simple and you want fast tests. Use PostgreSQL
when you need "the real thing", even if it's slower to bootstrap.
H2
H2 is a very fast database to use to run tests. Its drawback is that is may not always support all
real-world kind of queries, but other than that it does its job very well...
You enable the Spincast Testing H2 database simply by binding SpincastTestingH2
as a Provider for your DataSource:
@Override
protected Module getExtraOverridingModule() {
return Modules.override(super.getExtraOverridingModule()).with(new SpincastGuiceModuleBase() {
@Override
protected void configure() {
bind(DataSource.class).toProvider(SpincastTestingH2.class).in(Scopes.SINGLETON);
// ...
}
});
}
You then inject SpincastTestingH2 and the
DataSource in your test file (or a base class):
@Inject
protected SpincastTestingH2 spincastTestingH2;
@Inject
private DataSource testDataSource;
In beforeClass(), you can make sure the database starts in a clean state:
@Override
public void beforeClass() {
super.beforeClass();
spincastTestingH2.clearDatabase();
}
... you can also do this before each test, if required:
@Override
public void beforeTest() {
super.beforeTest();
spincastTestingH2.clearDatabase();
}
When the tests are over, you stop the server:
@Override
public void afterClass() {
super.afterClass();
spincastTestingH2.stopServer();
}
The way the H2 server is started, you are able to connect to your database using
an external tool. For example, you can set a breakpoint and open the database using
DBeaver (or another tool) using the
proper connection string ("jdbc:h2:tcp://localhost:9092/mem:test;MODE=PostgreSQL;DATABASE_TO_UPPER=false" for example).
This allows you to easily debug your tests.
You can change some configurations used by Spincast Testing H2 (the server port for example) by binding a custom implementation
of the SpincastTestingH2Config interface.
If you don't, the default configurations
will be used.
PostgreSQL
The PostgreSQL (or simply Postgres) database provided by Spincast is based on
otj-pg-embedded. It is a
standalone version of PostgreSQL (no installation required) that can be used to run your tests.
It is slower to start than H2 to run a tests file, but it is a real PostgreSQL database,
so you can run any real-world SQL on it!
You enable it simply by binding
SpincastTestingPostgres
as a Provider for your DataSource:
@Override
protected Module getExtraOverridingModule() {
return Modules.override(super.getExtraOverridingModule()).with(new SpincastGuiceModuleBase() {
@Override
protected void configure() {
bind(DataSource.class).toProvider(SpincastTestingPostgres.class).in(Scopes.SINGLETON);
// ...
}
});
}
You then inject SpincastTestingPostgres and the
DataSource in your test file (or a base class):
@Inject
protected SpincastTestingPostgres spincastTestingPostgres;
@Inject
private DataSource testDataSource;
The standalone Postgres database will then be started automatically when your tests are started.
When the tests are over, you can stop Postgres:
@Override
public void afterClass() {
super.afterClass();
spincastTestingPostgres.stopPostgres();
}
You can change some configurations used the database by binding a custom implementation
of the SpincastTestingPostgresConfig interface.
If you don't, the default configurations
will be used.
Testing code inside a .jar file
Sometimes, you need to test code exactly as it will be run in production, which means
from within an executable .jar file. Your Spincast application would indeed run from a
standalone Fat Jar when deployed to production... And tests executed from an IDE don't always have the
same behavior than code running from a .jar file.
Indeed, if you run your tests from an IDE (or using the command line), all the classpath resources
would be located on the file system, as regular files. But, in production, those resources
will be embedded in your .jar file. Accessing and using those resources, from the file system
or from inside a .jar file, may be very different. So how can you run tests in a way that
the code to validate is located inside a .jar file?
The answer is that Spincast provides utilities to extract a test Maven project from the classpath to the file system,
to programmatically run the "package" Maven goal on this extracted project and then to run
the .jar file generated from this process in order to test the code located inside it!
In more details:
-
You need to install the Spincast Process Utils plugin.
-
You create a Maven project containing the code you want to test from within a .jar file. You save this project
in your application's resources folder ("src/main/resources/testMavenProject" for example).
Here's an example
of such Maven project.
-
In one of your @Test, you use the "Running a goal on an external Maven project"
feature provided by the
Spincast Process Utils plugin to programmatically package this project:
File extractedProjectDir =
getSpincastProcessUtils()
.executeGoalOnExternalMavenProject(new ResourceInfo("/testMavenProject", true),
MavenProjectGoal.PACKAGE);
This will automatically extract the project from the classpath to the file system and will
generate the .jar containing the code to test! This .jar file will be generated at
"${extractedProjectDir}/target/my-test-project-1.0.0.jar" for example,
depending on the name and version of the project's artifact.
Note that the temporary directory where the
project is extracted on the file system is returned by the executeGoalOnExternalMavenProject(...)
method.
-
You use another feature provided by the
Spincast Process Utils plugin,
"Executing an external program, asynchronously"
to execute the generated .jar file. For example:
ProcessExecutionHandlerDefault handler = new ProcessExecutionHandlerDefault();
getSpincastProcessUtils().executeAsync(handler,
"java",
"-jar",
generatedJarFilePath,
"12345");
try {
// Wait for the HTTP port to be open
handler.waitForPortOpen("localhost", 12345, 10, 1000);
HttpResponse response = getHttpClient().GET("http://localhost:12345/test")
.send();
assertEquals(HttpStatus.SC_OK, response.getStatus());
} finally {
handler.killProcess();
}
In this example, the generated .jar file containing the code we want to test starts an HTTP server
(the test Maven project is, in fact, a standalone Spincast application!)...
We wait for the port this server is started on to be available and we then send a request
to it.
For your @Test to know if the executed code worked successfully or not inside the .jar file, you can
make the endpoint of your HTTP server return a 200 status code, for example. You could also return
a JSON object containing more details about the result of the execution.
-
Finally, when your test is done, you kill the created process ("
handler.killProcess()").
If you need to tweak the code of the test project before packaging it, or if you want to specify where
on the file system the project should be extracted, you can:
Note that when using a test Maven project, and that Maven project uses artifacts from your
main multi-modules project, you may have to add those artifacts as
<scope>test</scope> dependencies in your main artifact, where the test
Maven project is packaged. Indeed, without this, Maven can not know in advance that those artifacts are required by
the test Maven project, and therefore may not have built them prior to running the tests! By adding them as
dependencies in your main project, Maven will build those artifacts first.
Note that if you simply need to replace some placeholders
in the pom.xml file of the project, the
(executeGoalOnExternalMavenProject(...)
method already provides a way of doing it.
Here's
a real test class
validating code located inside a .jar file.
Post install tests
In some cases, mainly if you have some tests that programmatically package a test Maven project
and then uses the generated .jar file (as seen in the previous section),
you may need those tests to be run only when the artifacts of your main project are available
in your local repository.
Indeed, such test Maven projects may use artifacts from your main
project (in their pom.xml) and those artifacts may not be found if they were not
installed in the first place!
This situation may occur for example during the release of your project, if you use the "mvn release:prepare"
command.
For such tests that need to be run at the Maven install phase (right after
the default maven-install-plugin plugin), you can suffix their names
with "PostInstallTest". For example, a test class named "ExamplePostInstallTest"
would not be run at the standard Maven test phase, but rather at the
Maven install phase!:
public class ExamplePostInstallTest extends NoAppTestingBase {
@Test
public void test() throws Exception {
//...
}
}
What is a Spincast plugin?
A plugin can be a simple library, like any other Maven artifacts you
add to your project. It can provide components and utilities to be used in your
application.
But a plugin can also contribute to the Guice context of your application.
They can add some bindings to that context and can even modify/remove some!
All plugins are applied, in the order they are registered, during the bootstrapping
phase.
Some plugins may also suggest an add-on to install.
Installing a plugin
You first need to add the Maven artifact of the plugin to your
pom.xml (or build.gradle). For example :
<dependency>
<groupId>com.example</groupId>
<artifactId>some-wonderful-plugin</artifactId>
<version>1.2.3</version>
</dependency>
Most of the plugins need to bind some components to the Guice
context of the application. For them to be able to do so, you need to register
them using the plugin(...) method of the
Bootstrapper. For example :
public static void main(String[] args) {
Spincast.configure()
.module(new AppModule())
.plugin(new SomeWonderfulPlugin())
.requestContextImplementationClass(AppRequestContextDefault.class)
.init(args);
//...
}
Here, SomeWonderfulPlugin is the main class of the plugin, the
one implementing the SpincastPlugin
interface. To know what class to use to register a plugin, you have to read
its documentation.
Installing a Request Context add-on
One of the coolest features of Spincast is the ability to
extend the Request Context type.
The Request Context are objects, associated with a request, that Spincast automatically creates and passes
to your Route Handlers. You can extend the type of those object by adding add-ons.
Some plugins may suggest that you use one of their components as such add-on.
To do so, you first add the add-on entry point to your Request Context interface. This entry point is simply
a method, with a meaningful name, and that returns the add-on's main component :
public interface AppRequestContext extends RequestContext {
public WonderfulComponent wonderful();
//... other add-ons and methods
}
Here, the add-on is named "wonderful()" and its main component is
"WonderfulComponent".
Then, you inject a Provider for the main component in your
Request Context implementation, and you use it to return component instances :
public class AppRequestContext extends RequestContextBase<AppRequestContext>
implements AppRequestContext {
private final Provider<WonderfulComponent> wonderfulComponentProvider;
@AssistedInject
public AppRequestContext(@Assisted Object exchange,
RequestContextBaseDeps<AppRequestContext> requestContextBaseDeps,
Provider<WonderfulComponent> wonderfulComponentProvider) {
super(exchange, requestContextBaseDeps);
this.wonderfulComponentProvider = wonderfulComponentProvider;
}
@Override
public WonderfulComponent wonderful() {
return this.wonderfulComponentProvider.get();
}
//...
}
It's a good practice to always use a
Provider for the
add-on's component, because it is often not a singleton and may even be
request scoped.
You can now use the newly installed add-on, directly in your Route Handlers!
For example :
public void myRouteHandler(AppRequestContext context) {
context.wonderful().doSomething();
//...
}
Default plugins
By using the spincast-default Maven artifact and the
Bootstrapper, some plugins are installed by default. Those plugins provide implementations
for the main components required in any Spincast application. If you disable one of those plugins, you have
to bind by yourself implementations for the components that this plugin was binding.
-
SpincastCorePlugin : this is the only plugin which is not listed in
the plugins section because it is the very core of Spincast. But it's
interesting to know that even this core is a plugin!
-
Spincast Routing : binds all the components
related to routing, allows the creation of the
Routes and provides
the "routing()" add-on.
-
Spincast Request : provides
the
"request()" add-on which allows Route Handlers
to get information about the current request.
-
Spincast Response : provides
the
"response()" add-on which allows Route Handlers
to build the response to send.
-
Spincast Undertow : provides
an implementation for the required HTTP/Websocket
Server
component, using Undertow.
-
Spincast Locale Resolver : provides
an implementation for the required
LocaleResolver
component.
-
Spincast TimeZone Resolver : provides
an implementation for the required
TimeZoneResolver
component.
-
Spincast Variables add-on : as
its name suggests, this plugin simply provides a
"variables()" add-on to write and read information in
the request scope. This can be used to pass information from
a Route Handler to another.
-
Spincast Templating add-on :
provides a
"templating()" add-on giving access to
utilities to render some text based templates.
-
Spincast Pebble : provides
an implementation for the required
TemplatingEngine
component, using Pebble.
-
Spincast Jackson Json : provides
an implementation for the required
JsonManager
component, using Jackson.
-
Spincast Jackson XML : provides
an implementation for the required
XmlManager
component, using Jackson.
-
Spincast Config :
provides everything that is required to configure a Spincast application. It allows you to tweak the
default configurations used by the Spincast core components, and to create configurations
that are specific to your application.
-
Spincast Dictionary :
provides an implementation of the Dictionary
interface, allowing internationalization ("i18n"). It is used to specify labels in a multilingual application.
-
Spincast HTTP Caching Addon :
provides a
"cacheHeaders()" add-on to help dealing with
HTTP caching.
JDBC / SQL
Spincast provides utilities to perform SQL queries:
-
Scopes - automatic connections management and
support for transactions.
-
Statements - allow the creation of
SQL queries in a safe and easy manner, with
named parameters support.
-
Result Sets - with goodies and better
null
support compared to plain JDBC.
To access those JDBC features, you first have to install the
Spincast JDBC plugin. This plugin is not part of the
spincast-default artifact.
Scopes
A JDBC scope is a block of code that provides a connection to a data source and automatically returns it to the connection
pool when it is not needed anymore.
There is three kinds of scopes: autoCommit, transactional
and specificConnection.
You start a JDBC scope by calling the
JdbcUtils's scopes() method.
Here's how to start an autoCommit scope :
getJdbcUtils().scopes().autoCommit(getMainDataSource(), new JdbcQueries<Void>() {
@Override
public Void run(Connection connection) {
// SQL query #1...
// SQL query #2...
return null;
}
});
You call
getJdbcUtils().scopes().autoCommit(...) by passing the
DataSource to use, and a
JdbcQueries
instance. In the
run(...) method you receive a
connection that is ready to be used
to run your SQL queries.
When the run(...) method exits, the connection is automatically returned to the connection pool.
A transactional scope adds an extra functionality: all the SQL queries performed inside that scope,
directly or indirectly, will be part of a single transaction. In other words, all the queries will be committed
only when the scope exits, or will all be rollbacked if an exception occurres.
There are two ways to create a transactional scope. It can be created the same way an autoCommit
one is, by passing a DataSource and a JdbcQueries
instance:
getJdbcUtils().scopes().transactional(getMainDataSource(), new JdbcQueries<Void>() {
@Override
public Void run(Connection connection) throws Exception {
// SQL query #1...
// SQL query #2...
return null;
};
});
Or it can be created only to start a transaction, without the immediate need for a connection :
getJdbcUtils().scopes().transactional(new TransactionalScope<Void>() {
@Override
public Void run() throws Exception {
// Use component #1...
// Use component #2...
return null;
};
});
In both situations, any SQL queries performed in the scope,
directly or indirectly, and targetting a common DataSource,
will be part of the same transaction.
The final type of scope is specificConnection. In such scope,
all queries (directly or indirectly) are going to be ran using the same connection, the one
provided when creating the scope.
getJdbcUtils().scopes().specificConnection(connection, getMainDataSource(), new JdbcQueries<Void>() {
@Override
public Void run(Connection connection) {
// SQL query #1...
// SQL query #2...
return null;
}
});
Statements
By using the JdbcStatementFactory, by injecting it or
from the JdbcUtils's statements()
utility method,
you start the creation of SQL statements :
getJdbcUtils().scopes().transactional(getMainDataSource(), new JdbcQueries<Void>() {
@Override
public Void run(Connection connection) throws Exception {
SelectStatement stm1 = getJdbcUtils().statements().createSelectStatement(connection);
InsertStatement stm2 = getJdbcUtils().statements().createInsertStatement(connection);
BatchInsertStatement stm3 = getJdbcUtils().statements().createBatchInsertStatement(connection);
UpdateStatement stm4 = getJdbcUtils().statements().createUpdateStatement(connection);
DeleteStatement stm5 = getJdbcUtils().statements().createDeleteStatement(connection);
// ...
return null;
};
});
From such statements, you can build your SQL query and bind named parameters.
For example :
SelectStatement stm = getJdbcUtils().statements().createSelectStatement(connection);
stm.sql("SELECT name, level " +
"FROM users " +
"WHERE name = :name ");
stm.setString("name", "Stromgol");
if (minLevel != null) {
stm.sql("AND level >= :minLevel ");
stm.setInteger("minLevel", minLevel);
}
There are utility methods for IN conditions:
SelectStatement stm = getJdbcUtils().statements().createSelectStatement(connection);
stm.sql("SELECT name, level " +
"FROM users " +
"WHERE name IN(:names) ");
stm.setInString("names", Sets.newHashSet("Stromgol", "Patof", "Bozo"));
A setInstant(...)
method is provided : it converts the Instant object to a Timestamp at the UTC timezone.
In association with the result set's getInstant(),
and a "timestamp with time zone" or "timestamptz" column type, it is
an easy and efficient way of dealing with dates and timezones.
You can retrieve the current SQL and clears it if you need to :
stm.sql("SELECT * FROM users ");
// "true" => human friendly formatted
String currentSql = stm.getSql(true);
// clears the current query
stm.clearSql();
Finally, when your SQL query is ready, you execute it. The method to call to execute the
query depends on the type of statement you are using:
// SelectStatement
SelectStatement stm1 = getJdbcUtils().statements().createSelectStatement(connection);
stm.selectOne(...);
// or
stm.selectList(...);
// or
stm.selectListAndTotal(...);
// InsertStatement
InsertStatement stm2 = getJdbcUtils().statements().createInsertStatement(connection);
stm2.insert();
// or
stm2.insertGetGeneratedKeys();
// BatchInsertStatement
BatchInsertStatement stm3 = getJdbcUtils().statements().createBatchInsertStatement(connection);
stm3.batchInsert();
// or
stm3.batchInsertGetGeneratedKeys();
// UpdateStatement
UpdateStatement stm4 = getJdbcUtils().statements().createUpdateStatement(connection);
stm4.update();
// DeleteStatement
DeleteStatement stm5 = getJdbcUtils().statements().createDeleteStatement(connection);
stm5.delete();
Result Sets
When you execute a SelectStatement, you have to pass a
ResultSetHandler
in order to use the values returned by the database.
For example :
SelectStatement stm = getJdbcUtils().statements().createSelectStatement(connection);
stm.sql("SELECT name, level " +
"FROM users " +
"WHERE name = :name ");
stm.setString("name", "Stromgol");
User user = stm.selectOne(new ResultSetHandler<User>() {
@Override
public User handle(SpincastResultSet rs) throws Exception {
User user = new User(rs.getString("name"),
rs.getIntegerOrNull("level"));
return user;
}
});
In this example, you can see that you receive a
SpincastResultSet
to deal with the data returned from the database.
This SpincastResultSet object implements the default Java's java.sql.ResultSet,
but also provide additional features.
In SpincastResultSet, those methods are deprecated: getBoolean(...), getByte(...),
getShort(...), getInteger(...), getLong(...), getFloat(...),
getDouble(...).
They are replaced by :
-
getBooleanOrNull(...)
-
getByteOrNull(...)
-
getShortOrNull(...)
-
getIntegerOrNull(...)
-
getLongOrNull(...)
-
getFloatOrNull(...)
-
getDoubleOrNull(...)
Or, to get 0 like the original JDBC's getters would return when the actual value in
the database is null:
-
getBooleanOrZero(...)
-
getByteOrZero(...)
-
getShortOrZero(...)
-
getIntegerOrZero(...)
-
getLongOrZero(...)
-
getFloatOrZero(...)
-
getDoubleOrZero(...)
We do this to deal with the bad decision JDBC's creators did by using primitive types as return types for
those getters and therefore preventing null from being returned properly. Using plain JDBC, when a null value is returned
by the database, is it transformed to the default value of the primitive type : false for booleans and 0 for number
types. Using SpincastResultSet, you receive a proper null value when this is what the database returns.
Finally, a getInstant()
method is provided to easily convert a column of type "timestamp with time zone" or "timestamptz" to an Instant object.
Dictionary (i18n / internationalization)
Usage
The Dictionary interface
represents the object in which you store and from which you get localized messages for a multilingual application.
You get a localized message by injecting the Dictionary in a class
and by specifying the key of the message to get :
public class MyClass {
private final Dictionary dictionary;
@Inject
public MyClass(Dictionary dictionary) {
this.dictionary = dictionary;
}
protected Dictionary getDictionary() {
return this.dictionary;
}
public void someMethod() {
String localizedMessage = getDictionary().get("some.message.key");
System.out.println(localizedMessage);
}
}
In this example, the message key is "some.message.key"
By default, the Locale used to pick the right version of the message is the one returned
by the Locale Resolver. But you can also specify the Locale as a parameter:
String localizedMessage = getDictionary().get("some.message.key", Locale.JAPANESE);
System.out.println(localizedMessage);
The default Dictionary implementation,
SpincastDictionaryDefault,
uses the Templating Engine to evaluate messages. This means that you can pass parameters
when getting a message. For example :
// Let's say the "some.message.key" message in the dictionary is :
// "Hi {{userName}}! My name is {{authorName}}."
String localizedMessage = getDictionary().get("some.message.key",
Pair.of("userName", user.name),
Pair.of("authorName", admin.name));
Note that, to improve performance, a message from the dictionary is only evaluated using the
Templating Engine if at least one parameter is passed when getting it! Otherwise, the
message is going to be returned as is, without any evaluation. If you have
a message that doesn't require any parameter but still needs to be evaluated, you can force the
evaluation using the "forceEvaluation" parameter :
String localizedMessage = getDictionary().get("some.message.key", true);
Finally, note that Spincast also provides a msg(...)
function to get a localized message from a template (a HTML template, for example).
Adding messages to the dictionary
By default, only some Spincast core messages and some plugins messages will be added to the Dictionary.
To add your own messages, the ones required in your application, you extend the
SpincastDictionaryDefault
base class and you override the addMessages() method. By using the key() and
msg() helpers, you then specify the localized messages of your application.
For example :
public class AppDictionary extends SpincastDictionaryDefault {
@Inject
public AppDictionary(LocaleResolver localeResolver,
TemplatingEngine templatingEngine,
AppConfigs appConfig,
Set<DictionaryEntries> dictionaryEntries) {
super(localeResolver, templatingEngine, appConfig, dictionaryEntries);
}
@Override
protected void addMessages() {
key("users.home.welcome",
msg("", "Hi {{name}}!"),
msg("fr", "Salut {{name}}!"));
key("users.profile.title",
msg("", "Your profile"),
msg("fr", "Votre profil"),
msg("ja", "あなたのプロフィール"));
// ...
}
}
The first parameter of the msg() helper
is the language of the message. The empty language ("") is called the fallback language or
default language. It is english in our example. If a message is requested using a specific Locale but is not found,
Spincast will return the message using the fallback language, if it exists.
The default Dictionary implementation,
SpincastDictionaryDefault,
uses the Templating Engine to evaluate messages. This means that you can perform logic inside
your messages ("if", "for loops"...
anything supported by Pebble) and you can use parameters, as we
can see with the "{{name}}" part in the previous example.
Finally, don't forget to register your custom implementation of the
Dictionary interface (in our example:
"AppDictionary") in your Guice context! For example :
public class AppModule extends SpincastGuiceModuleBase {
@Override
protected void configure() {
bind(Dictionary.class).to(AppDictionary.class).in(Scopes.SINGLETON);
//...
}
}
Overriding core messages and plugins messages
Spincast core messages and plugins's messages are added to the Dictionary before you add
your own messages using the addMessage() method. This means that you can override them
and even translate them in a new language, if required.
The plugins should provide public constants representing the keys of the messages they use. This way,
you can easily know how to override them. For example, the keys of Spincast's core messages are provided as constants
in the
SpincastCoreDictionaryEntriesDefault class.
Each plugins should similarly list the keys of their messages in their respective documentation.
Here's an example of overriding a core Spincast message:
public class AppDictionary extends SpincastDictionaryDefault {
@Inject
public AppDictionary(LocaleResolver localeResolver,
TemplatingEngine templatingEngine,
AppConfigs appConfig,
Set<DictionaryEntries> dictionaryEntries) {
super(localeResolver, templatingEngine, appConfig, dictionaryEntries);
}
@Override
protected void addMessages() {
// Override a core message!
key(SpincastCoreDictionaryEntriesDefault.MESSAGE_KEY_ROUTE_NOT_FOUND_DEFAULTMESSAGE,
msg("", "my custom message!"));
// Then, add your custom messages...
}
}
Configuration
A configuration for the dictionary is available through SpincastConfig:
-
DictionaryEntryNotFoundBehavior getDictionaryEntryNotFoundFallbackTo()
When a requested message key is not found in the dictionary, this configuration specifies what
happens.
By default, when development mode is enabled, an exception is thrown. Otherwise, an empty string
is returned.
Note that if a version of the message exists with the fallback language (""),
it will always be found.
Flash messages
A Flash message is a message that is displayed to the user only once.
It is most of the time used to display
a confirmation message to the user when a form is submitted and the page
redirected.
A good practice on a website is indeed to redirect the user to a new
page when a form has been POSTed and is valid : that way, even if the
user refreshes the resulting page, the form
won't be resubmitted. But this pattern leads to a question : how to display
a confirmation message on the page the user is redirected to? Flash
messages are the answer to this question.
(All the Forms & Validation demos
use Flash messages to display a confirmation message when the Form is
submitted and is valid... Try them!)
A Flash message is most of the time used to display a confirmation
(success) message to the user, but it, in fact, supports three "levels" :
A Flash message can also have some variables associated with it
(in the form of an JsonObject),
and those variables can be used when the Flash message is retrieved.
You can specify a Flash message :
-
By using the
.response().redirect(...) method
in a Route Handler
public void myHandler(AppRequestContext context) {
context.response().redirect("/some-url/",
FlashMessageLevel.SUCCESS,
"The form has been processed successfully.");
}
-
By throwing a RedirectException
public void myHandler(AppRequestContext context) {
throw new RedirectException("/some-url/",
FlashMessageLevel.SUCCESS,
"The form has been processed successfully.");
}
Of course, it doesn't make sense to specify a Flash message
when redirecting the user to an external website!
Flash messages, when retrieved, are automatically added as a
global variable for the Templating Engine. It is, in fact, converted to
an Alert message.
How are Flash messages actually implemented? If Spincast
has validated that the user supports cookies, it uses one
to store the "id" of the Flash message and to retrieve it
on the page the user is redirected to. If cookies are disabled,
or if their support has not been validated yet, the "id" of the
Flash messageis added as a queryString parameter to
the URL of the page the user is redirected to.
Alert messages
An Alert message is a message that has a Success,
Warning or Error level and that is displayed to
the user, usually at the top of the page or of a section. It aims to inform
the user about the result of an action, for example.
There are multiple ways to display an Alert message on a website.
The Spincast website uses Toastr.js
when javascript is enabled , and a plain
<div> when javascript is disabled
( Try it!)
An Alert message is simply some text and a level associated with it,
both added as a templating variable. You can easily implement your own
way to pass such messages to be displayed to the user, but Spincast suggests a
convention and some utilities :
Note that Flash messages will be automatically
converted to Alert messages when it's time to render a template!
This means that as long as you add code to display Alert messages in your interface,
Flash messages will also be displayed properly.
Using a SSL certificate (HTTPS)
It is recommended that you serve your application over HTTPS and
not HTTP, which is not secure. To achieve that, you need to install a
SSL certificate.
If you download the Quick Start application, you will
find two files explaining the required procedure :
-
/varia/ssl_certificate_howto/self-signed.txt
Shows how to use a self-signed certificate, for development
purpose.
-
/varia/ssl_certificate_howto/lets-encrypt.txt
Shows how to use a Let's Encrypt
certificate. Let's Encrypt is a provider of free, but totally valid,
SSL certificates. Instructions in this file will probably work for certificates
obtained from other providers, but we haven't tested it yet.
Spincast Utilities
Spincast provides some generic utilities, accessible via the
SpincastUtils
interface :
-
void zipDirectory(File directoryToZip, File targetZipFile, boolean includeDirItself)
Zips a directory.
-
void zipExtract(File zipFile, File targetDir)
Extracts a .zip file to the specified directory.
-
String getMimeTypeFromMultipleSources(String responseContentTypeHeader, String resourcePath, String requestPath)
Gets the mime type using multiple sources of information.
-
String getMimeTypeFromPath(String path)
Gets the mime type from a path, using its extension.
-
String getMimeTypeFromExtension(String extension)
Gets the mime type from the extension.
-
Locale getLocaleBestMatchFromAcceptLanguageHeader(String acceptLanguageHeader)
Gets the best Locale to use given a "Accept-Language" HTTP header.
-
boolean isContentTypeToSkipGziping(String contentType)
Should the specified Content-Type be gzipped?
-
String getSpincastCurrentVersion()
Gets the current Spincast version.
-
String getCacheBusterCode()
The cache buster to use.
This should probably change each time
the application is restarted or at least redeployed.
It should also be in such a format that it's possible to
remove it from a given text.
This must be kept in sync with
removeCacheBusterCode!
-
String removeCacheBusterCodes(String text)
Removes the cache buster code occurences from the
given text.
Note that this won't simply remove the current
cache busting code, it will remove any valid cache busting code...
This is what we want since we don't want a client sending a request
containing an old cache busting code to break!
This must be kept in sync with
getCacheBusterCode!
-
String readClasspathFile(String path)
Reads a file on the classpath and returns it as a
String.
Paths are always considered from the root at the classpath.
You can start the path with a "/" or not, it makes no difference.
Uses UTF-8 by default.
-
InputStream getClasspathInputStream(String path)
Reads a file on the classpath and returns it as an InputStream.
Paths are always considered from the root at the classpath.
You can start the path with a "/" or not, it makes no difference.
Important : the calling code is the one
responsible to close the inputstream!
-
void copyClasspathFileToFileSystem(String classpathFilePath, File targetFile)
Copy a file from the classpath to the system file.
If the target file already exists, it is overwritten.
-
void copyClasspathDirToFileSystem(String classpathDirPath, File targetDir)
Recursively copy a directory from the classpath to the file system.
If the target directory already exists, it is overwritten.
-
boolean isClasspathResourceLoadedFromJar(String resourcePath)
Return true if the classpath resource
is located inside a .jar file. If it is a regular file located on the file system,
false is returned.
Throws an exception if the resource is not found.
-
boolean isClassLoadedFromJar(Class<?> clazz)
Return true if the specified Class was loaded from a
.jar file and not from a standalone .class file on the file system.
-
File getClassLocationDirOrJarFile(Class<?> clazz)
The location of the specified class.
This will be a directory if the class was loaded from the file system as
a standalone .class file or a .jar file if the class was loaded
from a jar.
You can use isClassLoadedFromJar() to
determine if the class was loaded from a .jar file or not.
-
boolean isRunningFromExecutableJar()
Return true if the application is currently running from an
executable Fat Jar. Returns false otherwise, for example when the
application is started from an IDE.
-
File getAppJarDirectory()
Returns the directory where the executable .jar from which the application is running
is located.
@Returns null if the application is currently not
running from an executable .jar file (for example if it was started from an IDE).
-
File getAppRootDirectoryNoJar()
Returns the root directory where the application is running, when the application
is not running from an executable .jar file.
@Returns null if the application is running from
an executable .jar file.
-
boolean isPortOpen(String host, int port)
Validate if a port is open on the specified host.
-
String convertToFriendlyToken(String str)
Converts a string so it can be used in an URL without
being escaped: remove accents, spaces, etc.
This can be used to create "friendly token" in an SEO
optimized URL. It can also be used to create a human friendly
file name from a random string.
Be careful if you plan on using the result of this
method as a unique token since many strings may
result in the same thing!
Returns the string with only a-z, "-" and "_" characters.
Or, if the resulting string is empty, a random UUID is returned.
@MainArgs
The init(...) method of the Bootstrapper allows you
to bind the arguments received in your main(...) method. For example :
public static void main(String[] args) {
Spincast.configure()
.module(new AppModule())
.init(args);
//....
}
By doing so, those arguments will be available for injection, using the @MainArgs
annotation :
public class AppConfig extends SpincastConfig implements AppConfig {
private final String[] mainArgs;
@Inject
public AppConfig(@MainArgs String[] mainArgs) {
this.mainArgs = mainArgs;
}
protected String[] getMainArgs() {
return this.mainArgs;
}
@Override
public int getHttpServerPort() {
int port = super.getHttpServerPort();
if(getMainArgs().length > 0) {
port = Integer.parseInt(getMainArgs()[0]);
}
return port;
}
}
Using an init() method
This is more about standard Guice development than about Spincast, but we
feel it's a useful thing to know.
Guice doesn't provide
support for a @PostConstruct annotation out of the box.
And since it is often seen as a bad practice to do too much work directly in a constructor, what we want
is an init() method to be called once the
object it fully constructed, and do the initialization work there.
The trick is that Guice calls any @Inject annotated methods
once the object is created, so let's use this to our advantage :
public class UserService implements UserService {
private final SpincastConfig spincastConfig;
@Inject
public UserService(SpincastConfig spincastConfig) {
this.spincastConfig = spincastConfig;
}
@Inject
protected void init() {
doSomeValidation();
doSomeInitialization();
}
//...
}
Explanation :
-
5-8 : The constructor's job is only to
receive the dependencies.
-
10-14 : An
init() method is
also annotated with @Inject. This method will be called once the
object is fully constructed. This is a good place to do some initialization work!
What we recommend is constructor injection + one (and only one) @Inject
annotated method. The problem with multiple @Inject annotated methods (other than
constructors) is that it's hard to know in which order they will be called.
Finally, if the init() method must be called as soon as the application starts, make sure
you bind the object using
asEagerSingleton()!
Server started listeners
Spincast provides a hook so you can be informed when your application's HTTP server
has been successfully started. For a class to be called:
1. The class must implement the
ServerStartedListener
interface. When the server is started, the serverStartedSuccessfully() method will be called:
public class MyClass implements ServerStartedListener {
@Override
public void serverStartedSuccessfully() {
System.out.println("Server started hook!");
}
//...
}
Note that each listener is called in a new Thread.
2. The class must be registered on the Multibinder<ServerStartedListener>
multibinder, in your application's Guice module:
Multibinder<ServerStartedListener> serverStartedListenersMultibinder =
Multibinder.newSetBinder(binder(), ServerStartedListener.class);
serverStartedListenersMultibinder.addBinding().to(MyClass.class).in(Scopes.SINGLETON);


 What's new?